I have lots of crafty goodness for you tonight! After my ill-advised and potentially dangerous attempt of making enamel dots from Perler beads last weekend I came up with something better and far less toxic:

A reader, Viki B., mentioned using embossing powder in a comment on that post and I thought Ah-ha! I can dome scrapbook paper and coat it in UTEE! Best of all you can use up scraps leftover from a project to make embellishments that match perfectly! Watch the video to see how easy it is!
I love making these “on demand” and as needed, not to mention no toxic fumes or potentially burning down the house. That’s what is known in the craftng world as a “win-win-win!”

I also was admiring some of the feather dies out there but I hate to buy something that is trendy because when the trend is over you are stuck with a die you may never use again. I’ll show you how to hand cut feathers. It’s quick and easy and no two will be the same, it’s like having an infinite amount of dies for zero bucks! Here is the video tutorial:
What do you think of approaching the project backwards? First make the envelope (I used a Kreate-a-lope from Green Sneakers) then make the embellishments. Hardly any waste so it is perfect for the paper we have been hoarding and so cute and useful! They would make great gift sets too I think!
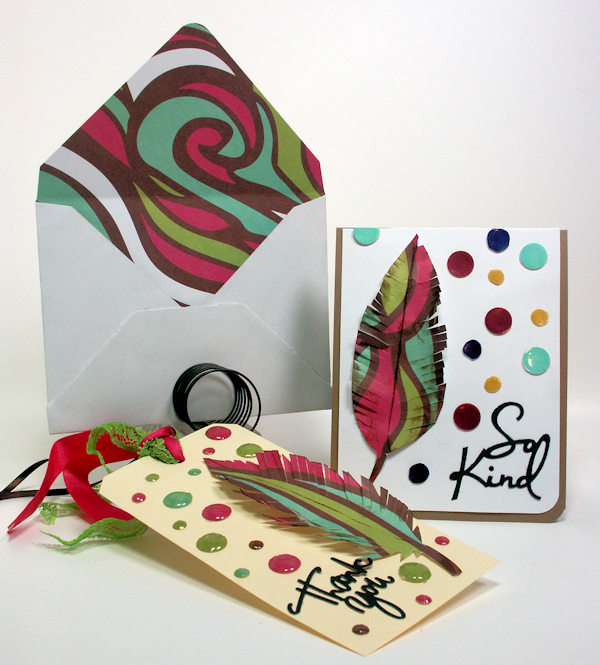
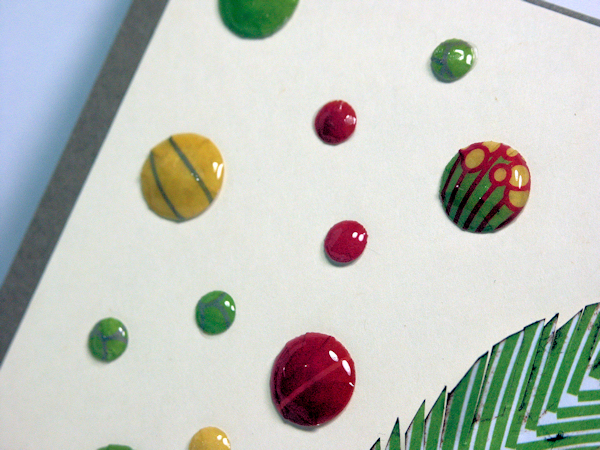
I wanted to share my first embossing powder attempt. I first thought I could stamp dots on my card and emboss them with colored powder but the result was kinda flat so I added more powder but I lost the definition. I punched out those attempts and adhered them to the above card. I was not happy with that so then I tried punching patterned paper, doming it and coating with UTEE. much better. See we rarely get it perfect on our first try, keep at it, you will get it! 3rd time’s a charm right? I hope you give this a try, thanks for stopping by and til next time happy crafting!

Brilliant! I LOVE this! I KNEW you could figure this out Lindsay!
LikeLike
Such a great idea! You are a great thinker, Lindsey! I would have broke out my box of limited fingernail polishes and made drops on wax paper to let them dry and tried those. But your way, there are no limits as most of us have papers in patterns that have every color imaginable in them. Thank you!
LikeLike
OH MY!!!! Absolutely STUNNING IDEAS!!!! Thank you so much Lindsay!!!!!!!!!!!! I too have tried, without much success, the pearler beads in the oven on parchment, but had no idea the hazards. Soooooo happy to now know a better way…will be trying it for myself tonight!
The feather looks easy too! You truly are a wonder! TFS!
So excited,
Jan
LikeLike
Lindsey this is fantastic it…I love how it all match’s….you always come up with the best idea…
Q: What did you say was in your pad??? my embossing pad is running low and needs to be reglue…I think you said glycerin…but not sure…tfs
LikeLike
glycerin:)
LikeLike
You are a WonderWoman! How creative, and easy! Love the ones that have a pattern – try that, melted beads!
LikeLike
Love your post. The feathers- cool, the dots- fantastic! Thank you for posting. I have to find my paper feather patterns!
LikeLike
if you can’t find your feather patterns you could always “wing” it LOL! Get it? wing, feathers?
LikeLike
SWEET!!!!!! I love the look of those things..but they are just not cheap and honestly I look at the colors and have never been thrilled with selection either!! I have pondered at how to make them but could never figure out a solution..(I am not as brave as you apparently LOL) so I am doing a big ol happy dance here on your success!!! I am lovin the fact of matching the LO, double points on that one as well!!
LikeLike
Awesome ideas as usual Lindsay 😀 Thank you so much for sharing them. I was going to buy a feather die, but not now 😉
Happy Crafting 😀 Mo
LikeLike
Lindsay – This pair of videos are my favorites! Thank you for sharing not only the clever, so doable frugal tips like using a golf tee and a glue dot to pick up teeny faux enamel dots. Brilliant! I also enjoy the use of a hot glue gun when creating a card. Who does that? Lindsay does!
Besides all that, the card and envelope are really really cute. The satisfaction of making a trendy card without the latest trendy tools and dies? Simply priceless. 🙂
LikeLike
Oh this is so much better than making those enamel beads. I really like the tee to hold the “dots”.
LikeLike
Great idea and a lot less work than the perler beads. TFS
LikeLike
An even easier idea is to make some small dots with hot glue, and when they´re cool cover them with some nailpolish, it doesn´t take as much work and most girls have some old nail polish they don´t use anymore, or we can buy some really cheap ones in the supermmarket and it works just as fine as expensive ones for this purpose, and you can make a lot in minutes and just leave them to dry and do something else, and it works just really perfect. I have tryed it.
LikeLike
That’s brilliant – thank you so much for coming up with the solution. I was all set to get hold of some plastic beads until I saw your video. If you couldnt’ do it I knew I wouldn’t be able to.This idea is so cool – I love the gloss on them too – much better than just ‘doming’ your punch outs.
Beryl xx
LikeLike
What a clever lady. These are totally gorgeous and brilliant. A must-try project. Love the use of patterned papers, too. A while back I bought a set of fancy brads that looked just like that – at great expense compared with this marvellous frugal approach, which has the added advantage of being tailor-made for each project! I love the feathers, too. I have very few dies (bought when I first started) and use my cutting machine, or cut by hand. I can design my own shapes and cut them whatever size I want, and there’s no storage problem for dies either.
Don’t we all just love the frugal approach? Using up scraps, rubbish, thinking outside the box – “I wonder how I could use THAT…” etc.!!
Thanks so much for sharing.
Shoshi
LikeLike
I use glossy accents by ranger to coat stamped dots…works great and is fast, easy and not messy. Love your videos thanks
LikeLike
Once again, you’ve blown me away! I can’t wait to try this out. You are an amazing and hilarious inspiration.
LikeLike
Approaching a project backwards is perfect!! The 12×12 pads are perfect for making an envelope and supplying coordinating paper for your card. Not much planning is required color wise or design wise since the paper supplies a framework. And there are plenty scraps left for my scrap bin for other projects. I LOVE it and I’m so glad you showed us how to do it!!
Your enamel dots are AWESOME. So much so that I bought my first bottle of UTEE so I don’t have to redip so much in regular powder.
I’ve been using my embossing powder to make very small lady bugs to adorn my paper flowers. I use a small circle punch, punching a black circle for the base base, and red for the wings ( I cut the red in half and glue it, offsetting it so it looks like there is a head on the bug, to the black body with the wings slightly spread) Then I add dots to the wings and eyes with a black sharpie or white gel pen. When dry I shape it like you shape the enamel dots. Then I dip and heat it. It’s so cute.
To make teeny tiny lady bugs for very small flowers I use a red and black sharpie right on the flower to make the bug, then I use a clear glaze pen to coat him, to make him shiny. You can use a dot of Glossy Accents but it can be hard to get a teeny tiny dot of glue.
If you’d like to share this lady bug idea please do, I never will since I don’t make videos or have a craft blog. I’d love to see what you come up with! I got the fire put under me to add ladybugs from the Susan’s Garden lady. She makes beautiful paper flowers. I’d love to see your paper flower ideas. I know there are some beautiful dies but I like using punches or free cutting with scissors–it’s faster imo.
Sorry this is so long—I love crafting and if I am passionate about anything I am verbose as well.
LikeLike
I have another idea using your enamel dots idea–if you are interested I’d love to see your take. SEQUINS. My method: Punch a tiny hole. Center a circle punch over it and punch it out. Shape like a sequin. For the metallic look I color my paper or thin chipboard with metallic sharpies. (I have a pen that has an octagon shape on the end, good for shaping a sequin)
I’ve also been making Asian coins. I use a rectangle or square punch and over punch with a circle punch. Then I stamp it. Have been coloring it with metallic sharpies/Bics.
I love making my own embellishments and would love more ideas if you have them. And would love your take on sequins and Asian coins too!
LikeLike
Wow Lindsey! Another genius idea. I love your blog! And glycerin? Who knew!
LikeLike
Great videos Lindsay. Love the dots and the feather ideas. Thanks.
LikeLike
Thanks for sharing the enamel dots idea. I have seen people use this technique to make faux brads using metallic embossing powders. A similar tip I’ve seen is to buy only white brads, colour with alcohol markers and then dip in embossing powders. (I wonder if a metallic paint coat and then embossing powder would work too.)
Anyway, I wanted to tell you the tip I saw for adhering them: layer two glue dots underneath – should support the dome. (Or, if you have them, there are 3D glue dots out there too – they don’t squish.)
LikeLike
Linsay, what did you use for the black lettering – thank you, etc? It looked like it was raised. Great cards. Many thanks!
LikeLike
it was an old die cut, cuttlebug brand, I bought in a set for $2 at Big Lots years a go:)
LikeLike
Lindsay, if I do not have a die cut machine is there a way that I can reproduce this lettering look. Continued thanks
LikeLike
you can always print something off the computer or stamp it or practise with a craft knife and paper.
LikeLike
Stunning tag and I loved both of your videos too, the dots are amazing! ~Diane
LikeLike
I tried your faux enamel dots idea and it is BRILLIANT! I love that I can coordinate with my papers perfectly. See the card here: http://tweedcurtain.blogspot.ca/2014/05/wfc-colour-challenge-and-faux-enamel.html
Thank you!
LikeLike
But, i’m in a littlebit of chock here😁😅 what beads did u use in u’r try to melt plastic beads/enameldots in the oven? Low temperature? But i think i used both like 200°c and around 125°c , and i got fine shiny and good looking enameldots 😍 a LOT more easy than how this looks to be, and more afordebly to those who don’t have all of this “crafty” stuff at home. Mvh Lilly /sweden
LikeLike
I think my beads must have been old, it did not work for me but I am glad you had success!
LikeLike