A Valentine Blog Hop!

Welcome to the Creative Cuts and More Valentine blog hop! If you just arrived here from Jenny Erichson’s blog you are in the right place, if you landed here from somewhere else be sure to start the blog hop at the beginning at the Die Cut Diva blog where you will find out how you can win an awesome grab bag of CC&M die cuts! The theme this month is Valentine’s Day (one of my favorite holidays!) here is my project:
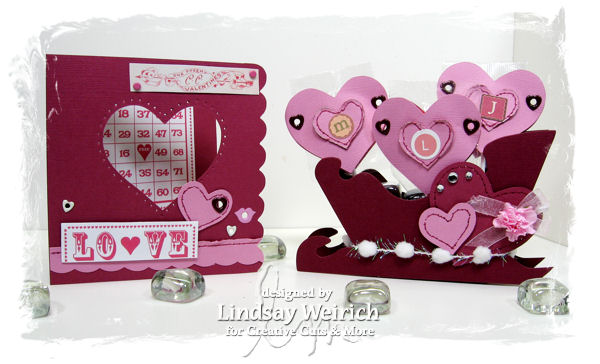
A sweet set using dies from Creative cuts and More!

I know a sleigh is normally thought of as a Christmas element but I live in Maine so it is very appropriate. I used the sleigh box in Loganberry Bazzill textured for this. I cut styrofoam to fit in the box and stuck in covered lollipops made with the Small heart #02 die (Just place the pop in between to hearts and secure it with an eyelet or staple on each side)  then I added some flat square marbles on top to anchor the box and give it some sparkle!

A Sled to hold Valentine Lollipops!

For the card I used the 5 1/4 scalloped heart window card and the mini hearts cut from petunia and sweetheart Bazzill cardstock. I cut apart the Bingo Card form the Love grows digital stamp set from Lindsay’s stamp Stuff and adhered the “Love” to the front of the card and the numbers inside. A little paper piercing and scallop scissors complete the look.

Die cuts: CC&M, Bingo Card Digital Stamp: Lindsay's Stamp Stuff

Now you have seen my project be sure to hop over to Chrissy’s Blog, you won’t be disappointed. Thanks for stopping by and till next time happy crafting!
Happy Monday!

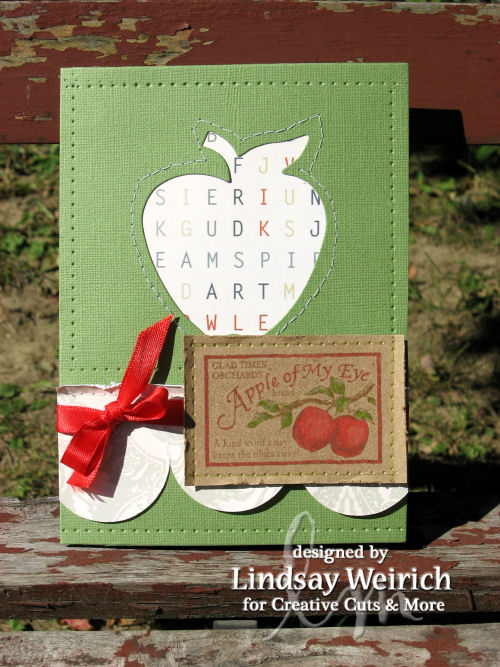
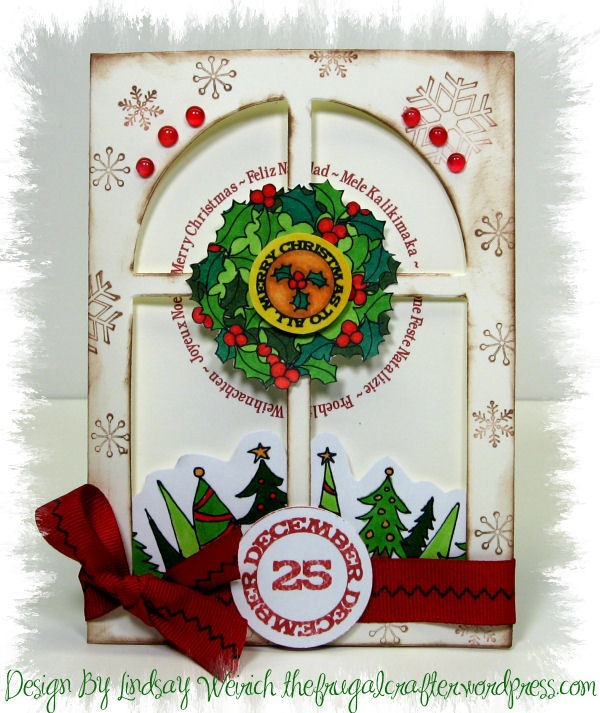
Wow, what a week! I’m so glad everyone in my house is over the flu and back to their normal routines! My poor craft room was severely neglected, I thought I was going to find cobwebs when I went down there to make this. I used the Arched Window card from Creative Cuts and More,  the sketch over at 2S4Y and digital stamps from Lindsay’s Stamp Stuff for this one:

lss_cc&M_archwindow
Digital Stamps: Lindsay's stamp Stuff, Die Cut: Creative Cuts and More, Markers: Bic Mark-its, Rubber stamps: (brown snowflakes) Delta

I used stamps from the Christmas Cupcakes digital stamp set. The cool thing about digital stamps is the ability to alter them to suit your needs, to make the wreath I used the holly from the holly cupcake wrapper, I just used the magic wand tool in Paint Shop Pro to select my images and arranged them in a circle to make a wreath. The trees are a cupcake wrapper too but I shrunk it down a bit to fit my card. The merry Christmas and December 25th label are also included in the Christmas Cupcakes Digital stamp set. The circle sentiment on the inside of the card I used a freebie that you can grab here.

Last week I introduced you to the 7 new Lindsay’s Stamp Stuff Designers. This week they are raring to go with their first official LSS projects, click on their names to see their fabulous work (and don’t forget to leave them some love too 😉

Kristen Hamlin

Joy Stagg

Karin Martin

Jennifer Bliss

Cheryl Gorka

Anette “Nettie” Robins

Cassandra Cushman

Thanks for stopping by and til next time happy crafting!

Caardvarks Holiday Hop Day3: Tablescapes

You have landed here on day 3 of the Caardvarks Holiday blog hop. today’s theme is Tablescapes. If you missed any of the other lovely blog hop projects be sure to pop over to the Caardvarks blog so you can start the hop at the beginning and sign up to win some nifty prizes from Creative Cuts and More!

tablescapeset2
Die Cuts: Creative Cuts and More

All of the die cuts are from Creative Cuts and More and all of my embellishments came from the Dollar Tree (or in the case of the fir branches my backyard LOL). It is so fun and easy to make decorations with die cuts, not to mention affordable! I used the sleigh box, the large matchbox and this accordion card insert all available from CC&M.

tablescapesleigh

For the sleigh I embossed the sleigh using a stylus and a fiskars texture plate because the die cut was to big to go though a Cuttlebug, gotta love the old-school tools! I rubbed two styrofoam balls together to make the snow that is one the sleigh runners (faux flower soft technique 😉 and the scalloped ribbon is plain velvet wrapping ribbon I cut with scallop edge scissors, cheap and easy!

tablescapematchbox

The matchbox was so cue as is but I dry embossed it, inked it, heat embossed it, wrapped it with ribbon and added a stamped monogram.

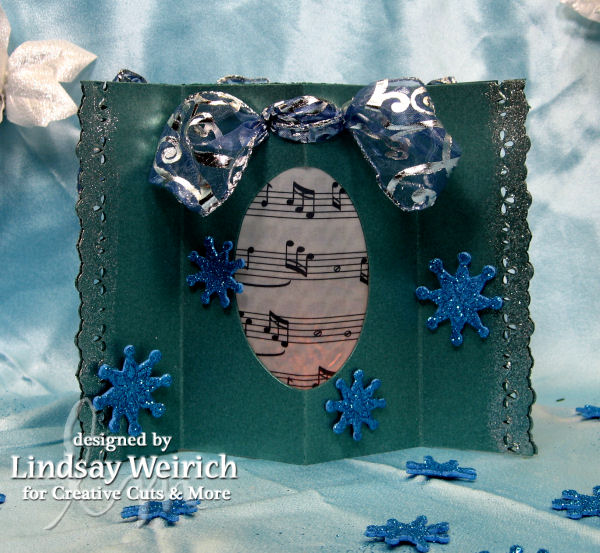
The luminary is just 3 die cut window card insides hooked together. I punched the edges to give it a bit of flair, inked the edges and dusted it with silver tinsel embossing powder.

tablesapeluminary

wouldn’t you even say it glows… 😉

tablescape_luminarydark

Remember that paper is flammable, I put a tea light in a canning jar to be safe inside the luminary and the music paper was an online freebie you can get from Linda’s blog, I printed it on vellum and trimmed it with an oval cutter.

Next hop over to Pam Smerkers blog to see her holiday inspiration, till next time happy crafting!

Caardvarks Holiday Hop: Pretty Packaging!

Welcome to day two of the fabulous Caardvarks Holiday blog hop. The theme is pretty packaging and it is sponsored by Creative Cuts and More, a leader in die cuts. If you came here from Lila’s blog you are in the right place but if you landed here first be sure to start at the Caardvarks blog so you don’t miss out on an exclusive CC&M coupon and your chance to win some great die cuts, this is a 3-day hop with a prize each day and lots of holiday inspiration.  Without further ado here are my quick and easy holiday wraps:

cardz_packagingset
Die cuts: Creative Cuts and More, Stamps: see credits below

I used the mug card, crayon box and short puff box for these and there are so many uses for them. they will each hold a gift card beautifully but Imagine the acetate puff box filled with chocolate covered cranberries, the mug filled with hot cocoa packets and candy canes and the crayon box filled with a mini note pad and crayons to entertain the youngins’ during a trip to grandmas! Another thing I love is how these sturdy boxes can be reused. Fill them with sweet treats for a friend then they can eat the sweets and tuck a gift card in and pass it on…I’m dreaming of a green Christmas 😉

cardv_coacopacketmugcard
Cocoa Packet Holder: Stamps: Stampin Up (stamp wheels), Inque Boutique/Darice: Label

For the cocoa packet holder I assembled the card with tape then used a stamp wheel to “pattern” my card base. I used chalk to color the images then I stamped the label on cream and adhered it over a ribbon with foam tape and stuck in a decorative spray.

cardv_hopcrayonbox
Crayon box: Stamps: The Rubber Cafe, Inque Boutique/Darice

For the crayon box I stamped a flourish and heat embossed it in white, tied on a ribbon and added the label, quick and easy!

carv_hop_shortpuffbox
Short puff box: CC&M

This was the easiest of all, assemble the box with double stick tape, wrap with a strip of paper and tie on a bow and glue on some dew drops!

Next stop on the hop is the wonderful Pam Smerker, be sure to check out her lovely work. Tomorrow is the final day of the holiday Blog hop and I do hop you will join us again, til then happy crafting!

Caardvarks Holiday Blog Hop!

Wow, I’m thrilled to be a part of the Caardvarks Holiday Blog Hop, if you are arriving from Lila’s blog you are in the right place! If you just stumbled upon the hop here be sure to start at the Caardvarks blog so you can see all of the fabulous cards from their design team and have a chance to win some goodies from Creative Cuts and More and get an exclusive coupon for CC&M too! This is a 3-Day Hop. Day one is cards. I hand make 70 Christmas cards every year (it’s my one big Christmas thing;) and I enjoy it immensely but I also am realistic, when you make that many they need to be cute, quick and easy, this card is all three:

caardvarksbloghopcard
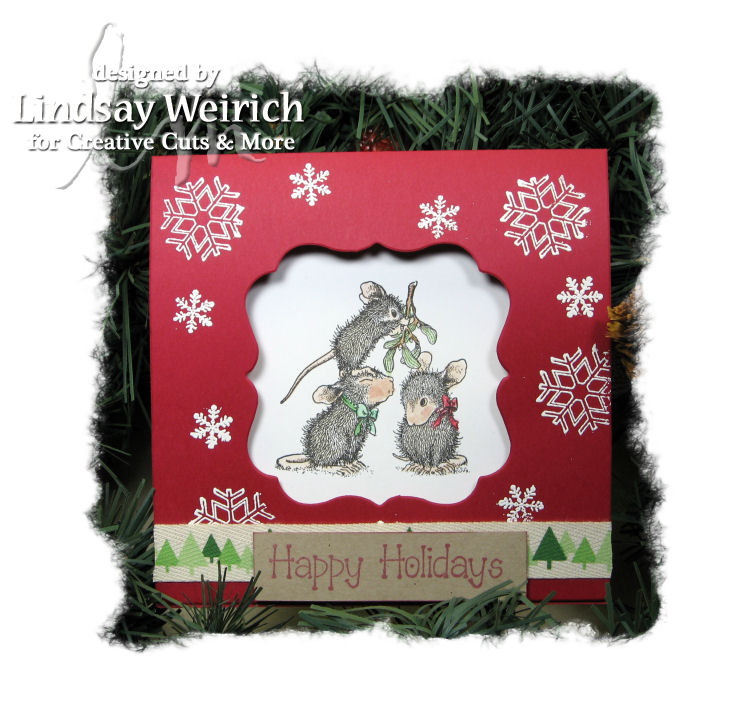
Die Cuts: Creative Cuts and More, Stamps: House Mouse, Rubber Stampede, MSE!

I used the 5 1/4″ square filigree window card in smooth red cardstock and heat embossed snowflakes in white (for some odd reason this red cardstock turns dark when you heat it but goes back to normal when it cools) randomly over the card. I stamped the Mistletoe Mice on white cardstock with Versafine ink and watercolored it. I stamped Happy Holidays on a kraft scrap and adhered to the card over a length of ribbon. Total time 20 minutes but if you make this card assembly line style it is even quicker;) And you save $$ when you but 10 or more of a die cut from Creative Cuts and More, perfect for mass producing x-mas cards! Using die cuts as embellishments is great too because they are flat and need no extra postage and are as little as 10 cents a pop! And it is nice not to have to cut them yourself 😉

Next stop on the hop is Pam Smerker, I can’t wait to see what she has cooked up for us…speaking of cooking you won’t want to miss the two great new recipe kits that Creative Cuts and More will be debuting next week (November 9th and 10th) during their Mega Recipe Blog hop!  They will be perfect for holiday gifts. You will even have a chance to win them;) That’s all for today, tomorrow I will have some pretty holiday packaging to share with you, till then Happy Crafting!

2s4you, CC&M and some Freebies!!!

I love Mondays! Why? because it’s time for another fun sketch over at 2sketches4you and this week they are sponsored by Creative Cuts and More, play along and you could win some awesome die cuts!

Die Cuts: CC&M, Digital Stamps (bingo card, circle frame on coffin) Lindsay's Stamp Stuff, Rubber Stamps: (pumpkin Face) Provocraft, (Dracula, Happy Halloween, Bats) Inkadinkado
Thi skeleton is from a set of Halloween lights!

I was working on this little Halloween set last night and I needed an extra stamp, so I made 4! I thought “why not give them away as freebies?”, I also added a couple of past Halloween freebies to the mix in case you missed them:

Click preview to dowload this free stamp set!

If you like this freebie please check out my other Halloween sets: Creepy Crow, Cute Halloween and Spooky Bingo Cards.

Here is a fun technique to try with your digital stamps: Embossing! What? Yes, you can emboss them. The first way is to print an image on vellum or glossy paper than quickly sprinkle them with embossing powder and heat. The way I embossed these was different. I used embossing markers. These markers are very wet and juicy giving you time to color the image, sprinkle with clear embossing powder and hear with a heat gun. Make sure the printer ink has plenty of time to dry or blast it with the heat gun before coloring with the markers so the ink won’t run. To do the “Boo 2 You” bingo card I colored a letter in orange (go over the black too if you want it embossed) then sprinkled it with clear ep and heated, then I moved on to the next letter. I colored the round ring on the coffin too. I stamped the vintage vampire in the center of the ring (clear stamp by inkadinkado) and embossed that too before coloring it in with my bic markits. It is impossible to tell what images are rubber stamped and digital stamped (printed), how cool!

Here are the Die Cuts I used From Creative Cuts and More:

Coffin Box in smooth black

Pumpkin small

Acetate box

Large Flourish

Thanks for stopping by and til next time happy crafting!

How “Charm”ing!

Welcome to Creative Cuts and More blog hop!  If you just landed here from Rita’s blog than you are in the right place, if this is the fist stop along the hop be sure to start at the Die Cut Diva blog so you won’t miss out on your chance to win the Fall Occasions Card kit or miss any of the wonderful DT projects. I have a special blog hop coupon for you to use for 15% off your next order at CC&M: Octbloghop1509

Die CutsL Creative Cuts and more, Ribbon: WalMart, Other: Beads, wine glass charm findings
Die Cuts: Creative Cuts and more, Ribbon: WalMart, Other: Beads, wine glass charm findings

Fall is officially upon us, time for family get-togethers and cozying up by the fire. When the design team at Creative Cuts and More was asked to make a Thanksgiving themed project for the October blog hop I knew what I wanted to do!

Wine glass charm made from the larger maple leaf die cut from translucent shrink plasitc, see tutorail below
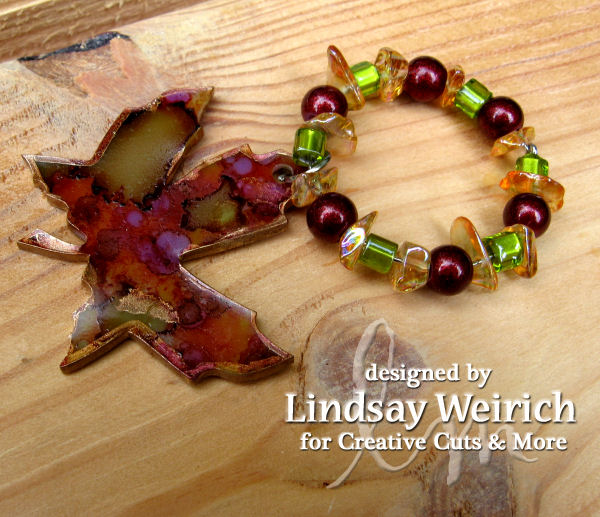
Wine glass charm made from the larger maple leaf die cut from translucent shrink plastic, see tutorial below

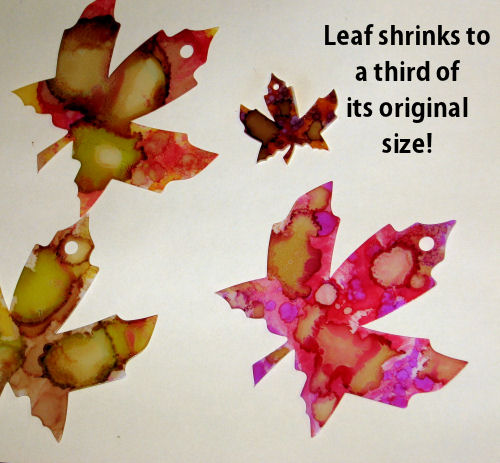
The charms are easy to make. I ordered the Maple Leaf #02 die in white Polyshrink for this project. They are only 35 cents a piece and less if you order more than 10! Think of the affordable Christmas gifts you can make!

First I dabbed the leaves with several colors of alcohol ink and punched 1/4″ holes at the top. You need to punch the holes before baking!

shrinkleaftut1

Then I used my heat gun to shrink each leaf. I kept a piercing tool handy to hold the leaf still as I shrunk it, it will curl up as you heat it but don’t worry, it will flatten when it is done.

shrinkleaftut2

shrinkleaftut3

I used a copper leafing pen to color the edges and back of the charms so they look like metal rather than plastic, this will take 10 minutes or so to dry, don’t rush it. After it was dry I used pliers to attach a jump ring to the hole in the charm. I bought a package of wine glass I.D. hoops at WalMart (12 for $1.50 I think) and simply added beads and the leaf charms. You want to vary the leaf and bead colors so people can tell their drinks apart at parties.

A look at the back of the finished wine glass charms
And here they are from the front

I only spent minutes on the boxes. I assembled the Chair and the Cake Slice box with Killer Red Tacky Tape (this tape holds! and they have the best prices on it at CC&M) wrapped them with fancy ribbon and added some bling. The pleated rosettes are fun to make, directions here. You could even stash some crayons and stickers in the cake slice box to amuse bored kids waiting for Thanksgiving dinner;) Just make sure they have a paper placemat or a coloring book handy!

lindsay_CCM_octbloghopboxes

Now that you have seen my creations be sure to check out Ellen Sosnoski’s blog for her fabulous projects!

Upcoming Creative Cuts and More Events:

Caardvarks Mega Blog Hop November 1st-3rd

Mega Recipe Blog Hop November 12th

Thanks for stopping by and til next time happy crafting!

a “Wicked” challenge!

Well, I must say that I am in full Halloween mode now (OK, I have been for a while)! And this week you can win some goodies from Creative Cuts and More just by playing along with the Belli Challenge blog:

Die Cuts: Creative Cuts and More, Stamps: Lindsay's Stamp Stuff, Paper: American Crafts, DCWV

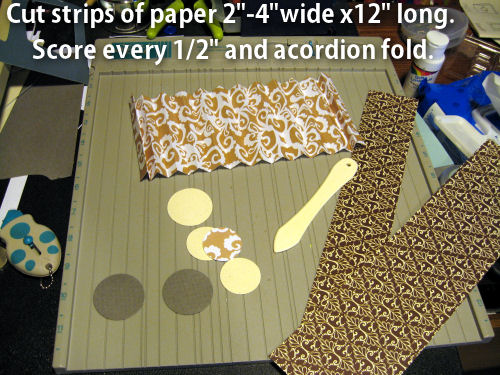
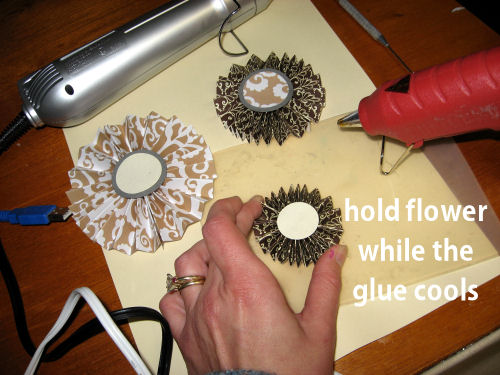
The theme is Halloween and I used the witch and spider die cuts from Creative Cuts and More to make these spooky cards. You can find the Spooky bingo cards in the Lindsay’s Stamp Stuff shop. Here is how to make the pleated (I want to call the ruffed because the remind me of the neck ruffs queens used to wear in the middle ages) flower I used on the wicked card. Here’s how:

flowertut1

After you glue the edges together you need to squirt a dab of glue in the middle and hold it until it cools.
I placed my punched circle right over the still hot glue. If you prefer not to have a center be sure to glue from the back.
here is a close up of the finished flower...cackle...

I will warn you that these are lumpy, they are very sturdy too but I don’t think it wise to mail them in a standard envelope. I’d hand deliver them or mail them in a box. They would be great to send in a in a boxed gift, such as a care package, too as they are lightweight but fun and sure to bring a smile.

don’t forget that we have out big Creative Cuts and More Blog Hop on Friday! Get ready to be inspired with all of the ways you can use die cuts, and don’t forget to play along with Belli Challenge for your chance to win some for free 😉 Thanks for stopping by and till next time happy crafting!

2S4Y & CC&M!

Yippee, today I get to play with two of my favorite creative things: the sketch at 2 Sketches 4 You and die-cuts from Creative Cuts & More!

Die cut: CC&M, Paper: Autumn Leaves, Stamp & Ink: SU, Markers: LePlume
Die cut: CC&M, Paper: Autumn Leaves, Stamp & Ink: SU, Tool for peircing: Scor-Pal & Scor-Bug, Markers: LePlume
This stamp is from a retired Stamp Up stamp set called Farm Fresh. I wanted this set foy years and found it a few weeks ago on ETSY! Yay! Aint it perty?
This stamp is from a retired Stampin' Up stamp set called Farm Fresh. I wanted this set for years and found it a few weeks ago on ETSY! Yay! Ain't it perty?

You can play along too, this weeks winner at 2 Sketches 4 You will get the Fall All-Occasion Card Kit from Creative Cuts and More! What are you waiting for, go play!

Thanks for stopping by and til next time happy crafting!