Hi friends! Today I am reviewing a line of watercolor by Golden who are famous for their acrylics. You can see swatches of the colors on their website, click on a swatch to see more detail. These QoR (pronounced core) watercolors use Aquazol instead of a traditional gum arabic binder but you can intermix these with other brands of watercolor with no problem. The paints rewet very well and dry down quickly and are super concentrated so I like to refill my travel palette with them because they are so slow wearing so I don’t have to refill often. Qor Watercolors can be purchased in 11ml tubes individually or in sets containing 6-24 5ml tubes. Since they are so slow wearing Irecommend starting with a intro set with the 24 set being the best value. They also just came out with a 12 half pan travel set that my want monster has his eyes on LOL! Watch the review for more info and a demo!
Pros:
great flow
Dryes down hard but rewets easily
clean vibrant color
the tin the sets come in are great for storing your paints and using as a palette
Price is affordable in sets
Cons:
The 11ml tubes that are available individually are a bit pricey but the paint goes a long way so it is about the same as other artist grade colors. I bought the sets for this reason.
Qor Watercolors are wonderful artist grade paints, I personally purchased all 3 intro sets of 6 and the 24 set and Golden sent me 6 large tubes of my choosing. If you want to start with a small set that I feel represents the uniqueness of the line try the high chroma set, the intense colors will knock your socks off! Also there is no duplication in colors in any of the 6 tube sets so you can build your collection slowly over time. Affiliate links used in this review. Thanks for watching and til next time happy crafting!
Hi friends! I am so glad that drawing food isn’t fattening or I would be in trouble because I think drawing food is way more satisfying that eating it and the enjoyment lasts longer! I spent a little over an hour on this mixed media sketch of a slice of pizza.
I also re-homed my gouache paint. I had originally stored them in individual plastic boxes with lids because they cracked and fell out of a traditional palette and I didn’t want to waste them but I liked having them ready to go when I wanted to paint. I don’t want to bother with unscrewing tubes of paint, I am that lazy. You can see how I had them stored here. But as they dried out I realized that I did not need that much space to store them and I wanted to be able to access all of my colors at once and have them fit more compactly on my table so I went to Harbor Freight last night and found a little 18 compartment box for under $3 that would do the trick. I would have rather had a 24 compartment box but those were huge so I decided to combine colors that had the same pigments and left my 3 least used colors (black, grey and “flesh tone”) in their individual boxes. The only other drawback was that the compartments were removable so I had to glue in the dividers (Iused hot glue) to make a seal so the paint couldn’t run underneath it if got juicy. Make sure you do that if you decide to use this as gouache storage. I did see this palette that looked like it would be a good option as the wells go all the way up to the lid but I didn’t want to spend the $10 LOL! I also added a few drop of glycerin in each pan to keep it from cracking in the future, I think after a few more uses they may settle into a nice solid cake so when I run out and refresh my paint with a new set I will add glycerin in from the get go. About 5 drops per tube and stir it in with a toothpick, use less if using less than a tube. You can see the new palette set up in the video as well as the painting demo.
Arteza Brush Pens *Use coupon code PROMO10 if ordering here or try Amazon as they are sometimes cheaper.
Arteza Gouache *Use coupon code PROMO10 if ordering here but amazon has a WAY better deal at regular price
Colored Pencils: I used and prefer Prismacolor pencils but Arteza expert pencils are nice too. Currently the price is about the same for both and in that case I’d go with Prismacolor but if the Prismas go back up the Arteza are a decent alternative.
The thing I really like about using gouache and Prismacolors is that what you see is what you get when you look st the pencil lead or dry paint, there is little or no color shift so you can work quickly and with confidence. What are you working on today? Let me know in the comments below and til next time happy crafting!
Howdy friends! Today I have a cute set of cards using a couple new stamp set from Rubber Stamp Tapestry to share!
Watch how easy it is to make them in today’s video!
This video is sponsored by Rubber Stamp Tapestry Use coupon code: LINDSAY and receive 15% off your retail order of $10 or more of peg stamps, peg stamp sets, and unmounted stamps! Coupon expires a week from this video publication. Continue to receive great deals by becoming a PegStamp VIP here. As a PegStamp VIP
you’ll get a weekly deal via email plus links to fabulous tutorials by me, Lindsay the Frugal Crafter and other designers.
Directions:
1. Fold cardstock in half and die cut large scalloped heart to make card. Make sure to let the top of the heart hang over the fold so you get a connected card. Die cut another smaller scalloped heart from white cardstock and plain harts from patterned paper.
2. Stamp garden sentiments and peg stamps on white scalloped heart. Add brad if desired.
3. Apply washi tape to plain heart mat. and layer up elements and adhere to card base.
4. Use a fork to make a tiny bow and glue to card. Decorate inside of card with washi tape and leftover hearts.
Thanks for stopping by and til next time happy crafting!
Hi friends! Today I have a technique that I think will blow your mind! It is called Grisaille and it is an old technique usually done in oils. It is how Baroque and Renaissance painters got dramatic and realistic looks to their paintings. Today we are going to learn how to do it in watercolor!
I have a lot of tips for success in this blog post so please read through before you begin to avoid any problems. You don’t want to spend a ton of time on your grey underpainting only to find your paint lifts for instance.
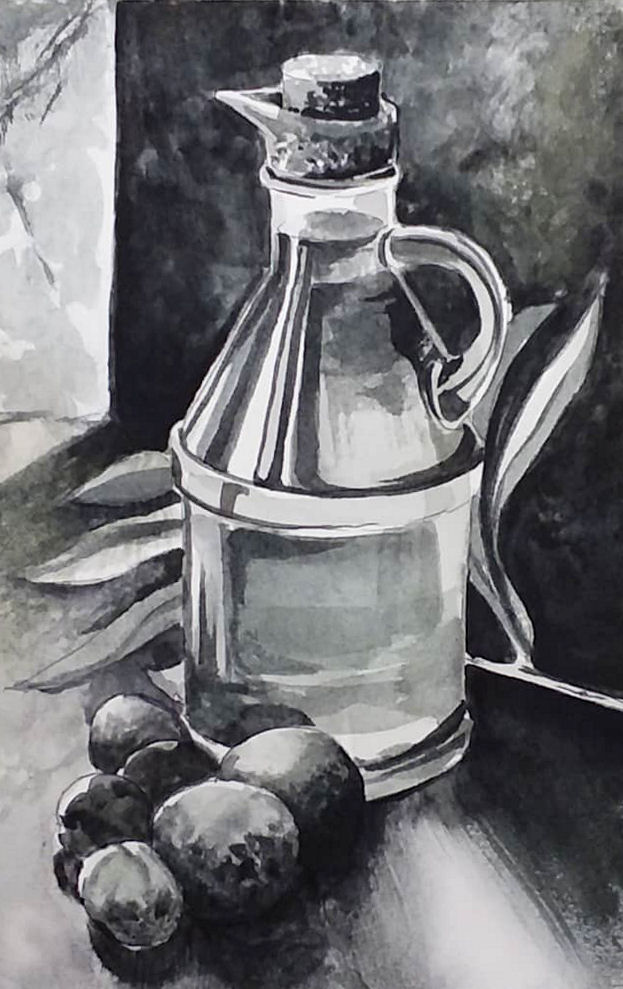
Grisaille is a French term that means to paint in monotone. You can paint in grey, brown or a grey green depending on the look you want. I am using QoR’s Neutral tint watercolor for several reasons: #1. A viewer requested a tutorial with it. #2. I had it from the 24 QoR set I recently purchased and I never thought I’d use it but I didn’t want it to go to waste and the most important reason #3. As luck would have it it’s the perfect neutral gray and it resists lifting so I don’t have to worry much about reactivating it while I glaze my color on top. Please refer to the photo of my grey underpainting below as you create your grisaille underpainting.
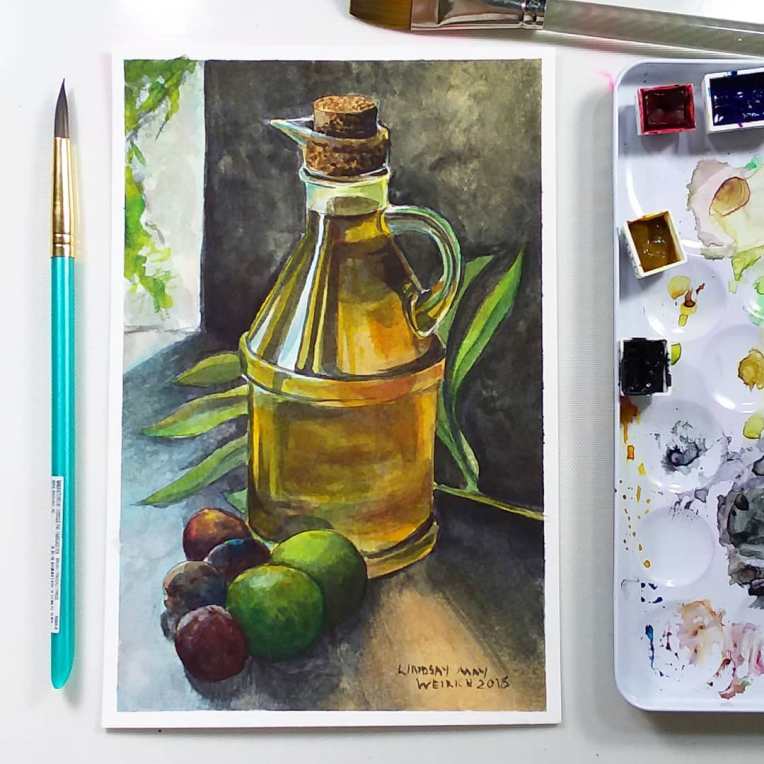
After your underpainting is dry you will be glazing (glazing means to paint a layer of transparent color over a dry layer) color on top. The colors for glazing are:
Permanent Alizarin Crimson-This is a transparent staining cool red
Phthalo Blue (Green Shade) – This is a transparent staining cool blue
Nickel Azo Yellow _ This is a chameleon of a color, when used thinly it has a cool greenish undertone but when used thickly it has a warm amber undertone, I have never seen a color to have such different color tones when used in different strengths. It is also very transparent which is quite odd for a yellow.
Here is the reference photo. You can download a larger version of this beautiful photo by Roberta Sorge on Unsplash for free. I chose this photo because of the dramatic lighting. This photo captures the Chiaroscuro effect perfectly. Chiaroscuro is an Italian art term referring to strong contracts between light and dark and you will often see the shadowed edges of objects just disappear into blackness (like the olives in this photo) if gives drama to a painting and adds volume and a sumptuous effect to a painting. This technique was favored by baroque painters and also used to depict dramatic religious scenes by Renaissance painters. Don’t you feel smart now?
Please watch the video for the full tutorial. This will be broadcast live at 12:30pm eastern time on 7/27/18 so tune in on YouTube if you want to ask questions as we go along. The replay will be available after the livestream as well. This technique takes time so don’t be discouraged if you need to take a few sessions to complete this or rest your eyes along the way. Enjoy the challenge of learning something new!
Supplies available at sponsor Jerry’s Artarama! Use coupon code: frugal20FS49 for 20% off $49 + Free Shipping (Excludes: Sale, Super Sale, Egift Cards, Buy It Try It’s and Vendor restricted items. Look for the green coupon eligible icon on the product listing.
Supplies:
QoR Watercolors (colors can be bought individually or in the 24 color set with many other useful colors I recommend) Neutral Tint, Permanent Alizarin Crimson, Phthalo Blue (Green Shade), Nickel Azo Yellow
Brushes: You want soft brushes for the color glazing such as the Mimic squirrel brushes in a variety of sizes. For the grisaille layer using neutral tint you can use whatever brushes you prefer. If you are not using QoR neutral tint be sure to test your “black” on the paper you plan to use for lifting as you want a staining color that is hard to lift. If you do not have a non lifting black watercolor use a non shellac waterproof black ink. ***Important! You will also want a soft blunt round or filbert (aka mop brush) that will be used dry for blending and mottling color. Do not rinse this brush while we paint, it is to remain dry for the duration of the painting and then you can clean it. A mimik filbert will be good for this or any small soft mop you have.
Learn the process by working step by step through this project so you know how to apply the layers before striking out on your own.
Take (or choose) a photo with strong lighting and high contrast between lights and shadows.
If you struggle seeing values (values means how light or dark something is) then desaturate (make grayscale) your photo in your computers image editing program to make it a black and white photo and it will be easier to work with.
Make sure whatever you use for your underpainting does not easily lift. Test your paint and paper before you begin so you don’t end up with mud when you glaze.
Use very transparent paint and soft watercolor brushes for glazing color.
Keep a couple soft dry brushes on hand for diffusing, blending and softening colors. Think of this process like hand tinting a black and white photo.
I get asked a lot about shading and value when I am watercolor painting. if you would like help with learning about values and drawing what you see accurately my online class Learn to Draw with Lindsay focuses on just that. I know many people have no interest in learning how to draw and that’s fine (that’s why I provide patterns for many of my painting tutorials) but if you want to be able to draw without gimmicks and train your eyes to see shade and values accurately please consider checking out this course:)
I hope you enjoyed this lesson that combines art history with classic technique. Pat yourself on the back if you painted along, it is probably the most advanced technique I’ve done on a free live friday watercolor lesson! If you would like to see more techniques like this let me know and please share this tutorial with a friend or on social media or pin it on Pinterest! Long in-depth tutorials don’t do well on YouTube so please share if you care! Thanks for stopping by and til next time happy crafting!
Hi friends! I think one of the most enjoyable aspect of stamping is to combine images to create new scenes. Sometimes I use a technique called masking where I stamp the image then cover it up and stamp another image on top so it appears to be behind the first. This allows you to create a picture with many images on one sheet of paper without overlapping lines. Sometimes though, you are better off to stamp images separately and cut them out and arrange them together on a separate sheet of paper. It depends on the type of images you are using and whether you are using a full image or part of an image.
In this card with the ladies sitting on the couch it would be difficult to get them positioned properly,also I wanted some layered paper and dimension to this card so cutting and glueing were the way to go.
But on this card by starting with the mixed frame stamp layout it as easy to mask off each box and keep my stamping inside. I also think by masking you create some organization to this wacky cast of barnyard characters.
Learn how I created these cards in today’s video!
This tutorial is sponsored by Top Flight Stamps! SAVE 10% off your next order with coupon code: thefrugalcrafter10 *USA orders of $50+ ship free!
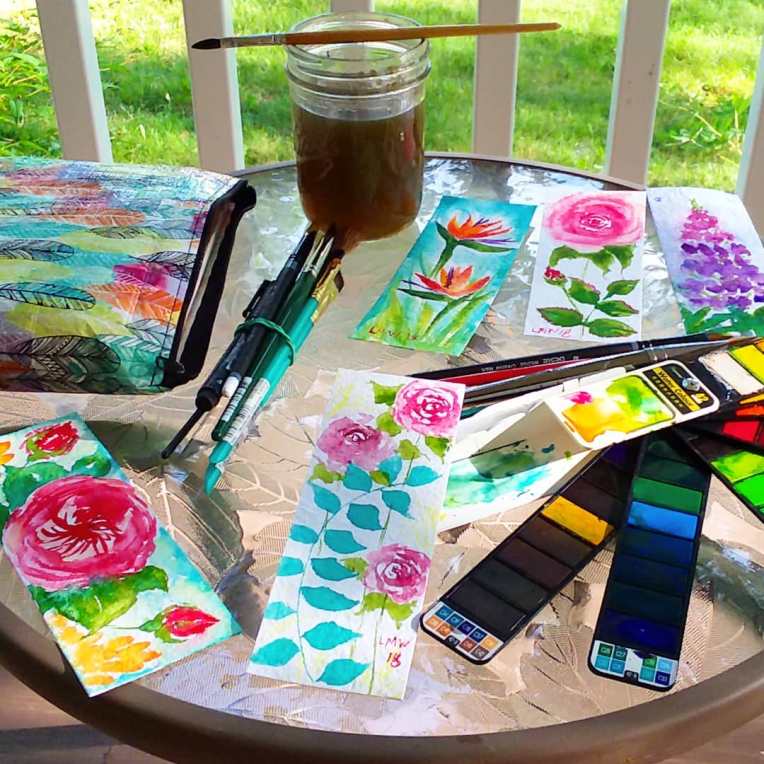
Hi friends! If you followed me on Instagram over the past month you have seem me painting cheerful postcards, bookmarks and sketchbook pages with a funny looking palette…
You may also have seen this palette advertised on Facebook and Instagram for a horrendous amount of money too! When I saw they wanted $50-$100 for this cute fan watercolor set I quickly put it out of my mind until I found it on Amazon for $18.99 and then I had to try it! I have carried this darling little palette everywhere with me for the past 3 weeks and have painted up a storm and surprisingly I have hardly made a dent in the paint. I was expecting with the super thin pans of color I’d use it up in no time and be left with a cute palette to refill. But no, there is still gobs and gobs of color left. Instead of me writing about how much I like this palette why not watch my video and I’ll tell you!
The details:
The palette I bought has 42 colors (the have smaller sets that are cheaper, the smaller sets will be shorter and probably come with a shorter waterbrush)
They also sell a pastel set of 18 colors for $11.99, and a cocktail set of 25 colors for $14.99. I did compare colors in the sets and if you buy the 42 color set I reviewed and the pastel set the only duplicate color is white. All the colors in the cocktail set can be found in the pastel set and the 42 set. I plan to get the pastel set as I think it would be handy for life drawing sessions and for painting sweets which is my current obsession.
Comes with a refillable water brush
These seem to be extruded very concentrated thin pans of watercolor
I bought mine from the seller MEEDEN because I have had good luck purchasing that brand before
Pros:
Price: $11.99-$18.99 depending on number of colors
Colors are clean and bright and very transparent
The waterbrush is decent
The colors are slow wearing, they should last quite a while
Some colors granulate like they would in traditional colors.
The colors Glaze well (2-3 layers) as you can see in my gemstone painting below.
Cons:
Small mixing area (that said you have enough colors you won’t need to mix but I prefer to use fewer colors and mix them) *Note, Some palettes are coming with a slide out mixing tray that is not shown in the product description which is a nice improvement as well as a brush wiping sponge!
No lightfast information
If you decide to use a regular watercolor brush and buckets of water you will want to leave it fanned out to dry so the wet paint won’t stick the palette shut. When in doubt dry it out.
Bottom line: These paints are surprisingly wonderful! They flow well and the colors are fresh and bright. I am keeping it in my car for impromptu painting. These won’t be the best choice for large paintings because the mixing areas are small and you would probably use them up quickly but for cardmaking, art journaling and sketching they really can’t be beat. I am using them mainly to paint bookmarks and postcards. If you are looking for an inexpensive travel set of a gift for an artsy friend I encourage you to give them a try! I also recommend you make a swatch like I showed in the video so you can keep the colors straight, they are so transparent they appear very dark in the pans.
FYI I intend to refill my palette when it runs out. I will use my QoR watercolors for that because they are very concentrated and dry down hard and low yet are easy to rewet so they seem to be the best option I think.
I hope you enjoyed this review as much as I have enjoyed playing with these fun paints! Affiliate links were used in this post meaning that if you purchase that palette I will earn a small commission at no cost to you, thanks! Thank you for stopping by and til next time happy crafting!
Hi friends! Today I am going to sketch from a photo I took in my sister’s garden. Isn’t it pretty?
Unfortunately I did not do it justice.
I thought about scrapping the whole project but I also think seeing someone work through problems in art is a valuable teaching tool and that is what you are going to see today. Me fixing many issues as they arise in a sketch. I hope you find it useful (or at least get a chuckle over my mishaps LOL!) Here’s the video!
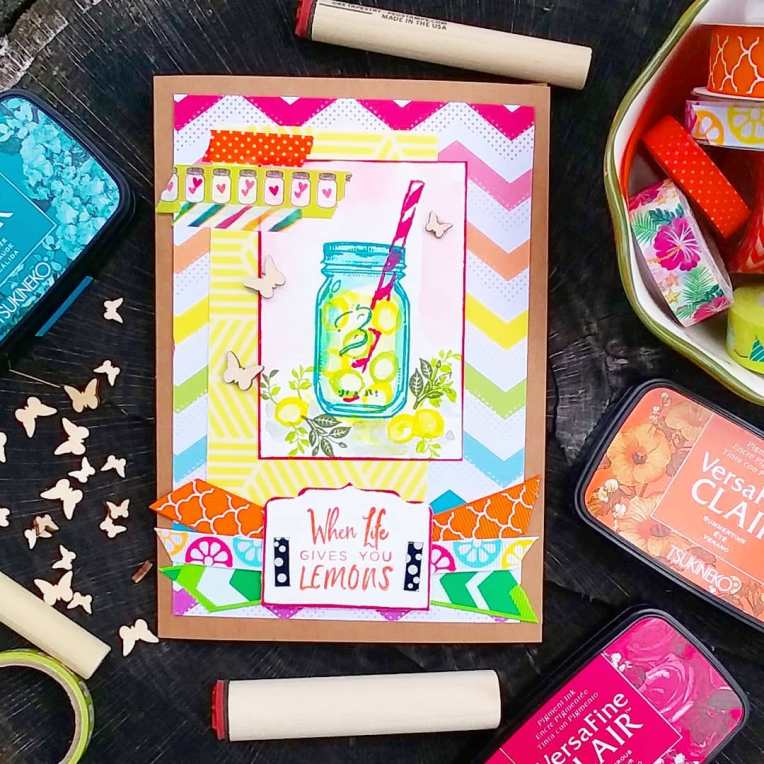
Hi friends! Today is my 17 year wedding anniversary! Isn’t it funny how time flies? My hubby and I have the entire day to spend together and I am so thankful. Some days are ideal and on other days we have to make the most of the time we have and try to Squeeze the best out of the day we are given.
I really liked this sentiment: “When life gives you lemons…Squeeze the day” because it is a good motto I think. It’s also nice if you like to decorate the inside and outside of a card.
Watch the video to see how I made this card!
This video is sponsored by Rubber Stamp Tapestry Use coupon code: LINDSAY and receive 15% off your retail order of $10 or more of peg stamps, peg stamp sets, and unmounted stamps! Coupon expires a week from this video publication. Continue to receive great deals by becoming a PegStamp VIP here. As a PegStamp VIP
you’ll get a weekly deal via email plus links to fabulous tutorials by me, Lindsay the Frugal Crafter and other designers.
*To make my unmounted rubber stamps stick to my block I trim them and the paint a thin coat of this glue on the back and let them dry and they are re-stickable
Squeeze the day, don’t hoard the washi tape and make the most from what you have! I hope you have a wonderful weekend and til next time happy crafting!
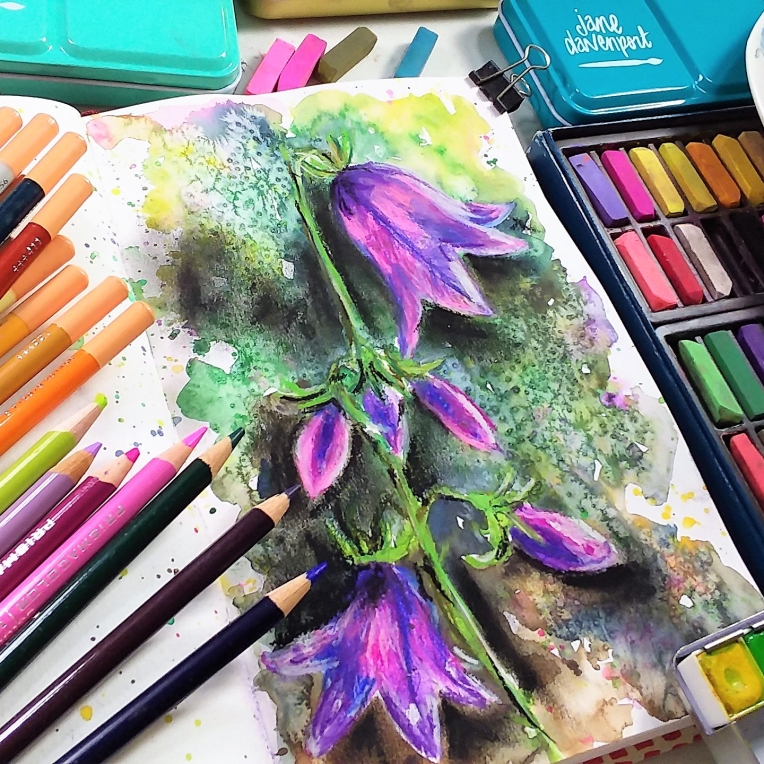
Hi friends! Today we are going to have a good time painting flowers in watercolor and pastel!
I like to use mixed media as you can pull in the best aspects of different mediums to achieve the results you want. You can also use these techniques to rescue a painting that is nor working. You can watch the live show or replay in the player below but if you want to chat live be sure to watch on YouTube at 12:30 today.
Last Day to get any class for $42 in my online school, use coupon code HB42 to get any class for $42 or 46% off payment plans. It’s my birthday week treat for you! All my classes have lifetime access so you can buy them on sale and take them when you have the time, you can also return to any lesson again and again as much as you like. Below is a rundown of the classes I offer and who they are best for!
Learn to Draw with Lindsay: This class is designed to teach anyone how to draw without gimmicks. You will learn to draw what you see. You will learn how to sketch, shade, decipher tonal values and how to apply your new drawing skills to other media. This beginner class is for anyone wanting to improve their drawing ability and contains nearly 8 hours of step by step video instruction. Enroll or learn more here.
Essential Tools and Techniques for Watercolor Painting: This class is designed to teach you everything you need to know about watercolor so you can get painting fast. This class is a good foundation for your watercolor studies. In the first part of this class you will learn about supplies, develop techniques and practise the skills you will need to create whatever paintings you desire in the future. In the second part of the class we will put all of the skills you learned into practise as we complete *four beautiful paintings. This class is my most popular course. *This class originally had 3 final paintings but I added a 4th on negative painting. Student always have access to any content added to classes they are enrolled in. Find out more here!
Texture Toolbox: Feathers & Fowl: This class will teach you how to realistically and expressly paint birds in watercolor. We work on capturing the subtle texture and shading in feathers and we add hints of colored pencil to enhance out feathered friends when desired. NEW! I have added an alphabetized bird painting tutorial archive to this class should you want to find past bird tutorials I have done that are not included in this course. Click here for more info or to enroll.
Watercolor Flower Workshop: This is my most recent class and it is all about loosely painting expressive flowers in watercolor. Have you ever tried to paint loose and ended up with a hot mess? Well, this class will offer the structure you need so you can create a floral scene from your imagination that is well-balanced, beautifully composed and loose! This class focuses heavily on brush control so it’s good for folks that need help with brush strokes and are curious about some of the odd specialty brushes that are out there. I soon will be adding a wedge brush section to this class! In addition to the all new step by step real-time instruction provided in the course there is also an alphabetized archive of other watercolor flower tutorials for your convenience. Learn more here.
In addition to the never before seen content in these classes you have access to my support in the online classroom. Under every lesson there is an area for you to post photos of your artwork and ask me questions. I love giving feedback and seeing your beautiful artwork! Here is what some of my students have said:
Thanks so much! Love this class I do each section so many times because it is fun and i keep learning! Thanks again! -Karen L Jackson on Watercolor Flower Workshop
I LOVE THIS COURSE! Actually can paint a flower without a drawing! -Joanna Stratten on Watercolor Flower Workshop
Hi Lindsay, what a great drawing course. I have been painting for 30 plus years, drawing was my weakest, until now. I’m starting to see things in shape, I think the most helpful is starting with a circle or shape then fill in with the shapes of whatever you are drawing. This has been the best money I have ever spent. What I love I can look at these lessons over & over until I get it!! -Linda on Learn to Draw with Lindsay
I am blown away by the excellence of your lessons! Things that I have struggled with are making more sense when I sketch along with you. So glad that I will be able to go back and reference your videos! -Irene Addison on Learn to Draw with Lindsay
Thanks for the tutorial. I am glad that it is in more depth than the YouTube videos, although I love them as well. I am brand new to both painting and drawing so even the iris was a challenge. When I started watching your YouTube videos I found that I had some watercolor supplies I had purchased about 15 years ago and never had the nerve to try. Thanks for giving me the idea that it is possible for me to learn to paint! -Helanna Andres on Essential Tools and Techniques for Watercolor
How to hold the brush is the best information you could have imparted! loving all these videos; can’t wait to start painting the iris. -Judith Taylor on Essential Tools and Techniques for Watercolor
Hi Lindsay, Great Class!!! Simple and easy to follow. Thx for putting this together. I can’t wait to start the next painting! -Tina Amoroso on Texture Toolbox Feathers & Fowl
Finished the duck and this course! Loved it! Thank you so much for these watercolor painting classes. I just got the Rembrandt 48 half pans and am excited to use them….. I can actually do some watercolor painting thanks to your classes. Crystal Neuendorf on Texture Toolbox Feathers & Fowl
I love helping people discover the hidden artistic ability within them and I welcome anyone who want to paint better (and more often) to join one of my watercolor classes! Use coupon code HB42, if discount doesn’t automatically appear, to get any class for $42 (that’s 47% off!) and start creating today! Don’t wait, today is the last day to take advantage of the Birthday deal! Thanks for stopping by and til next time happy crafting!