Hi friends! It is January which means we are all going to try and get organized right? Keep dreaming the dream folks LOL! Joking aside, today I have a quick storage DIY to make great use of wasted space like this side of a shelf in my office.
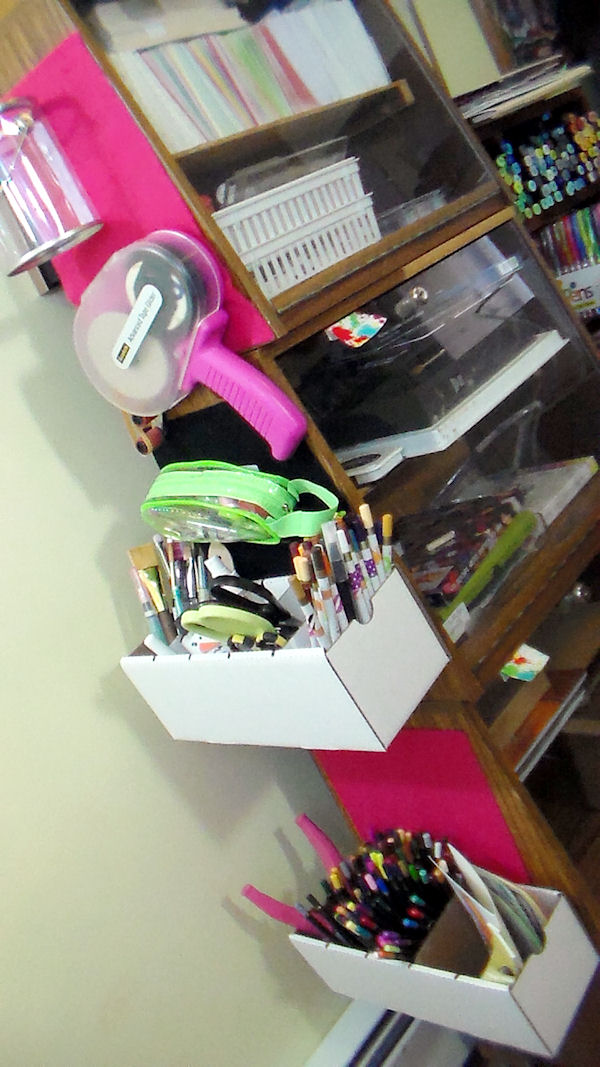
During the cold months I move my arts and craft operation out of my basement and into a corner of my office upstairs so I can enjoy the luxury of heat. The trade off is that my office desk is tiny and I have very little room to store my stuff so every inch of space matters. I was given this knife & ammo case from a general store that went out of business and since it has a small footprint I moved it in next to my desk. Everything is visible and it holds quite a bit considering how narrow it is. It is next to my office filing cabinet on one side (I store a couple large pads of paper there) but the side of the shelf behind where I sit was bare. I wanted to get my jars of pens, pencils and adhesives off my small desk so I came up with the idea of making a velcro wall to stick all of my often used stuff on.Here is how I did it!
Supplies:
- Hook and Loop Tape (AKA Velcro) *Unfortunately Papermart is no longer carrying hook and loop tape, I recommend Velcro brand available at any craft or department store.
- Hot Glue Gun & Sticks TIP! a viewer (xBoneOrchardx) noticed that I had to keep pushing my glue stick in my glue gun and told me I could glue the new stick to to end of the old one to prevent this, awesome!
- Bin Boxes
- Clear Pails *I am not sure how these will work out but they are really cute and useful for other projects:) I ended up putting my paint brushes in the velcro pail, we will see how well it holds up, so far, so good!
- Scissors
Directions:
1. Glue felt to area you want to use as storage.
2. Glue hook side of Velcro to boxed and other items you want to stick to the wall.
3. After all glue is dry press boxes to wall.
Tip, this is a great way to store small items as well. If you can glue a piece of Velcro to it will work as long as it’s not too heavy.
So, what are your favorite storage tips for tiny craft spaces? Lots of viewers shared great tips in the comment section of this video so be sure to check that out if you want more ideas! There were many ideas I had never thought of and I thought I knew all there was to know about cramming art stuff in small spaces LOL! Thanks for stopping by and til next time happy crafting!
Sponsored by Papermart

I store my crop-a-dile (heavy but constantly used) in a sturdy recyled box that is narrow and not very tall. I punched a hole in ti and used a strong “S” hook to hang over my rolling cart shelf. Now my hole punch is handy, out of the way, and the narrow box also holds another small hole punch. I also stand 3 corner chompers through the side wires of the same rolling cart and they stay perfectly ready for use. I used wire heavy duty spice shelves that are for over the door to store my regularly used punches and it works wonderfully. The last new way to store my ink is working great. I bought 3 level wire spice racks and store all my distress inks handy on top of my desk shelves. This was easier than in a drawer trying to find the right color. I just added a color chip to the outside of each pad. I use round oatmeal containers with empty paper towel cores inside to roll up my craft mat, add my rulers, and store my long handled paint brushes. Your storage wall is a great idea since I don’t have any available wall space so your end of the shelf idea is great. Love the cheap ways to provide necessary and very useful storage.
LikeLiked by 1 person
Great ideas!!! Thanks.
LikeLike
Wow every time I organize just gets pulled out and I have to start all over again.
LikeLike
very clever idea … I wish I had thought of a few things like that before I spent big $$ on Scrapbox Workboxes!!!
LikeLike
I would love to have one of those, my mom and sis do but I don’t think they use them much:(
LikeLike
I found big rings with a hanger hook–Joann’s sells for organizing quilt rulers & Dollar General sells for belts. You can put a myriad of things in ziploc bags (I like the heavy freezer type), punch a hole in the top edge and put on the ring. Holds many bags and you can put most anything in them. Easy to sort through & find the right bag and remove, and the ring can be hooked on the edge of a drawer, wire rack, etc.
LikeLiked by 1 person
Band-Aide boxes would work awesome for this idea to hold litle things!!
LikeLike
Take your old plates and bowls and make your own lazy susan! You can get the turn table for a couple dollars on Amazon and they come in different sizes. I believe in using all of my vertical space for storage too so these come in handy. I have made 2 and they house all of my mists (lots of them). I find platters work great because you want the bottom piece to be bigger than to top tier. I used old glasses to separate the tiers. Wine glasses, coffee cups, drinking glasses doesn’t matter what kind as long as they are sturdy.
You can spray paint them if you want a certain color and you can get all you need at the dollar store or yard sales for just a few bucks if you don’t have any old ones around the house.
You can also use pie or cake pans to do the same thing and candlesticks are another option for separating the tiers!
Happy Organizing!
LikeLiked by 1 person
great idea, I have a couple onld turntables kicking around!
LikeLike
I really like those boxes you used. Your cabinet was an awesome find. And, Lindsay, your hair looks adorable like that!!
LikeLike
awesome tip on the glue gun!!!! Thanks!
LikeLike
It’s amazing how you can cram so many things into a small space, and still have it functional, when you do it correctly. i’m still trying to figure out what “correct” is for me. Been working on that for years! But, I think I’m going to do the velcro trick on the side of my cabinet. It certainly will help my mess. Thanks so much for the idea.
LikeLike
Look at your beautiful CLEAN desk! Oh Lordy! Mine is ALWAYS messy. It stays clean about 30 min at the most between projects. That’s what happens when you have little space and so many supplies. I can barley move my chair (lol) Love all your tips. I have used many of them!
LikeLike
I pick up bins similar to what you have at Dollar General and Walmart when they become empty. Using them to file stamps and dies etc. They are free which is frugal crafter like. LOL also I saw somewhere one of those clear buckets used to store twine or ribbon. They punched holes in the bucket for the twine to be pulled out.
LikeLike
When the kids leave home, I am going to have a well organized craft room, but for now I have all of my craft supplies in two cupboards, one of which has a small shelf in it, where I work, with lights fitted underneath the shelf above, if that makes sense, I have all of my supplies in labeled boxes, it is the only way I can fit them in the cupboard, Oh how I long for my own space, the bed is where everything gets dumped while I work, and when I am done, I have to pack it all away again, very frustrating, which makes it less desirable to actually craft, hence i walk around like a bear with a sore head, ha ha ha, my tale of woe!
LikeLike