Hello Wowwers! Today my main craft desk is filled to the brim with stuff to package up for the craft fair I am doing in a week and a half {holy smokes! I am just now realizing it is less than 2 weeks away!?!} so instead of showing you the same old crap I’ve been making I thought I’d share another hard-used work area…my photography area!

That’s pretty sophisticated huh? Well, maybe not but the proof is in the pudding…or the photos so to speak so I thought I film a quick video blog today demonstrating my photography techniques and offering tips that you can try if you are unhappy with the way the photos of your crafts turn out.
Quick Tip Review:
- Hold your camera steady, tuck your elbows in at your sides, hold your camera in both hands close to your body, press the shutter halfway down to focus, exhale, press the shutter the rest of the way. Viola! Alternately you can use a tripod and a remote clicker to eliminate shake.
- Use the macro feature fore really small stuff like jewelry or details on a card or scrapbook page. This allows you to get physically close to the object and keep it in focus. It blurs the rest of the image for a professional ethereal look. I will often take a photo in regular mode too in case I don’t like the effect when I am editing. On most cameras there is a button on the back with a flower on it, push that to turn on the macro feature.
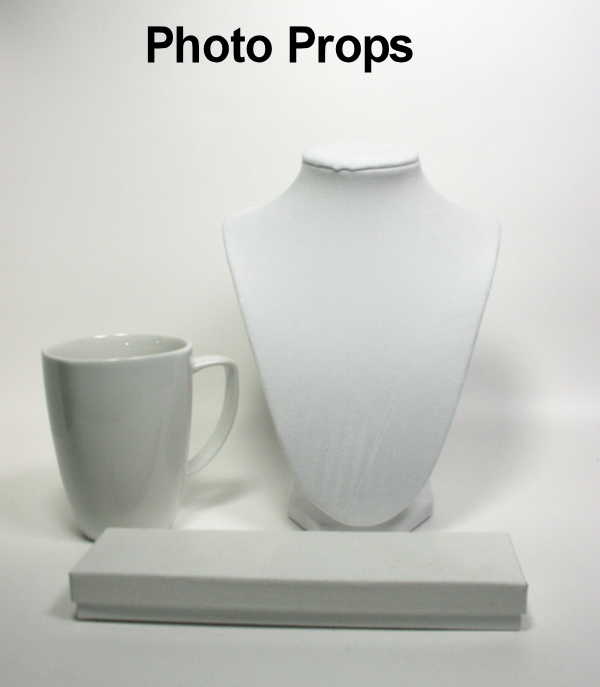
- KISS: Keep it Simple Stupid, I photograph my art in my white box against a white background with white props. It keeps the attention on my artwork. It also reflects and maximizes the light. Sometimes I will scatter buttons, or add a branch or flowers to a plain project to make the photo more interesting or place some scrapbook paper or fabric as a backdrop but in most cases regarding the use of props and backgrounds I have this mantra: “When in doubt, leave it out!” Ironically when it comes to creating the art my mantra is “The more the merrier!”
- Don’t use the flash, man! While the flash is great in a lot of circumstances it kills the detail and contrast in your still life photography, really what you are doing when you shoot your crafts is still-life. You should have plenty of light with your homemade light box so ditch the flash. To disable the flash look for a button with a lighting bolt on in and press it until you see an icon on the lighting bolt with a “not-allowed sign” around it.
- Adjust levels in image editing software such as Photoshop, Paint Shop Pro or the free program GIMP.
I save white pottery, boxes and dishes to use and photo props.
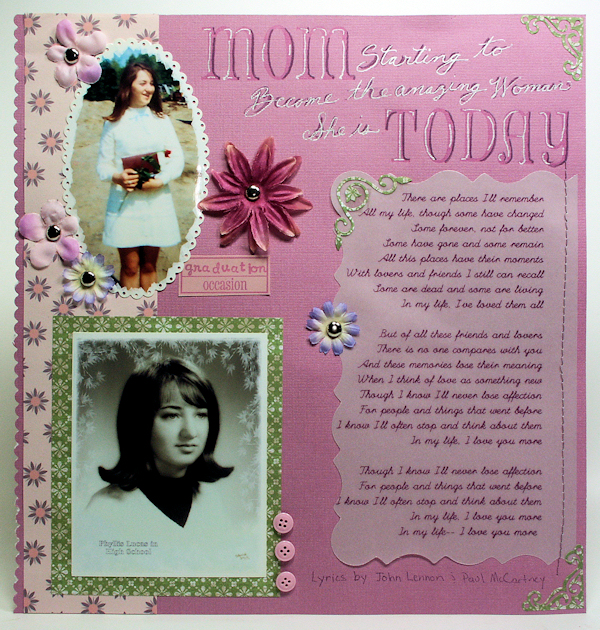
This is the simple easel I made to lean my scrapbook pages and small paintings against when I photograph them:

Uh, disregard the 2″x11″ notation, the base is 2″x8″. 😛 Here it is in use, there is enough support for the paper that is does not slide down or bow back at the corners.

A tip when shooting larger items like scrapbook pages and paintings is to use the “perspective adjustment” tool in your photo editing software. It had an icon that looks like a crop tool but you set each corner at the corner of your project and it straitens out any parallax. Try to shoot it as level as you can so the adjustment has to only be minor. Then crop your photo, I like to leave a border of the white backdrop around my scrapbook page or card but that is personal preference.
After you have these well shot photos you might want to enhance them a bit more. Your camera is tricky, give it too much white and it might want to make it grey, give it too much black and it wants to make it gray but you know your background is white so you can go in your trusty photo editing software and give that photo what-for! I like to use the curves/levels tool for this. In Paint Shop Pro I choose Curves (from the Adjust menu) then click levels. That usually dose the trick but if it still does not look like the original I slide the curve a bit until it really represents the artwork.

I hope this helps answer some of your artwork photography questions without being to overwhelming. Really, holding the camera still, not using flash and shooting your artwork in a simple white box is pretty much all you need to know…huh, I could have just typed that to begin with and save you from listening to me gab for 5+ minutes and reading all of this..oh well;) I hope you learned something new anyway 🙂 If you want to see what is happening on craftier desks head over to Julia’s blog for more What’s on Your Workdesk Wednesday fun! Til next time happy crafting!

Wow! what an informative, thoughtful, interesting post! Thank you. I shall print this out so that I can ‘inwardly digest’.
I especially like in point one – press the shutter halfway down to focus, exhale, press the shutter the rest of the way – exhale being the operative word!!
Thanks again
Bishopsmate #65
LikeLike
So useful. I was just saying elsewhere how rubbish my photography is 🙂 I am SO a “grab and snap” person….
Happy WOYWW
MA (4)
LikeLike
Thank you so much Lindsay. The tip about making and easel for layouts is fab! My photos of layouts tend to have a trapezium shape!!!! I am going to try this out and the photoshop tips too. Great post. Happy WOYWW to you Helen 92
LikeLike
You are a natural teacher. It’s generous of you to share your experience.I value the lessons. Thank you Carole
LikeLike
Thank you Lindsay! very helpful!
I mostly go outside to make my photoes …
my results are so much better outside with daylight!
LikeLike
Photo tips are much appreciated thanks for all the great info..
Sandy 🙂 #18
LikeLike
Awesome tips and pictures explaining everything! That’s why I check in every day!
LikeLike
Thank you for the tips, very helpful. Great scrapbook layout too.
Happy WOYWW
Eliza 46
LikeLike
Thanks for such a great photo tutorial. I have a pop up light tent I often use, but your tutorial is so easy to follow.
Thanks and happy WOYWW
Kyla #113
LikeLike
Amazing! I love this post–and your photography is so creative too. I’ve definitely bookmarked this one–I have totally needed this lesson! Happy WOYWW! Sandy Leigh #96
LikeLike
Wow, can’t wait to watch this with my hubby as he is taking my photos of my cards. I only do the ones on Weds of my desk as they are always just overhead shots. I got a small light box in our basement and it has made a big difference. Thank you for sharing yor pointers!!
Happy WOYWW! Winnie#76
LikeLike
wow thats a lot of thought and work gone in to that but the difference in the two photos is amazing
Have a great WOYWW today and enjoy the rest of your week
Ria #40
LikeLike
Fantastic, thank you, I struggle with my pics. Going to make an easel to see if that helps me photograph my cards which usually look wonky!
Karen #61
LikeLike
Lindsay, thank you so much for this post – it was super helpful. I always want to enter those online challenges with the things that I attempt but my photos are so crappy that it turns out looking really blah and unexciting – and not what it looks like to me in real life. I just comandeered two of my mini lamps and am now trying to set the whole thing up with typing paper – wish me luck! Hopefully if I get the pics right, I can start entering some cool challenges.
LikeLike
TYPO – commandeered
LikeLike
Another great post Lindsay! Thanks for sharing your expertise! PS, your Mom looks amazing!
LikeLike
Wow, thanks for the pointers! I might very well try some of them out next time I take pictures of my crafted stuff. Have a good Wednesday!
– Zildara #128
LikeLike
Thanks for this, always good to learn more photography tips.
Bridget #28
LikeLike
That’s really useful, thanks! Good luck for the fair.
LikeLike
Oh my goodness, this is so incredibly helpful! I can’t thank you enough!! I was honestly ready to trash my camera and get a more expensive one in hopes of getting clearer photos. I just tried out your tips and it’s unreal how much better my photos are. So it wasn’t the camera after all, but the user. LOL
LikeLike
funny, I experience the same thing with my tools LOL! I’m so glad it helped and save you a few hundred $$ too (not having to buy a new camera!)
LikeLike
So funny! I was just experimenting with this today! I love how some photo’s look so natural and yet perfect, like on Lily Beans Paperie, but I just haven’t gotten the mix down right yet myself. Well, and I don’t have photoshop pro or anything. Just my Kodak Easyshare software, but it does have quite a few options for editing. Anyways, thank for sharing and the info is super helpful! Have a great WOYWW! 🙂 Deeyll #139
LikeLike
I love Lillybeans photos too, notice that she usually has white props/white backgrounds, She used a lot of white vintage items as props to enhance her shabby chic style. You can always paint props to fit the style of cards you make too. Give it a try!
LikeLike
Nice Tutorial on photography- always a challenge!
I tend to use black backgrounds inside my light box- I;ll give white a try.
Robyn 99
LikeLike
What a brilliant post, so useful. Love the scrapbook page too.
K x
#137
LikeLike
Happy Very Belated WOYWW. Thank you so much for another’oh so useful’ tutorial. I need all the help I can get with photography. I just use my phone at the moment and definitely need to use Hubby’s camera. Ali x. #25
LikeLike
What a fantastic post! Thank you so much for sharing this and for all of the detailed pictures and instruction. Love your instruction on actually taking the picture. I will be tucking this one into the “how to” folder.
LikeLike
thanks for all the photo tips was a lot of helpful hints thanks
LikeLike
Fabulous post!!! Thank you, thank you, thank you!! I have wonderful light in the Sun Room Studio, but for only a portion of the year. THIS solves the problem……………….now if I can just find a spot to dedicate to it. LOL
LikeLike
Thank you…thank you…Lindsay, for directing me to this fabulous post! I may not have been able to find it on my own, in your blog nor on your You Tube channel. I love that you are always so kind, helpful, and generous! I always look forward to watching your videos. Happy crafting! God Bless you!
LikeLike