Hi friends! Today I have a video that is part review and part tutorial. I have a couple of sets of markers to review but I also wanted to make the video a useful tutorial on blending. Also I was curious about what kind or marker was quicker to color with. I also wanted to try to achieve the same look with different kids of markers to see how they did. If you are ready for all of that high-speed marker action buckle up and let’s go!

There is lots of info in this post, let’s start off with the video:
Supplies: (Affiliate links used. Products provided for review)
- Arrtx Alcohol Markers set of 80 ($33.89)
- Arrtx Watercolor Brush Markers set of 48 (48 set $26.99, 24 set $14. 20)
- *Also shown TouchNew 24 skintone alcohol based markers ($16.98)
- Paper for alcohol pens (Neenah classic crest) ($43 for a ream of 250 sheets)
- Arteza watercolor pads for watercolor markers (use the back side for stamping as it is smoother)
- Butterfly stamp set Stampendous $12.35
- Butterfly dies if desired ($12.78)
- Memento ink pad for use with alcohol pens
- Archival ink for watercolor markers
- *Note, if you don’t have either ink Gink K Anaglam ink is supposed to work for both watercolor and alcohol markers
- Swatching stamps
Review of the Arrtx Alcohol Markers
pros:
- Price: 80 color for under $34
- Color selection
- Blends well
- Dual tip (chisel & Bullet)
- Beautiful & sturdy carring case
- Colors are very juicy, no dry ones.
- Easy to tell the chisel and bullet ends because they have square and round color chips respectively. Color chips are pretty accurate but I still recommend swatching.
- Attractive matte white square barrel (non-roll)
Cons:
- No brush tip
- No colorless blender in set
- caps may be difficult to remove if you have arthritis
- Caps do not post (you can’t stick the cap on the end of the marker to hold it when coloring)
- As with most low-priced markers there is no open stock option (although they use the same numbering system as Concept at Jerry’s Artarma so you could get a replacement color if you needed too, it would look different tho)
- Non refillable

These markers are beautiful to look at and color nicely. They remind me of the quality of Ohuhu and they even use the same color number system. Many of the lower priced markers available now are using the same numbering system, I reckon it is because all of the inks are being made in the same factory in China. I have not seen this marker barrel style anywhere before and honestly I really like have the two distinct ends because I can quickly uncap the nib I need whereas with Copics and other markers I often get the wrong end even with the gray band they have for identifying. This saves me time and I like that. Below you will find my color chart for the set of 80 Arrtx alcohol markers.

Here are the colors I used (in order of appearance) to blend the alcohol marker butterfly: 13, 14, 16, 18, 22, 23, 33, 35, 37, 48, 49, 59, 58, 68, 67, 147, 76 *If you have other markers that use the same color number system great! Use what you have OR use the swatch chart to figure out what colors to use from your stash. If you want to order this set you can here.
Review of Arrtx Watercolor Real Brush Pens 48 color set
Pros:
- Great color selection
- Low price (even among other budget priced watercolor marker pens)
- Caps post (you can stick the marker cap on the end while coloring so you don’t lose it)
- All colors have a number on the end for identification
- Includes a reusable plastic carring case
Cons:
- Non refillable and no open stock options

These markers performed well as I would expect. I did have an issue with the plastic color coming off one of the pens but I was able to reassemble it and stick it back into place and I could feel some of the innards of the brush pens moving around so it doesn’t feel as good quality as the Zig Real Brush pens but they are less than half the price. The ink flowed smoothly, like other real brush pens I have used. These are on-par with the Arteza real brush pens but about $10 cheaper. If you already have those, or any other real brush pens, I don’t think these will be very different but if you are looking to try some they are a nice value. Below you will find my swatch of this set:
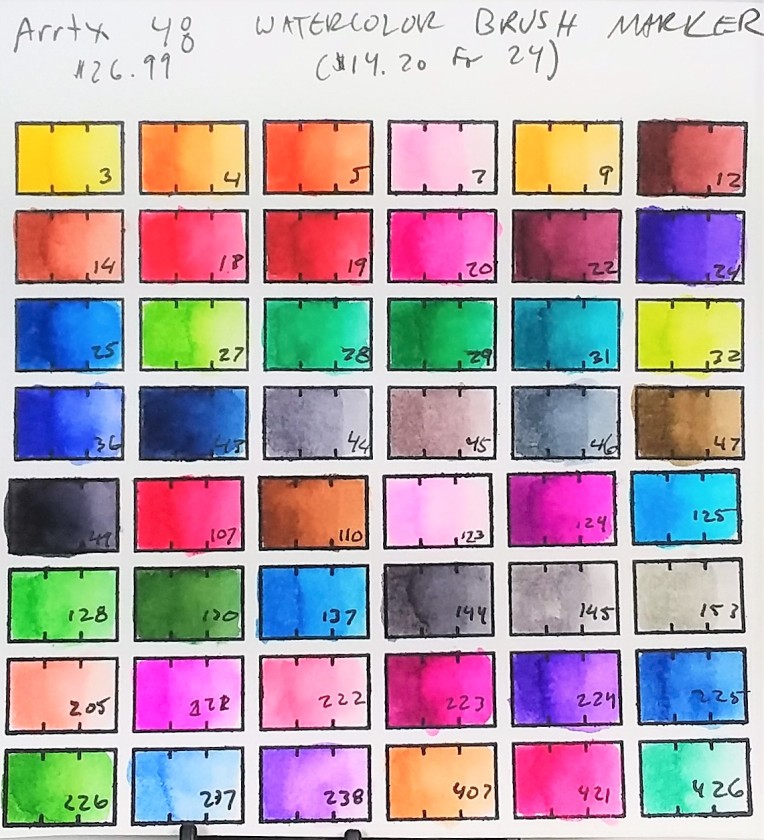
These are the markers I used on the watercolor butterfly in order of appearance: 18, 5, 4, 3, 27, 226, 28, 25, 125, 36, 238, 7. Feel free to use the swatch as a reference for matching the colors to what you have or if you want to buy this set you can here.
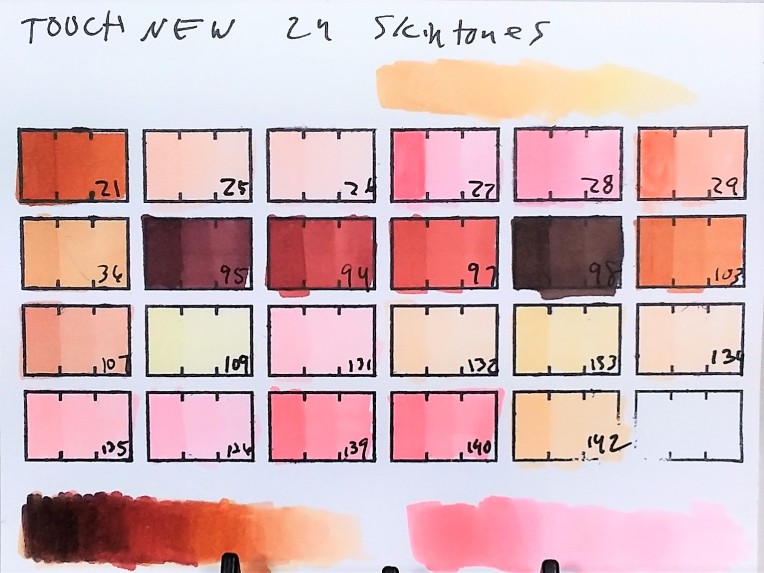
Review of TouchNew Skintone marker set of 24
Pros:
- Great selection of earth/skin/hair tones which are often lacking in marker sets.
- Price (under $17 for 24 markers)
- Dual tipped
- Cloth carry bag included
- Comes with a colorless blender
Cons:
- No brush nib
- Bullet tips were dry on a couple of my markers
- Caps do not post
- No open stock or refills (but you can order Concept markers from Jerry’s to replace a color)
These markers use the same numbering system as the Arrtx alcohol markers as well as other budget brands. The marker style is the same as the original Ohuhu markers who recently changed to an oval barrel that seems to keep the marker fresher as I had a few of the old style Ohuhu pens go dry prematurely.) I recommend storing them on their sides so the bullet tip doesn’t dry out and having denatured alcohol (or Copic blending solution) on hand in case you need to refresh them. If you need a set of skintone markers to fill in your set these are a good value but I’d check the color numbers to make sure they are not all duplicates to what you have if you already own markers with the same numbering system. Also because one of the marker is a colorless blender you are really only getting 23 colors. I wish these had brush tips though it is so much easier to blend with a brush tip and you want to be able to get really smooth skin and tones. To be honest tho, if you already had a set of 80 or higher of the Arrtx or Ohuhu alcohol markers I think I would pass on these are there are duplicates and consider investing in a couple of Copic brush tip skin tone markers as you need them because in this instance I think it would be more enjoyable and cheaper long-term to get a refillable marker that performs better. If you have a smaller set of assorted markers this 24 set would go a long way to fill in gaps. It really boils down to what you already have for markers and how much you intend to use them.
I hope you found this helpful and if you have markers I hope you try creating a rainbow blend. It is a great technique for learning to blend and it’s fun too! Or practice blending colors in general and write down your successful recipes so you can duplicate them later. The truth of truths with markers (especial alcohol markers) is that is takes practice and there is a learning curve to them so don’t jump from brand to brand thinking that one is going to make you a superstar. In fact it could harm your progress as you get used to one kind and then when you try another it’s like relearning because it is a bit juicier or the nib is harder or softer. You have to put in the time. Speaking of time wasn’t it interesting how much quicker the water based markers were to color with? I really wanted to do the comparison because I was curious but also to share that if you are not into spending lots of time coloring you might prefer a waterbased marker. Well, this post is long enough, have a great night and til next time happy crafting!

so for this technique you simply apply water to the already colored paper? It’s interesting because a few kids were thinking about this and it’s such a great idea!
LikeLike
I didnt adf any water but you can if your colors don’t blend enough. Just clean your brush as you go so you don’t get mud.
LikeLiked by 1 person
Thanks
LikeLike