Hi friends! I had many people asking me what I thought about Distress Oxide ink so I decided to get some and try them out!
I will play with them some more and do another tutorial with fun ideas for these but for now I have a few fun techniques in today’s video! I will also share some alternative ways to get this look if you don’t have Distress Oxide inks!
This video is sponsored by Rubber Stamp Tapestry Use coupon code: LINDSAY17 – 20% off peg stamps and peg stamp sets on orders of $10 or more. Coupon expires July 3, 2017. New stamps are being released soon, sign up for the Rubber Stamp Tapestry newsletter for bonus free projects and fun news! *Please note that unmounted stamps and other craft supplies are not coupon eligible due to their already low everyday price:)
Supplies:
- Distress Oxide Ink (Faded jeans, Broken China, Peeled paint, Worn Lipstick)
- Distress ink in Black Soot and Dusty Concord
- Mixed Media Paper OR Bristol OR Hot PRess Watercolor Paper OR Heavy/Smooth White cardstock
- Stamp Sets: English Lavender peg stamp set, Butterflies & Ivy UM set, Live, Love, Be Thankful UM set
- Stencil (I use a doily from the Crafters Workshop)
- Spray bottle with water
- Gel pens
- Masking tape (or painters tape)
- Mixed media paper, Bristol or smooth heavy cardstock
- Make up sponges OR ink blending foam
Directions:
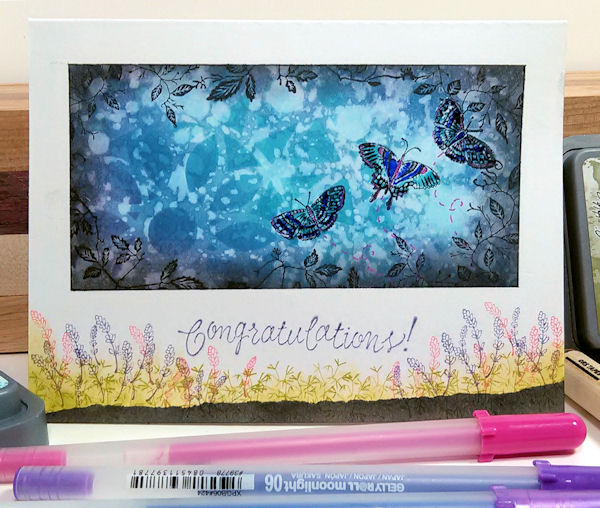
1. Make a card from mixed media paper and tape it to a board, mask the borders of the card so you have a window to stamp in
2. Sponge blue and purple ink in window, dry then spatter with water and blot. Let dry.
3. Pounce ink through a stencil with a make up sponge. Also use a sponge and black in to make a frame. Spatter with water.
4. Stamp vines around the edges of the window and butterflies within the window.
5. Accent the butterflies with gel pens and outline the window with black.
6. Remove the tape and stamp flowers and sentiment on the bottom of the card.
7. Ink the bottom of the card if desired.
I hope you try a one layer inky card, even if you don;t have the new distress oxide inks you can use the inks you have to get a similar effect, the more you play with your supplies the more versatile they become! Thanks for stopping by and til next time happy crafting!

Gorgeous
LikeLike
Oh soooo pretty Lindsay…TFS. I know I will enjoy using the Oxides too!
Paper Hugs,
Jan
LikeLike
Love the card. Any suggestions for using distress ink? I haven’t had much luck with blending. I bought them brand new, and struggled , the pads were so dry. I sprayed them with the glycerine/water combination, but still no luck. any help?
LikeLike
if they were dry when you got them I’d email ranger, they are good about replacing faulty product. Otherwise you can purchase bottles of reinker to ink them back up. They might be prone to drying more in dry locations so you might want to put them in a ziploc bag iif you are going to go a long time without using them.
LikeLike
Lovely! It’s always so much fun to watch your create and see what your active imagination has come up with. 😉
LikeLike
I really like this one Lindsay. I’m not really into stamping – or haven’t been, but i really do like what you create. I’m working toward retirement and trying to simplify my life and “stuff” so I’m not really in place to buy more stamps, stencils, etc, but your tutorials have me thinking about it.
LikeLike
Excellent tutorial and I always appreciate your ideas for using what you have. Your card is beautiful.
LikeLike
I’m really hesitating to jump on the Distress Oxide band wagon… They seem like chalk inks to me… do you know how different they are to chalk inks? Can one get similar results?
LikeLike
I think if you used regular distress inks and they chalk inks on top you would get a similar effect. Try it with what you have already and see, it can’t hurt:)
LikeLike
Just love this tutorial using the Distressed Inks from Tim Holtz. Will have to try this soon. THANKS FOR ANOTHER GREAT VIDEO…
LikeLike
Love your resourcefullness, creativity and detailed instruction!! Do you have a tutorial yet on making your own sponge doppers to use with inks? They are so expensive to buy. I would rather make my own like I see on your video. Thanks for being so inspiring.
LikeLike