Colorful Cat Card {that was SO much fun to make!)

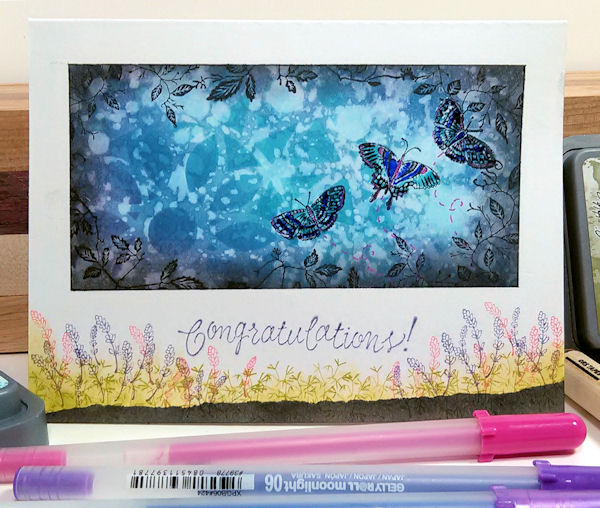
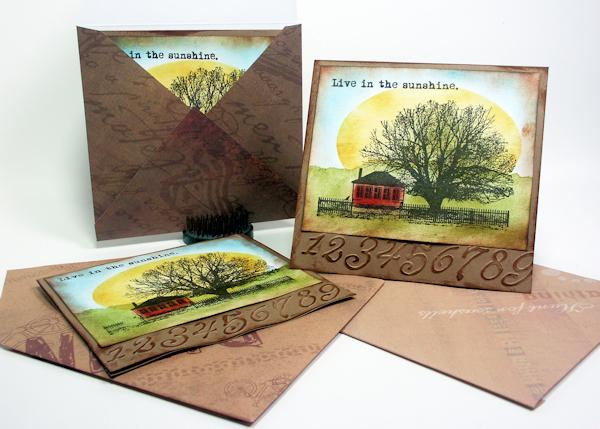
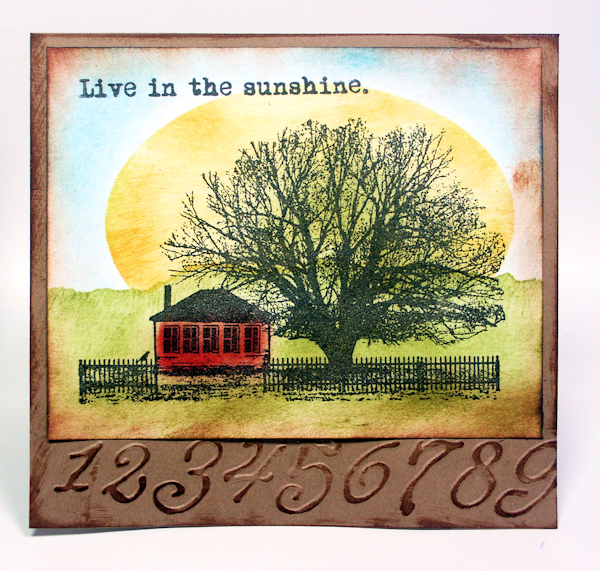
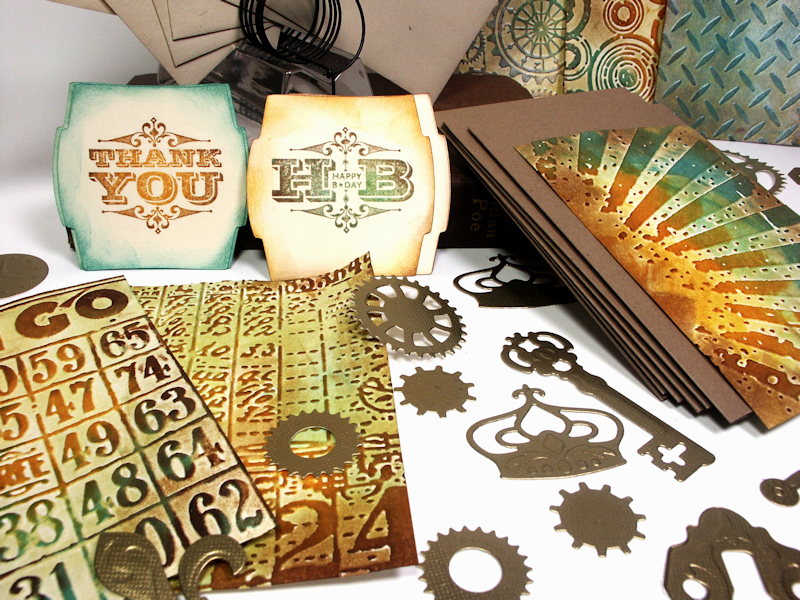
Hi friends! Today we are going to get inky and make a cheerful belated birthday card!

blog_catcard

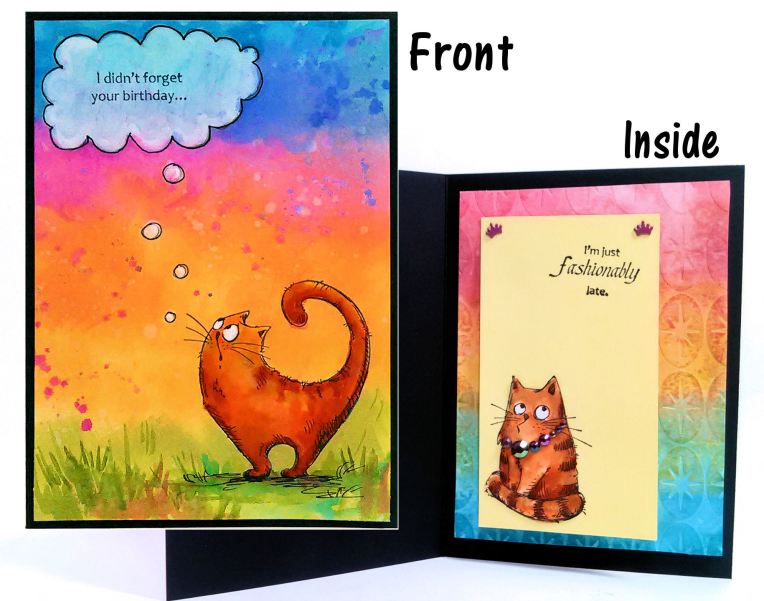
I am really loving playing with my new Distress Oxide inks but you don’t have to have them to make this card, use the inkpads you have and see how they work, even in the effect isn’t identical that’s part of the fun! Crafting would be pretty boring if we all made the exact same stuff. Watch the video to see how this card was put together then try some of the techniques for yourself:)

Supplies from Sponsor Top Flight Stamps (Use coupon code thefrugalcrafter10 to save 10% on your order!)

Other Supplies:

The watercolor I used are not on the market yet but you can get more info here.

I have to admit I feel like a bit of a doofus giving a belated birthday card but the funny thing is I often get told that it’s better than an on-time birthday greeting because it is unexpected and it extends the celebration longer. At least we can still show someone we care even if being punctual is not out strong suit:) Do you send belated birthday cards? Let me know in the comments below and share any clever sayings you put on them, it will help us all out! Thanks for stopping by and til next time happy crafting!

Distress Oxide Inky One Layer Card {Stamp School!}

Hi friends! I had many people asking me what I thought about Distress Oxide ink so I decided to get some and try them out!

oxideblogcard

I will play with them some more and do another tutorial with fun ideas for these but for now I have a few fun techniques in today’s video! I will also share some alternative ways to get this look if you don’t have Distress Oxide inks!

This video is sponsored by Rubber Stamp Tapestry  Use coupon code: LINDSAY17 – 20% off peg stamps and peg stamp sets on orders of $10 or more. Coupon expires July 3, 2017. New stamps are being released soon, sign up for the Rubber Stamp Tapestry newsletter for bonus free projects and fun news! *Please note that unmounted stamps and other craft supplies are not coupon eligible due to their already low everyday price:)

Supplies:

Directions:
1. Make a card from mixed media paper and tape it to a board, mask the borders of the card so you have a window to stamp in

2. Sponge blue and purple ink in window, dry then spatter with water and blot. Let dry.

3. Pounce ink through a stencil with a make up sponge. Also use a sponge and black in to make a frame. Spatter with water.

4. Stamp vines around the edges of the window and butterflies within the window.

5. Accent the butterflies with gel pens and outline the window with black.

6. Remove the tape and stamp flowers and sentiment on the bottom of the card.

7. Ink the bottom of the card if desired.

I hope you try a one layer inky card, even if you don;t have the new distress oxide inks you can use the inks you have to get a similar effect, the more you play with your supplies the more versatile they become! Thanks for stopping by and til next time happy crafting!

Don’t be a chicken, enter to win this stamp!

Hello friends! I do love a good pun! And a good giveaway! Today I am giving away this beautiful stamp from Art Neko. It is the state bird and flower of Rhode Island (OK it should be a Rhode Island Red but I thought it would show up better as a lighter bird, my apologies Rhode Island) and the stamp is on sale for $4.50. I have the complete set of 50 state Birds and Flowers and they are all wonderful, especially if you like to color. It includes 54 ATC sized images that are super detailed and crisp on deeply etched red rubber. It is such a lovely set for anyone who likes nature. In all honesty it is my favorite stamp set.

DCF 1.0

I colored my chicken with my new Spectrum Noir colored pencils. I got to try the Spectrum Noir blending solution too. It is Gamsol (it says so right on the label and it is made by Gamblin for Grafter’s Companion.) I have never used Gamsol thinking it would be just like odorless mineral spirits and it does work just like OMS but there is no smell at all! I could not believe it! That said, keep it away from kids and pets because it looks and smells like water. Usually I prefer to blend with baby oil but you cannot add more pencil over it but with the Spectrum Noir Blending Solution you can continue to layer colors after blending. I used a very smooth cardstock so if you want deeper colors you can use a rougher paper. Watch the tutorial for the coloring demo. If you like to listen to me jibber-jabber while I color for 19 minutes than this video is for you…don’t say I didn’t warn you LOL! Oh, I will show you how to make the card and the distress ink gelato background too so there’s that. Really, sorry about the long coloring video…and the mess at 13 minutes…that said, if you still want to watch the video here you go!

If you want to win the stamp I used and a $10 gift certificate to Art Neko leave a comment below and I will pick a winner next week! Good luck and happy crafting!

Funky chess piece tags and pocket cards!

Howdy Friends!  yesterday was a nice relaxing Saturday. My Husband had a large woodworking project going on in his side (or meager corner) of the basement, my daughters worked on Pearler beads and scrapbooking while watching Once Upon A Time the basement TV and I made bookmarks! All of the stamps used on these tags are from Lost Coast Designs.

DCF 1.0

I think having that show on in the background influenced my work, the creepy trees and full moon in the background…it is a little Big-Bad Wolf/Red Riding Hoodish…

DCF 1.0

I spent a lot of time on these, they are so addicting! The tags are actually quick to make but man, they are like potato chips, you can’t stop at just one! Just be warned, after this video you might find yourself going on a tag making binge!

I decided that I should make a card to house my tags but these tags are big so I grabbed my new Business Envelope Kreate-a-Lope and made an envelope, then I took a piece of 8″x9″ paper, folded in half to make a card. I used a scrap of the paper leftover from the envie to make the pocket for the tag!

DCF 1.0

I love these chess piece stamps from Lost Coast Designs, just when you think you have seen it all in stamping you find a company that has truly unique offerings.

DCF 1.0

A couple of people on YouTube asked me what laminator I used to laminate the tags and it was a cheapie I bought for $18 at ABC Distributing and I got that one because the packs of 100 refill sheets are under $5 a set. You have to pay shipping so I bought 3 packs of the refill sheets when I got the laminator. It works great too, I’ve been using it about a year now.

DCF 1.0

That’s it for me today! If you have any questions on this project of the supplies I used just leave a comment! Thanks for stopping by and til next time happy crafting!

WOYWW: An Inky Week!

I have been having so much fun in my studio this week! From making my cheap homemade version of Goosebumps  spray (Recipe here) to playing with ink and cheap kids stencil brushes:

DCF 1.0

Yep, I got a 15 pack of stencil brushes at Micheals with a coupon for $5 and I went to town, you can see them in the soup can on my desk along with my big ink sweeper, distress ink pads, random backgrounds over-stamped with my lovely new from the stamp show Artistic Outpost stamps and my homemade bottle cap & cosmetic wedge daubers. I love me some homemade supplies. Why am I sharing my desk you ask? Because it is What’s on Your Workdesk Wednesday of course!

DCF 1.0

The stencil brush ink technique is so quick and easy and a great solution for folks who have a hard time getting a smooth blend with foam blenders, have a look:

I also want to mention again how much I lobe my Samsung F90, it is so easy to shoot and share that I can make a quick little tutorial whenever I am in the mood. I’m not endorsed by them or anyone who sells them but I know a lot of you make craft videos too so I’m just sharing my opinion. For me the pause/record feature is what makes it, I can pause the video if I need to let something dry or get something and then resume it so no need to edit it later. I will say that I do not care for the software that comes with the camera, if I need to edit something I use Corel Video Studio Pro. Anyway, here is a close up of the inky card, not bad for 6 minutes eh?

DCF 1.0

So, do you want to see more crafty desks from around the globe? Check out Julia’s blog The Stamping Ground for more WOYWW fun! Thanks for stopping by and til next time happy crafting!

A ‘punky’ gift for a funky friend!

Howdy folks, I hope you had a nice weekend! My husband was on an organizing tear yesterday, he cleared surfaces, assembled shelves, moved stuff around in the basement {not touching my craft-cave of course!} and really made some progress in the house! I decided I am not going to be the “slacker housewife” today and finish up some of the projects that he started. I had the kids put their post-Christmas nightmare of a bedroom(s) in order and my son did such a good job that I offered to sew him some new curtains for his closet (I went on a kick many years ago and removed all of the luan sliding closet doors from the bedrooms-that’s why all of the surfaces in my craft room are made from doors!) He had Thomas the Train curtains that I made him when he was 3…he’s 10 now…ah, definitely time for a change, we went with desert camo, DS and I picked out fabric and I sewed him the curtains and a bolster pillow (perhaps the only camouflage bolster pillow in the world) last night…well, maybe I’m not a slacker housewife after all LOL! 😀 OK you are not here to learn about my prowess as a homemaker, you wanna see some crafty goodness…well, here is a gift set I made for a friend for Christmas:

DCF 1.0

This is an “activity” gift, you see my friend claims that she is not crafty BUT she likes to send handmade cards so I made her a kit so she can make 3 thank you cards and 3 birthday ones.

DCF 1.0

First take a card base and glue on an embossed panel…

DCF 1.0

Then add a sentiment…

DCF 1.0

And a few fancy bits (AKA embellishments) and write your message on the inside of the card and place it in the matching envie!

DCF 1.0

Look, it all fits in the altered box that I created for, and had published in, Just Steampunk 2 magazine:

DCF 1.0

Easy peasy! I know some of you will want to know what I used so here is a list:

Sentiment stamps: Stampin Up

Steampunk Stamps: Inkadinkado (Clear set)

Embossing folders: Sizzix (there might be a Cuttlebug one in there too but I no longer buy products from ProvoCraft-they are on my list!)

Ink: Tim Holtz Distress ink in Vintage Photo, Wild Honey and Broken China

Dies: Spellbinders

Oh, and here is the tag I put on the gift, the build-an-ornament stamp is from Oriental Trading, it is one of their $4 sets.

DCF 1.0

Thanks for stopping by and til next time happy crafting!

I’m a little bit rusty..in a good way!

Hi there crafters! I was in need of a birthday card for a guy and came up with this:


I die cut some gears from cardstock and wanted them to look like metal so I inked them with pigment ink and used copper embossing powder and heat it…but wait? Where is my shiny finish?!? My old embossing powder had tarnished from either age, humidity or both and my gears looked rusty…but wait, I like it!


I even bent the gear in the center to crack the embossing and it flaked off like real rust, score! I never thought I’d be so excited about rust LOL! In case rust is not your thing you can get a metal look too, check out these tags. The one on the left I inked with tumbled glass distress ink and swiped with a gold inkpad (I also tried it with gold powder eyeshadow and it worked great too!) then I inked up an embossing folder with brown ink (the side that will face the right side of the tag) and ran it through my big shot. Since the tag was damp with ink I quickly dipped it in clear embossing powder and heated it for a glassy shine. Since I used some gold ink it look rather metallic but to enhance the effect you can use more metallic inks, it is all up to you.


To grungify the tag on the right I did all the steps as the other tag then brushed some acrylic paint over the raised area and sprinkled my tarnished copper EP on top. I heated it and the paint cracked and the EP got all rusty, overall a great old distressed look I think!

I guess I won’t be throwing away my old embossing powders after all 😛 Thanks for stopping by and til next time happy crafting!

Buy new or make do? {I think you know the answer!}

I have been drooling over the new Tim Holtz Distress markers since I saw a video of him demonstrating them at CHA. I really WANT them but I don’t NEED them with all of the supplies in my craft room. So I was brainstorming a way to try some of the techniques that he does with the markers with something else. I have other brands of water-based markers and while they are great for coloring the rubber and stamping with they don’t blend like watercolors (or the new TH markers) but then I remembered my well loved watercolor crayons! I love the result! BTW if you do not have watercolor crayons you can use watercolor paint and a brush to do the same thing!

If you want to learn how I made this card and stamped with the watercolor crayons check out this video. You might want to click on the fullscreen button to see more detail. Please note, I moved my water bucket out of the way but I still dipped my crayon on the water each time I colored with it. I just didn’t think it was fun looking at my nasty water bucket for the entire video 🙂

I used the sketch at Oriental stamp Art to make my card. BTW, if you want to join a wonderfully supportive stamping group and you happen to like Asian art you should check out the Oriental Stamp Art Yahoo Group. I love the window, it is a fun touch, I love how it reveals a surprise on the inside. I stamped and blended with my watercolor crayons and then stitched a layer of vellum over the inside panel, filled it with glitter and stitched the rest up. I used double stick tape to adhere the panel to the inside of my card so the stitches wouldn’t show.

I hope you enjoyed the video and you will see what you can do with the supplies you already have:)

BUT, if you are itching to spend some money you can check out the 50% off sale I have in my shop now through Saturday (nice segue huh?) Thanks for stopping by and til next time happy crafting!

DIY “Distress” Stain!

OK, I have been keeping way too clean this week with the knitting so today I just had to get inky and make my own version of Distress Stain. Here is my first project with my homemade stain:


The only thing you need to get to make the stain is the bingo-dauber top bottles. If you play bingo you might be able to reuse actual bingo daubers but I don’t so I found this set of 12 dauber top bottles at Oriental Trading Company for $7.50, they are good quality and refillable! I also got their mini mister bottles that are wonderful and half the price of the ranger ones. I just did not want to recommend either of them until I had the chance to use them but they both get 2 big thumbs up from me! 🙂


The homemade stain is so easy to make and you can use the supplies you already have. Simply fill the bottle 2/3 full of water then I added some cheap student grade watercolor paint in it. I used a whole tube per bottle but the paint was cheap: $7 for all 12 paint colors. Try the Reeves brand, they have it at AC Moore. But you could also use reinker, gouache, liquid watercolors or even fabric dye! I actually used a bit of reinker to adjust the colors a wee bit. 🙂 I will say that the student watercolor paint will not stain your hands like reinkers do!


You can see how vibrant the stain is I made. Since I used a tube of cheap watercolor in each bottle the color is semi-opaque (cheap watercolors are more opaque than artist grade due to the chalk filler they use but still, the paint will not fade as dye or ink is wont to do.) If you want a more transparent stain stick to reinkers or dye. I love how you can scribble on the color like I did under the sentiment or smack down the tip on the paper for a starburst effect like I did on the background paper. Yep, I got good and inky today! 

You can also use this to dye fabric, ribbon, crochet flowers…you name it! I have some other cards I’ve been working on with these stains and I’ll share them with you later, til then happy crafting!