Hi friends! Over the years I have posted many DIY stamping ink recipes and tips for reviving dry ink pads. I decided to put them all in one blog post/video so you can bookmark it and refer back to it if you end up running out of ink in the middle of a project and need to make some fast!

Keep in mind the best practices for keeping your ink pads in good working order is to use the appropriate reinker so I make sure to have a reinker for any inkpad I rely on. For those other inks that I am not married to I’m fine making my own ink. Sometimes a company doesn’t even offer a reinker or they discontinue a color and you can’t get one so this blog post can help you in those events too! Watch the video for a demo of all of these inks. You can find the written recipes below.
Sponsored by Lava® Soap. Find Lava soap at Walmart, and other fine retailers. Visit Lava® Soap to learn more and find a store near you. For money-saving coupons click here. Follow Lava Soap on Facebook for more tips on how to clean up after craft projects.
Protect your workspace! I use these super cheap teflon mats than can be cut up to convenient sizes. You get 3 huge ones for $7. They are $25 each or more at the craft store!
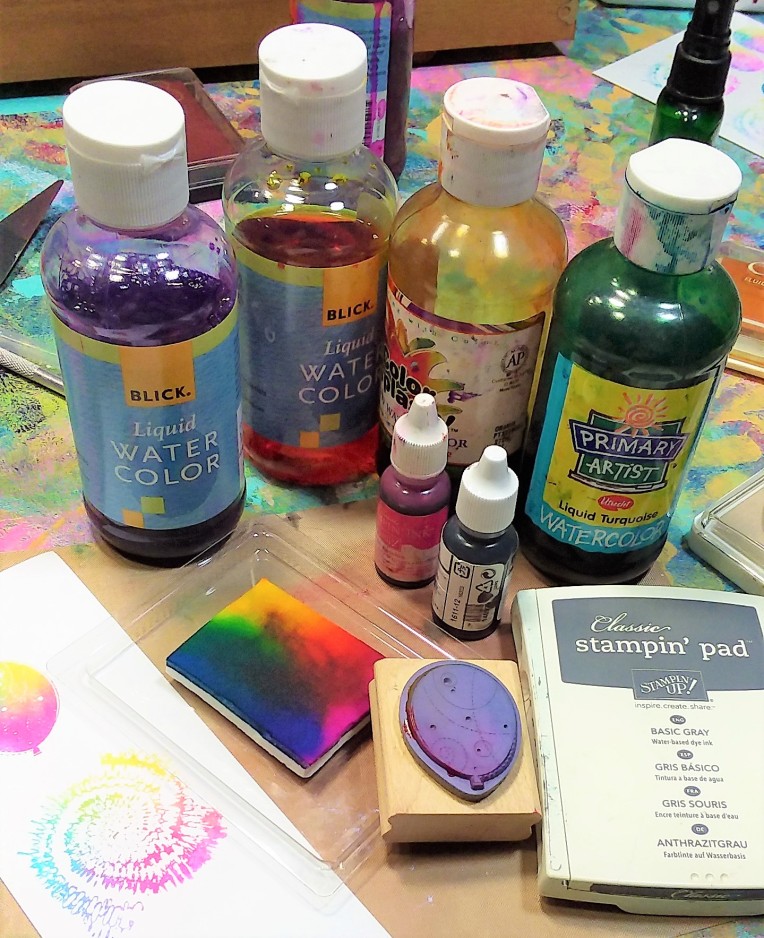
Reinking a dye based ink pad. I have to say that for dye ink pads that adult stampers use your best bet is to buy a commercially prepared reinker. Most dye based pads are similar and you can cross brands. I have used Stampin Up reinkers to ink of other brands pads with no issues. In fact many popular companies all have their inks made by the same company. I like juicy ink pads to I keep adding ink to my pad until it stops absorbing ink.
DIY Dye Based Ink Recipe:
Directions: For children’s ink pads mix liquid watercolors to desired share and drip on ink pad.
For adult stampers ink pads add 1 drop glycerin to every 2 drops liquid watercolor (mix to achieve the correct color) and apply to inkpad. If the inkpad stamps splotchy or seems to juicy leave uncovered for a few hours and do a test stamp. That will allow excess water in the watercolor to evaporate.
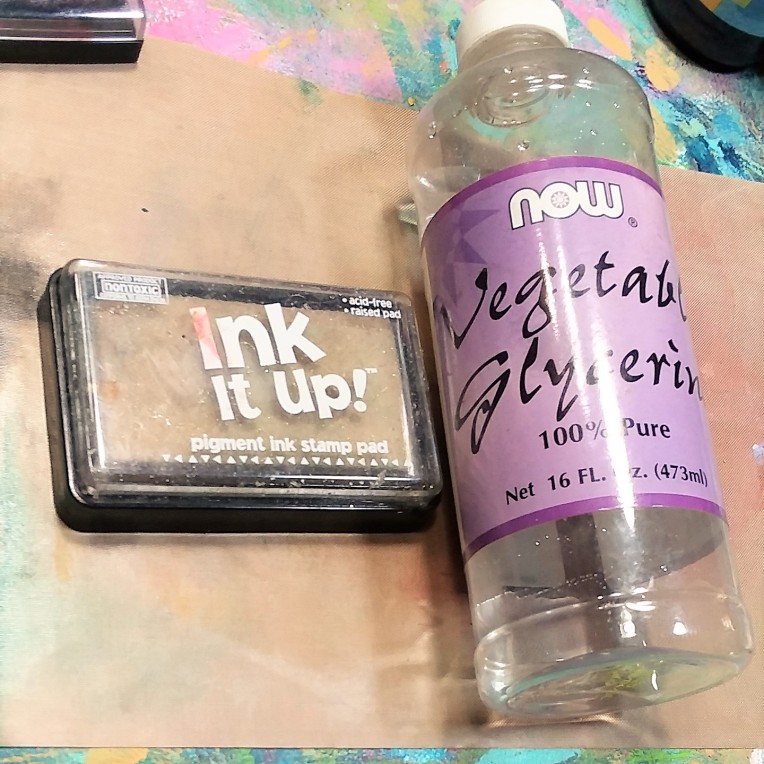
DIY Embossing ink: Glycerin *Use in pace of embossing re-inker

DIY Ink Refresher: Fill a 4oz spray bottle with water and 1 Tablespoon of glycerin, shake and spray on dried out dye ink pads.

DIY chalk ink:
- Drugstore Isopropyl Alcohol or distilled water (in a spray bottle)
- Chalk pastels
Directions: Spray some rubbing alcohol (or distilled water) on a teflon mat and scribble the select colors of pastel chalks to match the inkpad you wish to reink. You will make a cream consistency slurry or ink. Use your chalk inkpad to sop up the ink. Easy peasy and with 64 colors in the $10 chalk set you probably won’t have to mix colors!

DIY Ink Pads:
- For Dye inks you need Cut and Dry Felt (more expensive on Amazon)
- For pigment or chalk inks you need Cut and Dry Foam (more expensive on Amazon)
- A shallow container such as clamshell packaging. *I used 2 lids that Rubber Stamp Tapestry peg stamp come in and hinged them together with washi tape:)
Directions: Cut the felt to size and ink up with the appropriate ink!
*This is great for making custom rainbow and ombre inks. For a disposable option you can add reinkers to a baby wipe.

DIY Pigment ink:
- Gouache paint (opaque watercolor)
- Glycerin
- A palette knife or spatula for mixing
Directions: Take a pea-blueberry size dab of gouache and add 5 drops of glycerin, mix well with a palette knife and apply to dry pigment ink pad. If the ink feels too thick spritz with distilled water or drugstore alcohol.
*For metallic ink use metallic gouache or Pearl Ex (see below)

Pearl-Ex Ink pads:
- Pearl Ex mica powder
- Glycerin
Directions: Add ½ teaspoon of pigment powder to the ink pad. Drop on 10 drops of glycerin on top. Spread out with an old gift card. If it feels to dry spritz with alcohol.
*This will also work for old Mica Magic Ink pads, this is great on black paper!

Staz-On Ink refresher (alcohol ink pads)
Directions: Apply to dry or sticky stazon pad. I use about 15 drops and let sit an hour before using. If your inkpad is used up you will get a faint impression but if it is just dried out this will reconstitute the ink. I alternate using Staz-On Reinker and Denatured alcohol because if you get too much reinker on the pad it feels sticky. *You can also use denatured alcohol to revive dried up alcohol pens. Do not spray apply denatured alcohol!
I hope you found this compilation of recipients useful! I had a couple of people ask me about DIY hybrid reinkers and honestly I couldn’t tell you because I don’t use hybrid ink pads. I have nothing against them, I just already had lots of pigment and dye inks by the time they became popular. They are fast drying and fade resistant, I reckon you could use gouache and equal parts glycerin and distilled water (or drugstore rubbing alcohol) to reink them as you want a thinner pigment ink essentially but as I mentioned before if you really rely on an ink pad (especially a color you stamp outlines with and them color with wet mediums) I would get a reinker but if you are just going to trash it when it runs out then give the homemade version a try. I also got asked about Distress Oxide Inks and I actually bought the full set of reinkers and pads for the first 24 colors because the pads can be used up quick and I use it like paint direct from the pad. For those if I had to guess I’d mix liquid watercolor and white gouache. I have a faux distress oxide look tutorial here if you care to try and not buy:)
Don’t forget to use Lava soap to clean up your hands afterward! Happy crafting!

Thank you so much for sharing these. That took alot of work . This helps so many that are on a tight budget.
LikeLike
I usually save your videos to watch later but this one is absolutely great! I have lots of old Stampin Up pads that may be dry by now and this will help with them a lot. This has been a wonderful help.
LikeLike
Thanks Emilie!
LikeLike
The link doesnât work!
Sent from my iPad
>
LikeLike
Thank you Lindsay! This was interesting and a totally helpful video. Then again, which of your’s aren’t. Talk about saving money, WooHoo!! I never thought of the lava soap, I have some here at the house too for greasy, grimy stuff. Another money saver.
LikeLike
Hi there’ I am trying to sign on for the water color class. Can it be viewed when i have time?
Sent from my iPad
>
LikeLike
Yes, you have lifetime access:)
LikeLike
Did I hear you say you were trying to create an alcohol lift ink? I have seen how it can be used with alcohol ink to create some really lovely looks, but the inks are ridiculously expensive without paying for something else to achieve the look. I think it was around the time you introduced the pearl-ex pads, but it went by real fast!!! Thanks for putting all this in one place. I started with pigment ink pads, and still love them, but still lean that way BECAUSE I saw you make the gouache refill. They stamp beautifully, and the colors are amazingly simple to do. (This from a zero art background, now loves playing with mixing colors!!) BUT: you just made it harder to give up my blick liquid w/c’s.
LikeLike
Yes, hand sanitizer works as a lift ink:)
LikeLike
I bought glycerin from the drug store. Does that work?
LikeLike
yes:)
LikeLike
Thank you for following up!:)
LikeLike
How do you make liquid pearls like nuvo pearl drops?
LikeLike
I’d use hot glue and when dry dust them with mica powder or nail polish
LikeLiked by 1 person
I really learned a lot from you, thanks!
LikeLike
I have a lot of Stampin up Craft ink pads that are dry and you cannot get reinkers for them. How would you refresh them?
LikeLike
gouache, glycerin and a bit of water
LikeLike
Can deatured alcohol be substituted with 91percent isopropyl alcohol to revive my ink pads? Thanks
Sally in NH.
LikeLike
Distress oxide ink stain I meant to say, whoops! The excitement I had to share it must’ve lead to the typo, hee hee!
LikeLike
Oh my gosh thank you!!! I figured out how to do a faux DISTRESS OXIDE ink stain look too (have not yet seen your link that clicks to Lindsay’s version yet-so here’s to hoping I don’t make too much of a fool of myself.) but stamp or spray some DISTRESS ink on paper, then add water, then her resist spray and sponge or smudge! I tried it in the rusty hinge color and it works! Didn’t work with black soot color.
LikeLike
I LOVE this woman’s creative brain! Seriously, she is a crafting goddess/guru because of her talent, creativity, and zippiddy-do-da-day attitude! Lol I just now tried out her resist spray and it’s works! Though I see a difference for me when I circular rub sponge it and pat down sponge it. And in a “happy accident”, I made a pretty close oxide distress look!! I added 1 tblspoon extra of the glue to her resist because I substituted for modpodge matte instead. So all I did was ink the paper directly with the stamp, or use refill ink drops, or the spray stain. Then spritz with some water to make it runny, then spray resist it as much as you need it as the magic will happen on its own semi-dry to dry. But depending on the paper-if you sponge it it’ll rub some paper off. Can’t say it right, sorry. I tried it in rusty hinge (and it worked!) And black soot (didn’t look like it worked right but not sure) I’m so excited to share it in hopes that the wonderful Lindsey will figure out how to perfect it because I can’t remember which of the ways I tried worked so I hope she’ll see this and show us how to make our own distress oxide inks, please girl!! But I’m pretty sure the bottles are water, ink, and resist spray stuff in it, those secret recipe hoggers at R…. Lol
LikeLike
Thank you so much for this recipe share and the resus one! (Sorry if repeat messages are seen, my phone screen is cracked terribly from accident by baby) I LOVE this woman’s creative brain! Seriously, she is a crafting goddess/guru because of her talent, creativity, and zippiddy-do-da-day attitude! Lol I just now tried out her resist spray and it’s works! Though I see a difference for me when I circular rub sponge it and pat down sponge it. And in a “happy accident”, I made a pretty close oxide distress look!! I added 1 tblspoon extra of the glue to her resist because I substituted for modpodge matte instead. So all I did was ink the paper directly with the stamp, or use refill ink drops, or the spray stain. Then spritz with some water to make it runny, then spray resist it as much as you need it as the magic will happen on its own semi-dry to dry. But depending on the paper-if you sponge it it’ll rub some paper off. Can’t say it right, sorry. I tried it in rusty hinge (and it worked!) And black soot (didn’t look like it worked right but not sure) I’m so excited to share it in hopes that the wonderful Lindsey will figure out how to perfect it because I can’t remember which of the ways I tried worked so I hope she’ll see this and show us how to make our own distress oxide inks, please girl!! But I’m pretty sure the bottles are water, ink, and resist spray stuff in it, those secret recipe hoggers at R…. Lol
LikeLike
Thanks very much for these recipes. I came by them by mistake at a time I really need them. Cheers!
LikeLike
Thank You for sharing your knowledge
YOU ROCK
LikeLiked by 1 person
Thank you so much! Im new to stamping but I want to do a big Surface and as cheap as possible that will look right 🙂 you answered everything I was wondering about and so much I didn’t even know was possible, thanks for your effort
LikeLike
I apologize if I am being dense, but what is the recipe for ink refresher? One post says 2 drops to 2 oz water, then 1 tsp to 4 oz water and another says 1tbsp to 4 oz water. Help!
LikeLike
its really not specific but I would do a teaspoon of glycerin in a 2oz spray bottle of water
LikeLike
Will these work on SOLVENT ink pads like Staz-On?
LikeLiked by 1 person
you can use denatured alcohol to revive them if dried but I reacommend buying staz on reinker as it is thicker
LikeLike