Hi friends! It’s a snow day in my part of the world, who wants to stay home and paint? We will paint this vintage light bulb. I painted it originally this summer during World Watercolor Month and I had many requests to do a tutorial on it so here we are!
Class News!
I am adding 3 new ornaments to the Hand Painted Holiday Class this week! I am also putting the class on sale for 40% off (it’s already my most affordable class, Regular price $39, sale $23.40) Use the coupon code 40OFFNOV22 if the discount doesn’t appear automatically *Offer ends 12/4/22 (If you have bought this class in the past you will find the new lessons in your account later this week, no need to rebuy!)
Derwent Chromaflow pencils: *There is a good sale on these on Amazon at the time of posting! *BUT* I found a better deal at Blick, use coupon code v22d2 to get the Derwent Chromaflow 72 set for $77.50 and free shipping (sale price is $93 but the discount is given when you add the coupon code! Other things are probably less with that code too, I found it in my sale catalog) You also get a free e-gift card if you spend over $50 with that coupon code!
Please feel free to use whatever watercolors and colored pencils you have for today’s project. It is fun to grab some weird ones from time to time to play with tho. See you at noon! Happy crafting!
Hi friends, I had a lot of requests to do a tutorial of this vintage pocket watch I painted during world watercolor month so here we are! Here is the reference photo I took with a strong shadow. The shadow is what really inspired me!
We will draw together but feel free to print this out and trace it if you are not comfortable drawing it (I promise I will break it down easily for you tho.) Here is the painting from my sketchbook:
You can watch the live broadcast or the replay in the player below. If you want to chat live or ask me questions be sure to tune in at 12 noon ET today on the YouTube watch page.
Supplies (affiliate links used)
I recommend having some granulating watercolors to make the shadow interesting, I used Masha’s watercolors on ETSY. These are beautiful but pricey, you can use any granulating colors you have for texture, look for ultramarines, cobalt, and mars colors.
I am so excited to visit with you live today! If you plan to catch the replay, don’t worry, I don’t dilly-dally on my lives and I answer Q&A in designated blocks that you can skip if you just want the painting tutorial. It’s the best of both worlds! See you soon and til then happy crafting!
PS: 50% off Launch Special on my new class Alcohol Marker Workshop *Use coupon code MARKER50 if the discount doesn’t apply automatically. *Offer ends 11/30/22
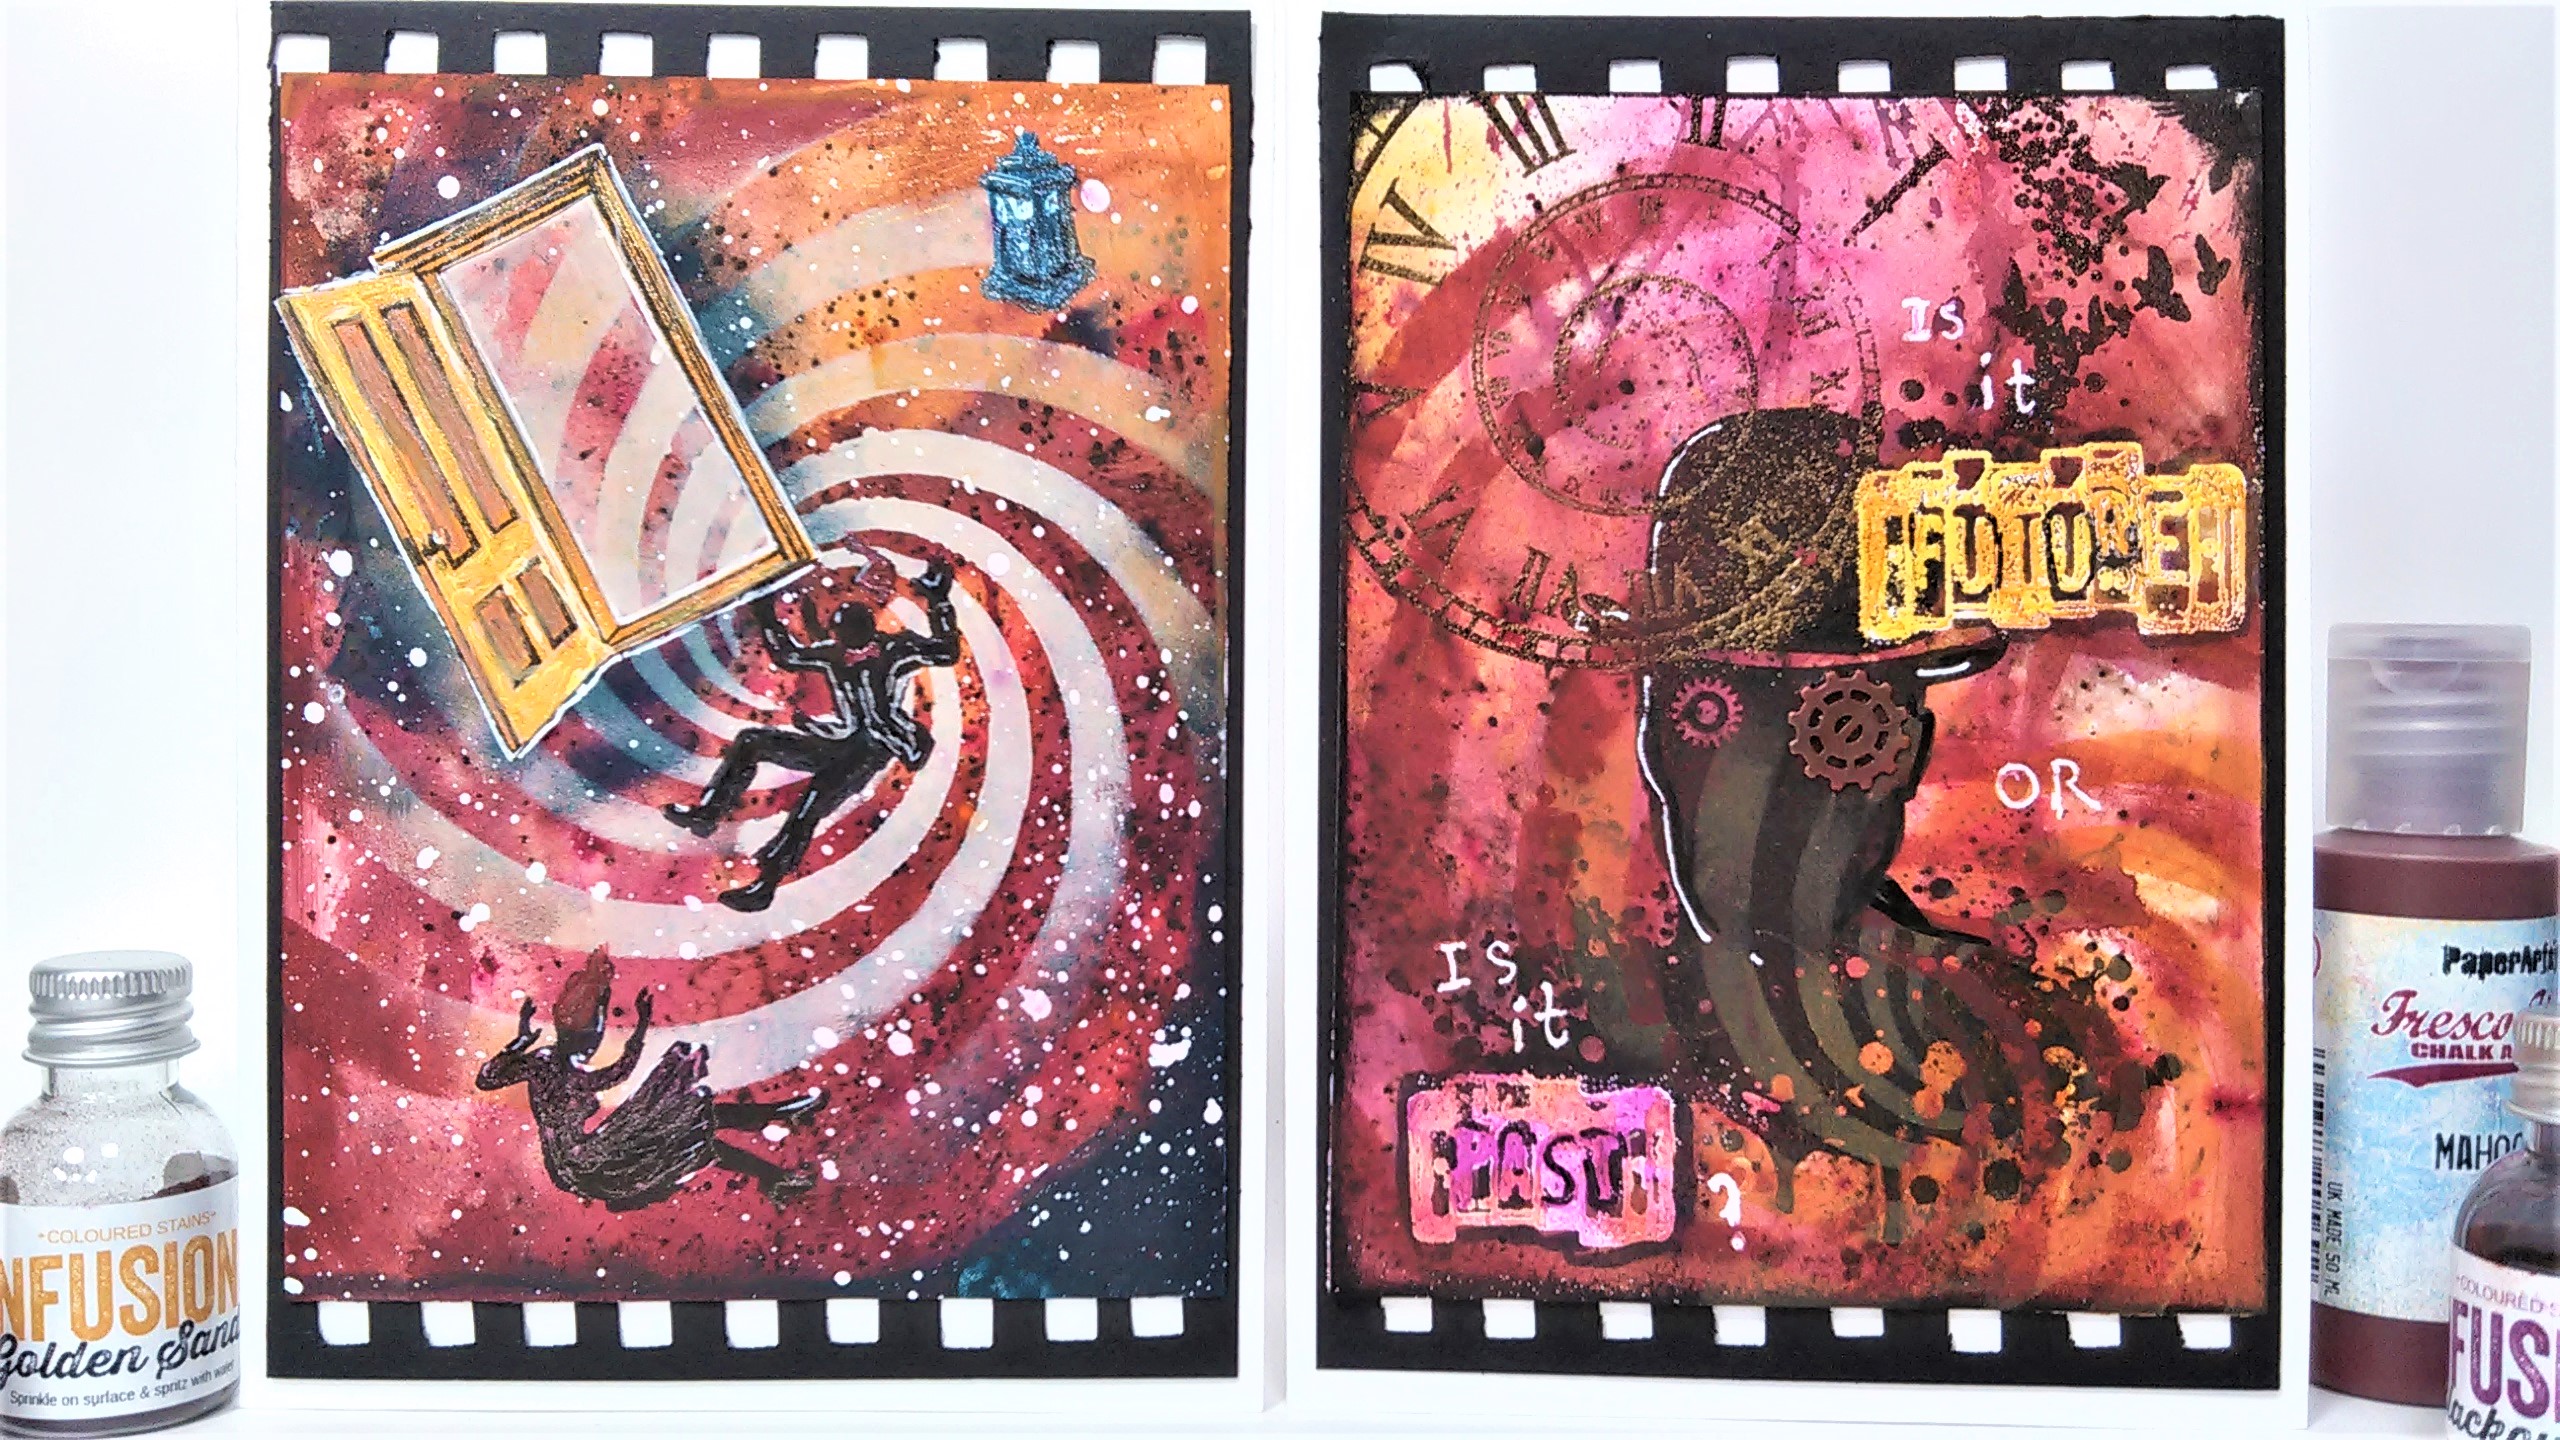
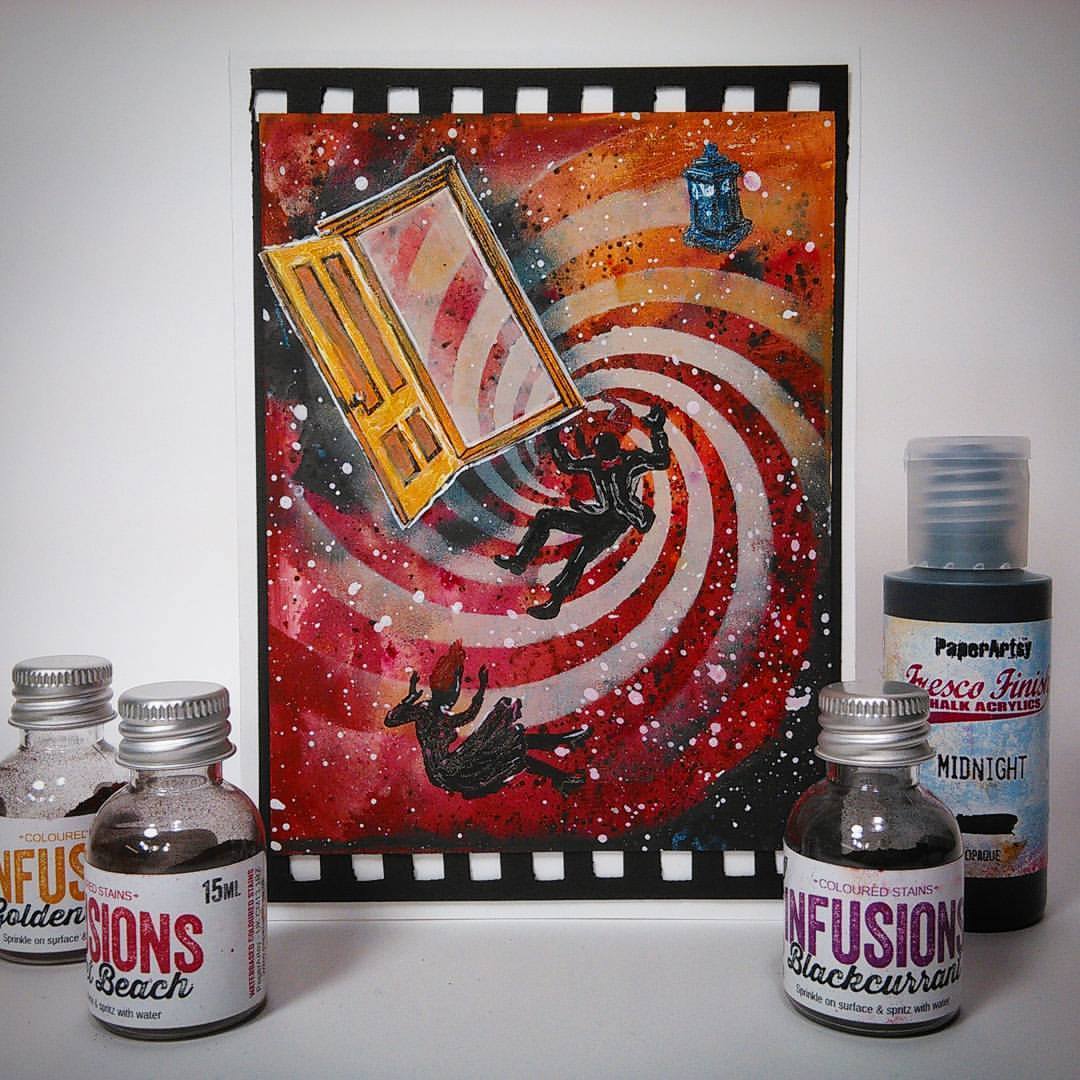
Hi friends! I totally realize that these specific cards are for a very limited audience but you can use the techniques and ideas to make other cards too!
I didn’t know what I was going to create when I set out my supplies but I sure did have a good time playing! It takes longer to create in this manner but that’s how you learn, grow and discover techniques that you will able to efficiently use on your future cards. Feel free to binge watch your favorite TV show while you create for inspiration!
On the inside of this card you could write: “Geronimo! Now off to your next adventure!” and use it for a retirement or graduation card. I dipped into some older stash to mix in with my new supplies for this card, namely gel pens and Paper Artsy acrylic paints. I really enjoyed using the matte acrylics because it allowed me to stamp and use gel pens on top. I think it is the glossy plastic-like surface that I don’t care for in other acrylics but I really like the matte finish ones. I need to make a not of that. I wonder if there is anything I can add to the other acrylics I have to degloss them. If you know of such a thing let me know in the comments! We can learn together! Now, without further ado let’s watch the tutorial!
Video!
This tutorial is sponsored by Top Flight Stamps! SAVE 10% off your next order with coupon code: thefrugalcrafter10 *USA orders of $50+ ship free!
Hi friends, today I have acard background recipe for you: Distress Oxides + Color Burst + Gesso = Fun Inky Cards! It is so easy to fall into the “gotta have its!” when we see a new product that we jump in and buy a complete line before we take the time to think if it really suits us or if you have something already in your stash that will do the same thing. Many expensive mistakes can be avoided if we build our collection slowly and exhaust the possibility of a supply before trying something else. By proceeding in this way we can avoid the overwhelm of being confronted with a room full of media we don’t know how to use. Also we can avoid the regret that comes from spending money on a full set of something that we really don’t like. We all know how hard it is to let go of something we paid a lot of money for right? So with this theme in mind I want you to use what you have to create these fun inky backgrounds today. If I am using something you don’t have, find something similar. If you want to try the exact stuff I am using (like a Distress Oxide ink pad or gel printing plate) just try a couple of your favorite colors and see how they suit you rather than the entire line (trust me, they will be there when you decide if you like them or not.) I can hear the protests already “But it’s a better deal if I buy the entire set and if I end up buying the whole set then I’ll have two duplicates!” And yes, that is kind of true if you are really going to use every color, but more often that not you will probably only love half the colors in a line so why buy ones you won’t use that much? You are spending extra money, space and time to maintain these things. If you buy a complete set you might not bother to see how they work with the supplies you already own For instance the Distress Oxides work great with regular Distress ink and I’d never know that if I wasn’t limited in colors and wanted brighter hues. Full disclosure I ended up collecting the entire line (by purchase and gift) because they really suited me. I am waiting to buy reinkers until the pads are used up to make sure they still add value to my creative process. I think we all face the “fear of missing out” and we buy in a state of panic that we won’t be able to get something because it will be sold out or become more expensive but let me tell you if it keeps selling they will keep making it!
Speaking of fear in our cardmaking…If you are afraid when you create you will be leery of wasting supplies. We tend to collect and hoard and then we become overwhelmed or even worse we forget what we have. The gel printing plate I am using today was a “had to have it, yet to use it” item I bought when it first came out. Why have I been saving it? You can’t use it up. I put it in a drawer safe in the knowledge that I can access it whenever I like but never did. Crazy huh? Just think of the treasures we could find if we just shopped our stash! In today’s video I am going to show you how to mix up supplies and make interesting artsy backgrounds and also how to look at your rubber stamps in new ways to increase their versatility, I hope you play along!
Video!
This video is sponsored by Rubber Stamp Tapestry use coupon code: FRUGALAUGUST17 – 10% off everything in the store. Coupon expires August 31, 2017. Become a Peg Stamp VIP & get an instant coupon for 20% off RST stamps here plus the deepest weekly discounts available! Offer expires August 31, 2017.
Directions: Watch the video and then grab the supplies you have and make some ink backgrounds! Don’t get overwhelmed, just have fun! After all, it’s just a piece of paper!
5 Do’s & Donts for inky backgrounds!
1. Do try making backgrounds using the supplies you already have. If a new product peaks your interest try one or two colors before purchasing the whole set to see if it suits you.
2. Don’t worry about making a mess or wasting supplies. You can use cheap white cardstock cut into quarters for your inky backgrounds. Then trim and mount the great ones to cards made of heavyweight cardstock.
3. Do use lots of adhesive when mounting the inky papers. You can even weight it with a book if it wants to warp.
4. Don’t overlook the cool stencils in your stash, you don’t have to use polka dots, take the idea and make it your own!
5. Do trusts your instincts and pick colors and images you like because it’s your art after all!
I realize you may think it’s funny that I am urging you not to go crazy over-buying supplies on a sponsored blog post but I love this hobby and for it to be sustainable we need to find value and get use from the products we buy. If we stock up but never use these treasures it is a total waste. We need to pace ourselves and learn what our own style is (not what the cool crafters on YouTube are doing) or we will end up with drawers full of supplies that we don’t really like. This blog post and video was inspired by some critical comments on my YouTube channel where some viewers complained about the colors I chose for various projects. It’s easy to swap a color for one you prefer and I want to give you permission to do that, or use a whole different product all together. You don’t need to copy a project exactly for it to be good or meaningful, in fact it’s better to add your own style and spice to it! Vive la différence! You do you and it will be fabulous! Thanks for taking the time to read though my long pep talk (rant?) and as always continue the discussion in the comments below. I am really enjoying our conversations lately! Have a great weekend and til next time happy crafting!
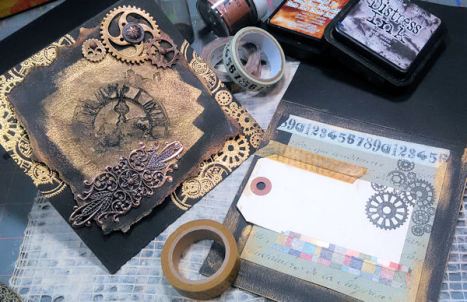
Hi friends! With Father’s Day right around the corner I thought I would make a card that would be suitable for that occasion AND give you a chance to win the stamps I used from Art Neko! Just leave a comment and I will draw a winner next Wednesday!
Watch the video for lots of fun techniques!
Video!
Today I am using stamps from our sponsor ArtNeko! *Save 10% off your next order of any size or get free shipping on orders over $50 (whichever discount is greater you get!) just by mentioning thefrugalcrafter!
Supplies:
Stamps Steampunk Fun (Art Neko) *Currently on sale, $5 off!
Pigment ink (black, gold)
Dye ink (Black)
Acrylic paint (black)
Gold embossing powder
Black cardstock
Washi Tape
Shipping tag
Pattern Paper
Charms (gears and filigree)
Heat tool
Follow the direction in the video to stamp in molten embossing powder to create an engraved look. Don’t forget to leave a comment for a chance to win these fun stamps from Art Neko (don’t worry, if you already have them or decide to buy them while they are on sale you can pick some different stamps if you win:) Thanks for stopping by and til next time happy crafting!
Howdy friends, wow, it has been super busy here! I have so many projects in the works but none completed right now so I thought I’d share these quick tags I made using dies from Cheery Lynn Designs:
I cut the steampunk shoe out of 3 colors of cardstock and pieced them together on text paper and there they sat in a pile for a month. While cleaning last weekend I found them again and put them on a tag. There. I finished something. Now I feel quite virtuous. So, go ahead, finish something! It feels so good! Thanks for stopping by and til next time happy crafting!
Howdy friends and happy Veterans Day! Today I have an exciting giveaway for you from the fine folks at Green Sneakers. Whenever I host a giveaway I always hope the person who wins really likes their prize, well I won’t have to worry this time because you get to pick your prize! How cool is that? Go to Green Sneakers and find 2 templates you would most like to win, then come back here and leave a comment mentioning your picks. If I draw your name next Monday you get the templates you chose. Neat huh? Perhaps you would like to win the A2 Kreate-a-lope and Portfolio templates I used in my tutorial today:
…or maybe you want something completely different. It is up to you! And to sweeten the deal they are offering a 20% discount to any of my readers who want to place an order! Use the code Lin20as many times as you want between now and November 21st. Please note: You must log in and use the coupon code to see the 20% savings.You can tell your friends too and make sure they come by for their chance to win or use the coupon to get a head start on Christmas shopping! Check out their kits and specials for additional savings. Alright, now for a video tutorial so you can see these wonderful templates in action:
I think these DIY card kits would make a fabulous gift or craft fair items. It is also a chance to use some of those embossing folders we crafters tend to collect…or is that just me? I think I will make some in wild bright primary colors (hubby’s idea) for children’s cards and some with more sentiments. I am considering taking special orders for these and bringing them to my next craft fair, I think they are a super gift (but I don’t want to sell out of my stash because I plan on giving some too!)
You could also use the portfolio to make a painting studio on the go, put a small palette of paints and a waterbrush on one side and cut watercolor paper on the other, instant art studio!
Use this idea with the supplies you have in the colors you like. I’m sure you can make a perfect stationary set for anyone.
So, to recap: Visit Green Sneakers and check out the goods, leave a comment on my blog letting us know what TWO templates you want if your name is drawn. That’s it. Easy Peasy. If you feel the urge to shop use the coupon Lin20 to save 20% on your order. This contest is open to U.S. residents only, sorry for any inconvenience:) Good luck! Thanks for stopping by and til next time happy crafting!
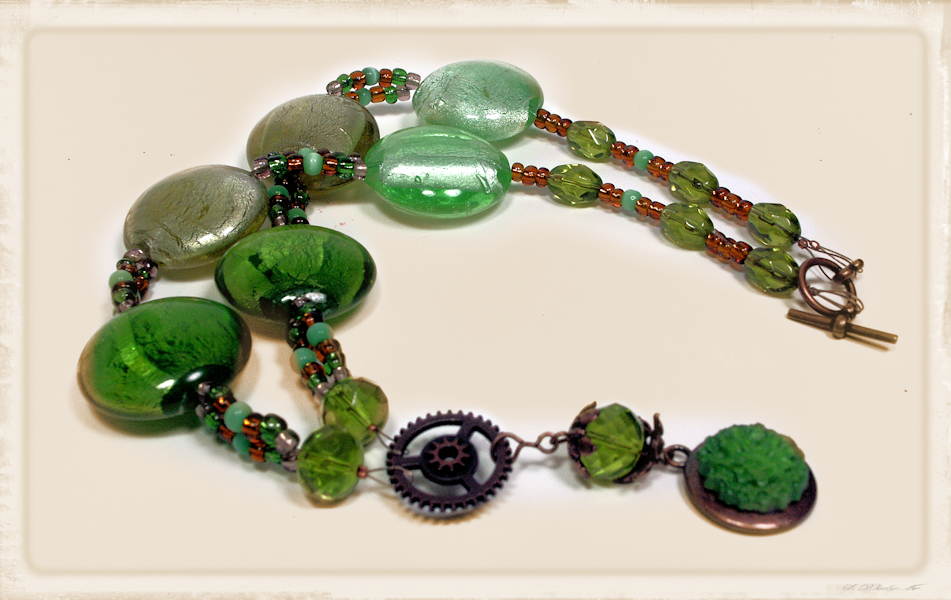
…and it’s probably because I wore this heavy necklace the last two days:
Usually when I make a chunky necklace I mix in some acrylic beads to cut down on the weight but I had these gorgeous foil glass beads that I wanted to use and I like the repetition of them all together so I threw caution to the wind. The flower focal drop I made from resin, it was an ugly speckled white because my white paint I colored the resin with did not mix well so I painted it green. I enjoy olive green because it seems to flatter so many skin tones.
I call it elegant steampunk…and heavy…really freaking heavy…
It’s still pretty though, but I think I will only wear it for short amounts of time and not all day again. That’s all for today! Thanks for stopping by and til next time happy crafting!
Howdy friends! I hope everyone in the states is enjoying a nice Labor Day, I am hoping the weather clears up so we can take the kids to the fair, I think it will, positive thinking right? The other day I was playing with a bunch of the resin pieces I had previously cast. I really liked the green frame I made in the Martha Stewart Mold and wanted to make a pendant with it. I did not want to drill holes so I tried some wire wrapping:
I have to say that wire wrapping resin is much easier than wrapping glass or stone, it has a bit more grab to it. I also wrapped the earrings:
I used 20 gauge copper wire for the weight bearing wraps and accented it with a lighter 24 gauge wire for interest. I made the top loop of the pendant 2 wraps thick for added strength.
To get the jade appearance I added a pea sized dab of light green Liquitex heavy body paint to 1 oz of resin and a small scoop of gold pearl ex. Add this to the resin before the catalyst so you have time to mix before it hardens. If using polyester resin as I did add an extra drop or 2 of catalyst to compensate for the moisture in the paint. After you unmold it file off any rough spots or overfill with a nail file. Dust with peal ex if desired. Follow up with a coat of water-based clear sealer like Future Floor Wax or Mod Podge and let dry before making the jewelry. The sealer will bring back the shine lost when you sanded the edges and lock in the extra peal-ex. Also, sometime polyester resin remains tacky on the side exposed to the air so the sealer will remedy that as well. The three dark green beads directly under the frame were made by recycling stained glass remnants and working them with the torch! I love recycling! Just a note, if you are lamp-working with stained glass remnants do not mix them with the Italian rods because they have a different EOE.
I really like the effect of the colored resin to mimic stone. It is really fun to work with and it gives you new options for the clay molds you have hanging around. If you have any questions please leave a comment and til next time happy crafting!