Studio Tour & Craftsy Class Launch!

Hi Friends! Wahoo! Today is launch day for my class at Craftsy! It is so cool to see 4 months or work finally come together! The class is called Mix it Up Mixed Media Step-by-Step and I get to give all of my blog readers a 50% discount on the class! Just click the link in this post to get the discount, if you go to Craftsy and look up the class it will be full price ($29.99) but because you are the most awesome, supportive people ever you get the class for $14.99 and you can be the first to take the class! Oh, and I have a winner to announce from the random drawing for a free spot in the class, drumroll please … it’s Stephanie Drury!!! I sent you an email with your prize so check your SPAM folder if you don’t see it!

titleCard_10621

So after I got back from filming in Denver I had so many ideas on how I could improve my studio for filming, it is a work in progress but so far it is working out well. We all have different stuff and take part of different hobbies but hopefully it will help you get some storage and workflow ideas to fit your needs.

Studio Tour Video!

What are your best storage ideas? I’d love to hear them in the comments below. Don’t be afraid to move your room around and try different storage ideas. My room is a work in progress, as my interests change I want to have different supplies within reach and that’s OK! The worst thing you can do is expect your room to perfect and static, give yourself permission to change what doesn’t work AND to do what is right for you. We are all different and have different needs so out craft rooms will be different. I hope you got a few ideas that will work in your space or at least you have a video to show your husband to prove that you are not a crazy craft horder, or at least you are not as bad as me LOL!

Thanks for stopping by, thank you for having a look at my new class Mix it Up Mixed Media Step by Step (and don’t miss out on the 50% off deal!) I’ll have a new pastel tutorial for you tomorrow, til then, Happy Crafting!

10621_728x90-69f3487a-a83b-4bcf-8da9-19bb6fe4b711

DIY Washi Storage Solution!

Hi friends! Show of hands, how many of you hoard your washi tape? Well, don’t worry, today’s project will not only help you store it but use it too!

open

My precious (said in best Sméagol voice) washi tapes are showcased in all their beauty and are ready to use at a moments notice. I am using the brand new washi tape from Papermart today, it is only $1.34 for 10 yards so you don’t have to hoard it (OK, buy two rolls of each design and hoard one if you must.) This project is great for me because I also hoard boxes…anyone else? Watch the video and see how it’s done!

You can also use this idea to make divided boxes for other arts and craft supplies like beads, pencils, markers or embellishments. You can make it match your style and personality!

SAM_2013

You will need:
A shallow cardboard box
Washi Tape
Measuring tape trim or Lace trim
Scrapbook paper (I used the Shimelle line from American Crafts)
Glue
Alphabet stamps and ink if desired

Directions:
Cover all sides of the box with scrapbook paper. Cut a piece of paper the same width of your box but 3″ longer. Fold up a section to make a divider so your tape can be held snug in the box. Add a label on the top or side of your box so you will always know what is inside!

SAM_2015

If you like this idea be sure to pin it for later and share it with your friends (there are handy buttons below for sharing!) Thanks for stopping by and til next time happy crafting!

2014 Studio Tour!

Howdy folks! I love to see where other people create, from creative closets to entire rooms devoted to their art I just love to look. It is fun to see how other people store their supplies and I always come out with an idea or two. As an artist who works in many media I have a lot of stuff, add to that I am an art teacher and you get more stuff. My workroom (not really a room but a corner of my basement) is a supply closet as well as a work area. Everything, almost, is modular and I end up moving it around quite a bit as my needs change. Here is how it is looking right now:

I find that the longer I am in a space the less drastic my reorganization gets because I know how I work best. If something isn’t right I change it. Craft rooms are not stagnant if they are being used because you will acquire more stuff, use up stuff, gain interests, and lose interests. I’m not a fan of getting rid of good craft supplies. Most items can be used again in different ways. Stamps and patterned paper get discontinued but that does not mean they expire and are no longer good so why toss them? Even if you dislike the pattern, guess what, the other side is probably white. Why get rid of your old decorator chalk to buy new chalk from a more trendy company? It makes no sense. Sometimes you will find something that really is not for you, you tried it, did not like it and have no plans to ever use it again, OK give it to someone who can use it but the other stuff that you bought because you loved it, keep it, everything comes back around or don’t buy the trendy stuff, get basic stuff like solid color papers and paints, pencils and inks and make your own.  If you find that you are buying more stuff than you can possibly ever use (which I think is a great deal of us) make a plan to use it. I feel bad when I buy something and don’t use it, it does not happen often but when it does I will grab that supply and dive in. You will get rid of the guilt of just owning it and get to the pleasure of using it. We buy supplies with the optimistic attitude of what we will make with it. When we don’t use it we feel like we have abandoned our dreams and wasted money, we feel like a failure. When you use the supply you will get a better feeling than a “shopper’s high” you will get a “crafter’s high” and feel so good that you used what you bought. You bought it because you liked it so use it!

I don’t know how I got on that philosophical tangent LOL! I noticed when I was watching the video back that I forgot to mention a couple of things:

  • The bird-cages hanging from the ceiling hold lace trim
  • The mail sorter on the end of my counter near “die cut land” holds glass rods for bead making
  • The big honking shelf behind me as I walk over to my bead storage area is my wood-mounted rubber stamp shelf.

If there was anything else you were wondering about in my room just leave a comment and I will explain about it:) Have a great “Superbowl Sunday” and til next time happy crafting!

WOYWW: Craftroom Tour {in High Definition!}

Howdy folks and happy Wednesday! This week for What’s on Your Workdesk Wednesday I thought I would do an updated studio tour and storage video! And (drumroll please) it is in high-definition (notice how I am not in front of the camera LOL!) Just promise me that you won’t report me to the TV show Hoarders!

So I walked into my craftroom the other day and thought “what the hell happened in here?!?” it was a mess, boxes of quilling and knitting mayhem not put away from classes I taught last week, beads everywhere and general crafty chaos…well, you saw last weeks WOYWW desk…just multiply that and add a few more piles, it was a freaking craft obstacle course! So Saturday night I cleaned up my mess (I am a wild woman, home organizing on a Saturday night) and here the photos:

DCF 1.0

DCF 1.0

DCF 1.0

DCF 1.0

DCF 1.0

Well there you have it, since my kids are on vacation this week it still looks this way too (will wonders ever cease?) But best of all I come in ready to create and not bummed out about the mess or injured because I tripped over a 25 pound box of glue sticks. If you have any questions about how I store my stash just leave a comment and I am happy to answer it. Thanks for visiting me in my studio today and til next time happy crafting!

String Storage Solution! {video tutorial}

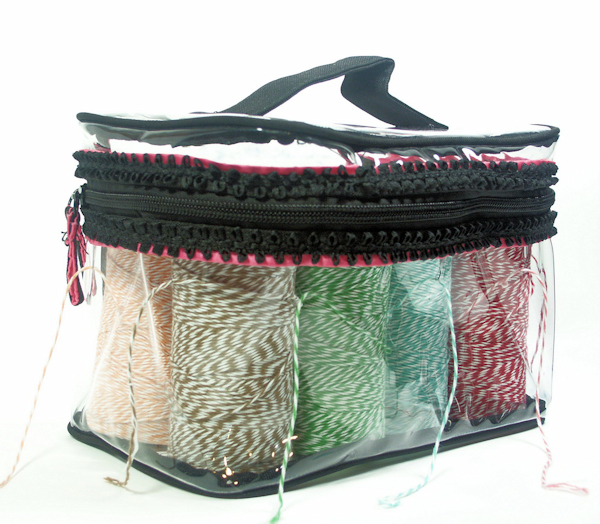
Happy Black Friday everyone! I did not go out into the madness but I cheered on all of my girlfriends who kept me updated on facebook…vicarious Black Friday shopping is probably more my pace anyway. I do intend to check out some Cyber-Monday deals if my kids ever tell me what they want for Christmas LOL! Today I have a storage tutorial for you. I have made a  storage bag for the luscious newbaker’s twine I got from Papermart but this would also be great to get all of your holiday wrapping ribbons and string in order too!

Here is the video:

You can use this method to store any ribbon, yarn, string or fibers. Just punch more holes as needed! Be sure to save the bags that bath sets (we always seem to get some of these as Christmas gifts don’t we?) curtains and blankets come is because the plastic is thick and the zippers are sturdy and best of all the bags are clear so you can see your ribbons and trims! Speaking of ribbon, string and trims be sure to check out the wonderful selection at Papermart. I have realized that if they sell it it will be the cheapest place to get it. Sometimes the quantities are large but you can always split it with your stamping friends, I do that a lot!

Thanks for stopping by and til next time happy crafting!

DIY Craft Desk & WOYWW

Howdy folks! It’s funny how after a few days away from home you can look at your surroundings with a fresh eye. When I went down to craft yesterday my desk was so uninspiring. My binders of unmounted stamps were hard to pull out and I didn’t feel that I had room to work, also I had left my craft area in a bit of chaos so that didn’t help either…so…I spent $5 at the lumber yard and transformed my workdesk from this:


To this:


Here is a video to show you how I revamped my workdesk. Now, don’t go expecting a “Bob Villa” quality project here, we are talking saw horses, cinder blocks, an old door and boards but I am thrilled with the results, have a look:

See, how easy, anyone can do it! I wonder if I can get a guest spot on This Old House? Nah, you probably have to at least break out a hammer 🙂 I will say that I did measure everything and sketch out a design before I underwent this re-do. It probably saved me an hour of moving stuff around because I had a good estimation of what would fit. So my tip is make sure to measure to stuff you want to contain on your desk shelves!  Here are so more after shots:


…and now for something completely different…

Now, I realize that my studio will never be featured in House Beautiful but it is a WORKING studio and I need to be able to make a mess, hose it down and make another one. It works for me! So head out to the lumber yard, pick up a few cinder blocks and let’s get this party started!

Thanks for stopping by and til next time happy crafting!

Pssst…wanna see more crazy tables? Head on over to the Stamping Ground for What’s on your Workdesk Wednesday or as I affectionately call it  ‘my craft hoarding support group’ you will get an eyeful of creativity and it is so much fun!