Hi friends! Sometimes it’s fun to take seemingly unrelated supplies and make something:
These supplies came in the September Stamp Art Box (except stamps) and I was happy to play. Watch the video to learn some fun techniques you can apply to a card or painting!
Sponsored by Smart Art Box. Shipping to many countries worldwide, you can either subscribe and get a surprise box of art supplies every month or order the boxes you like while supplies are available. You can get the box I used today here. You can find the large butterfly stamp here, and smaller ones here.
Have a play with your supplies today! Happy crafting!
Hi friends! Sometimes you come across a really cool techniques when you are trying to do something else, this is one of those times!
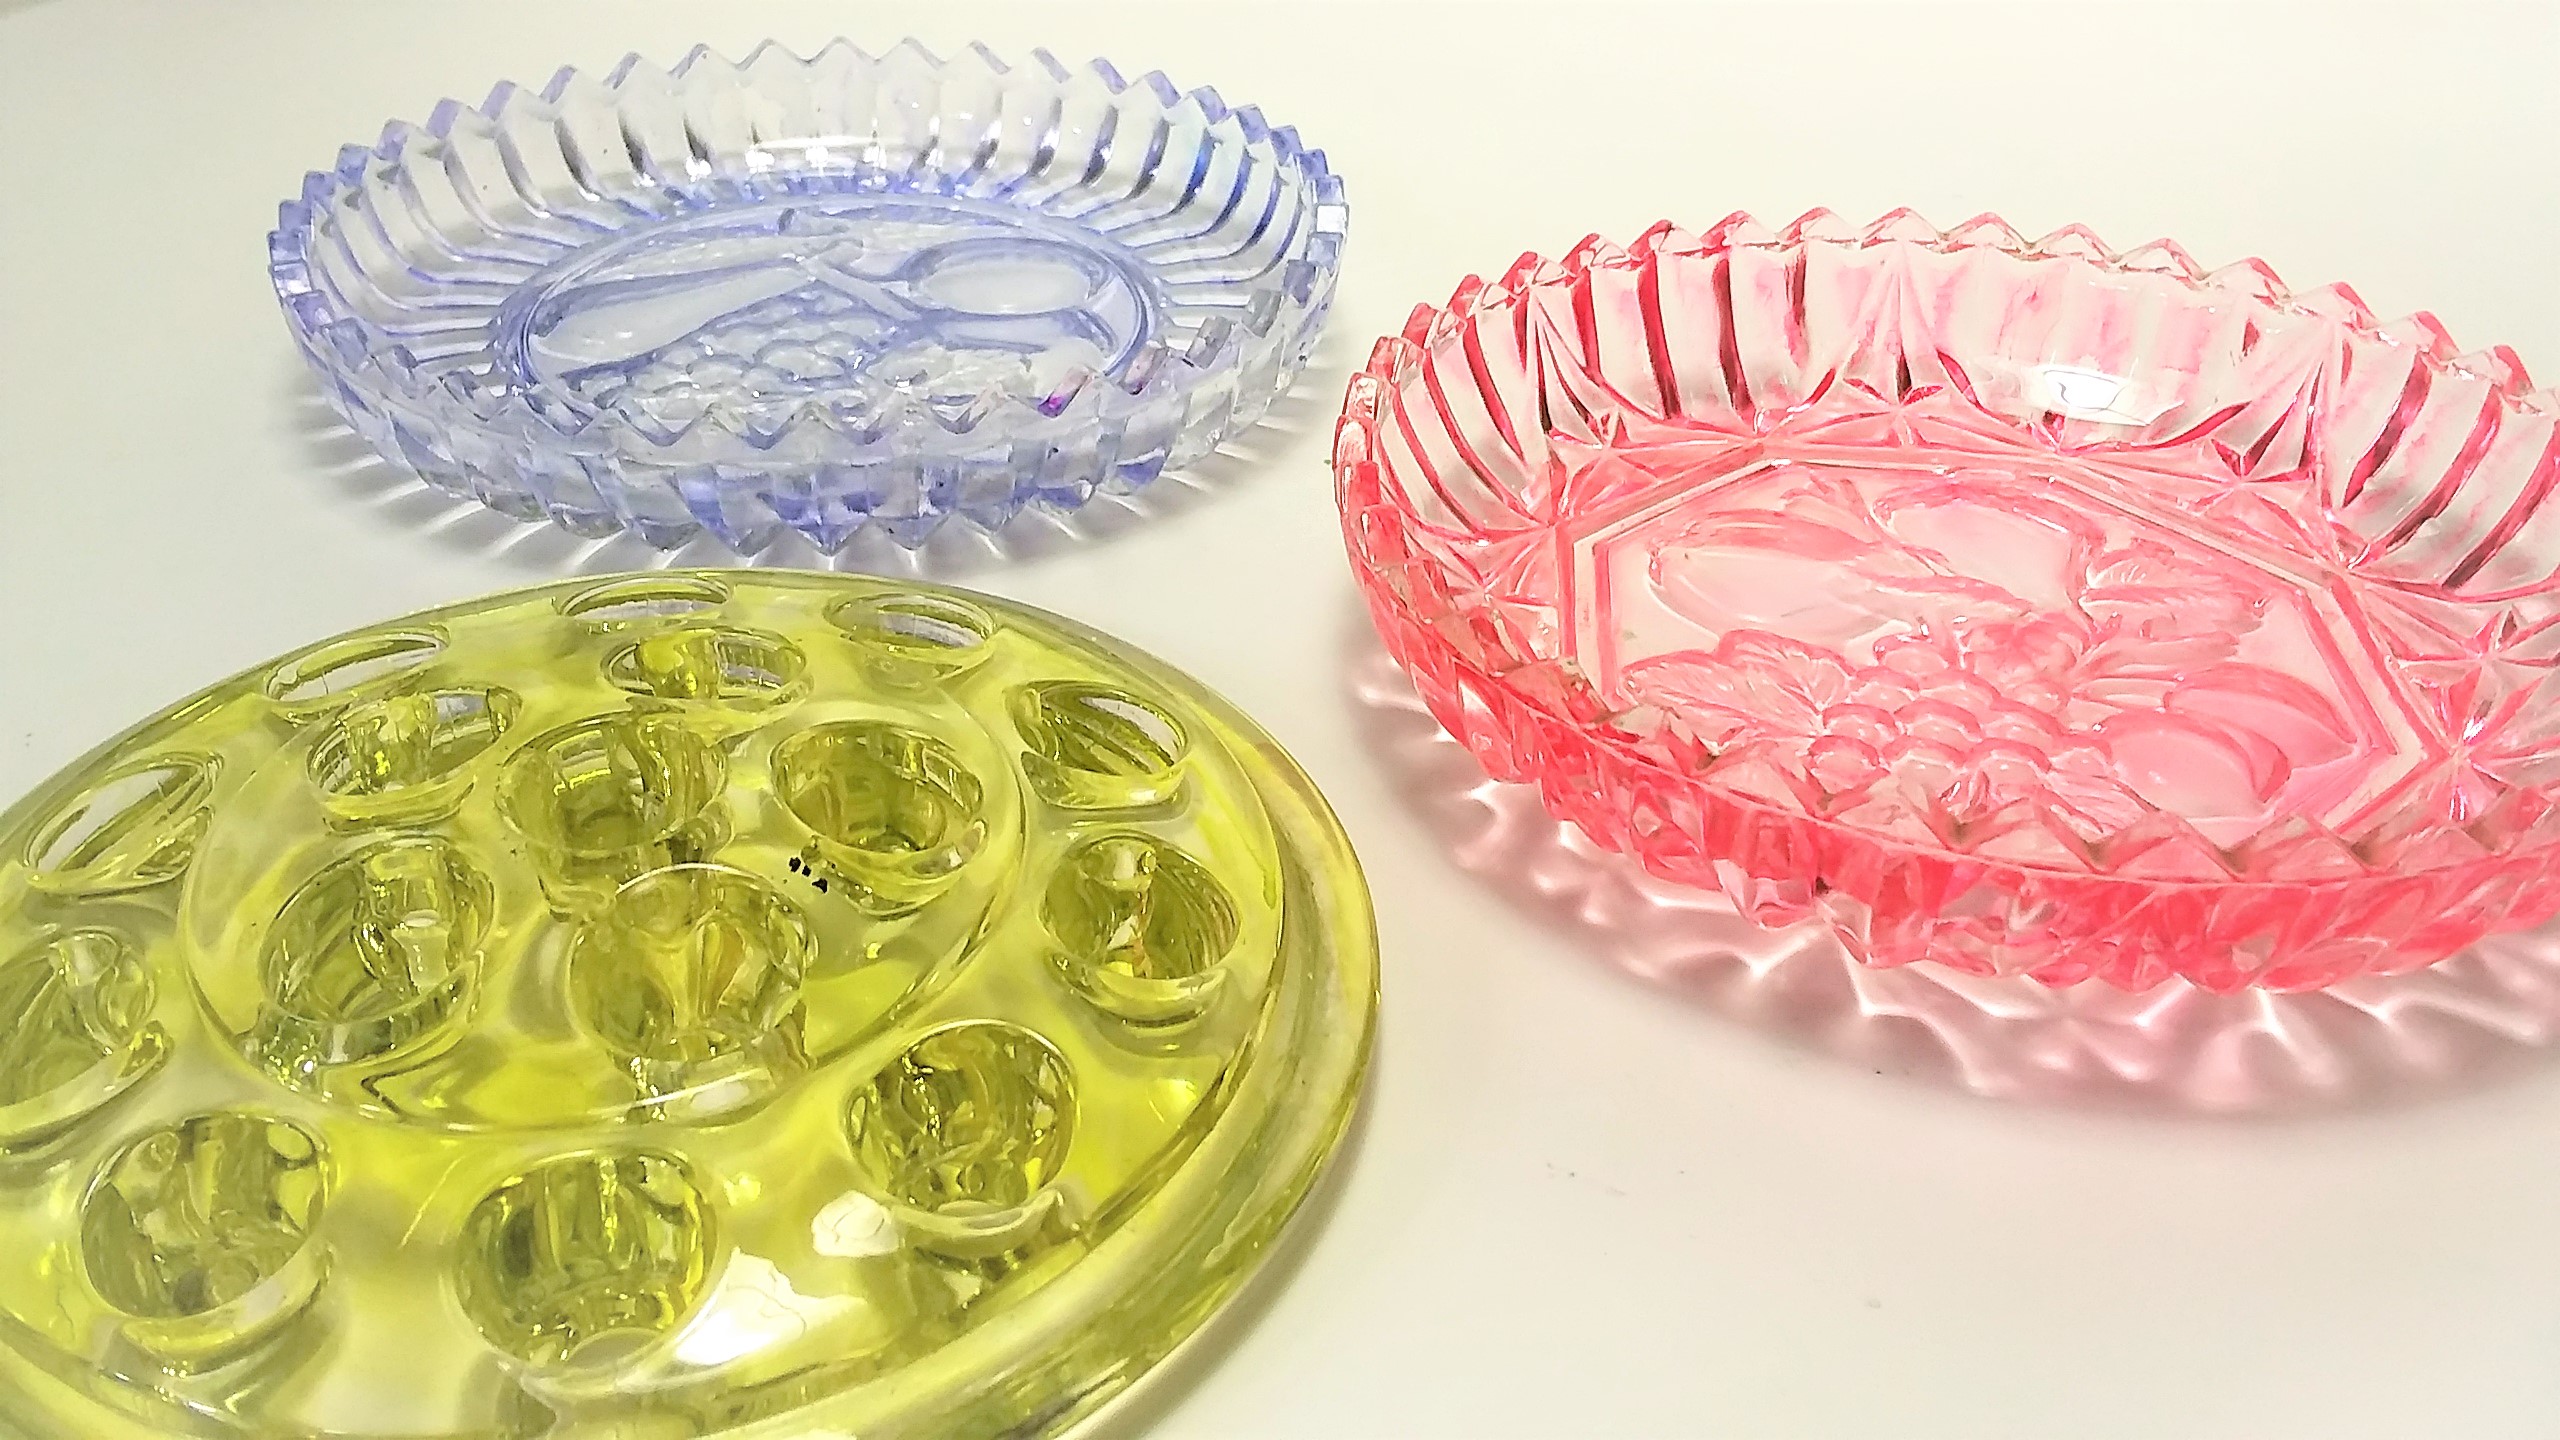
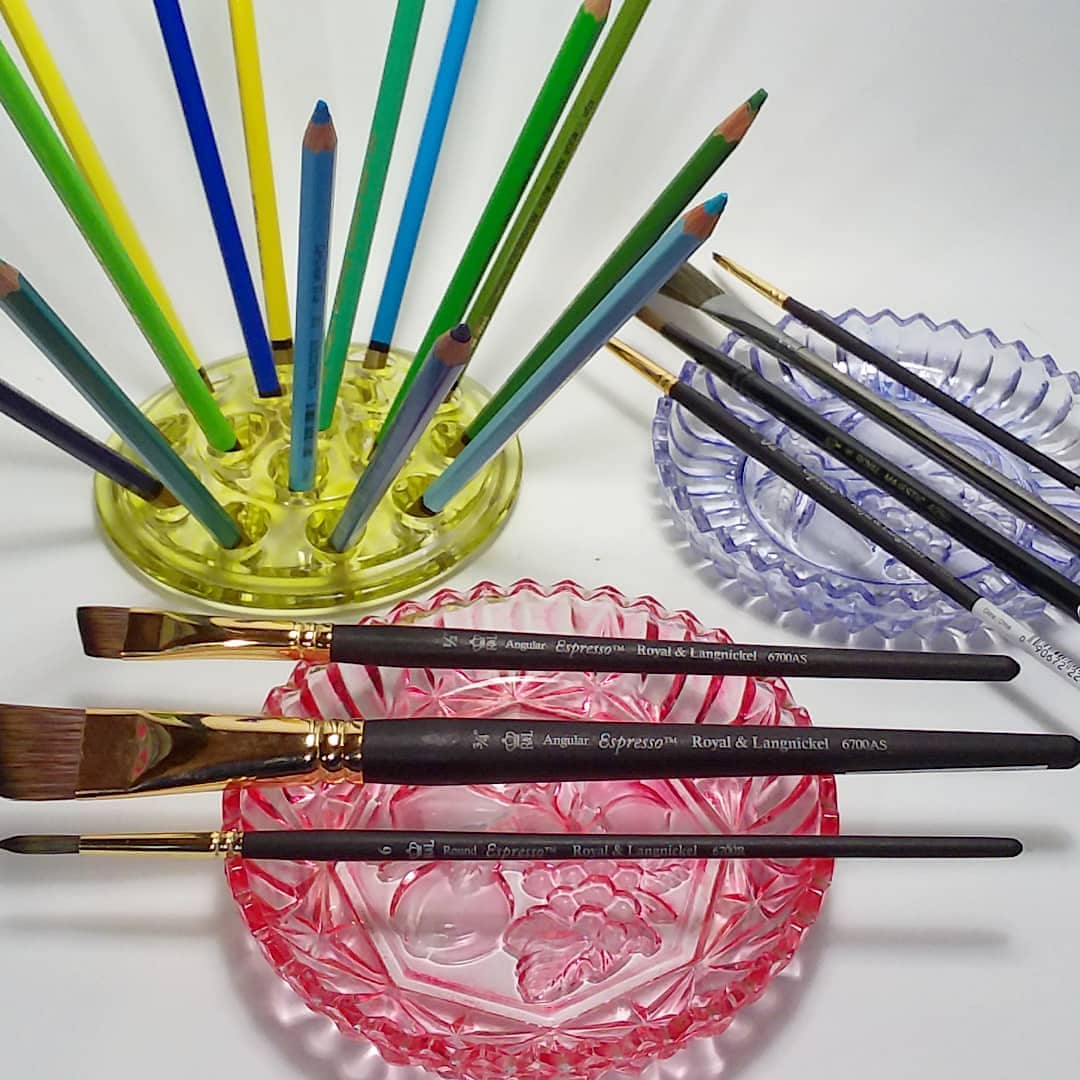
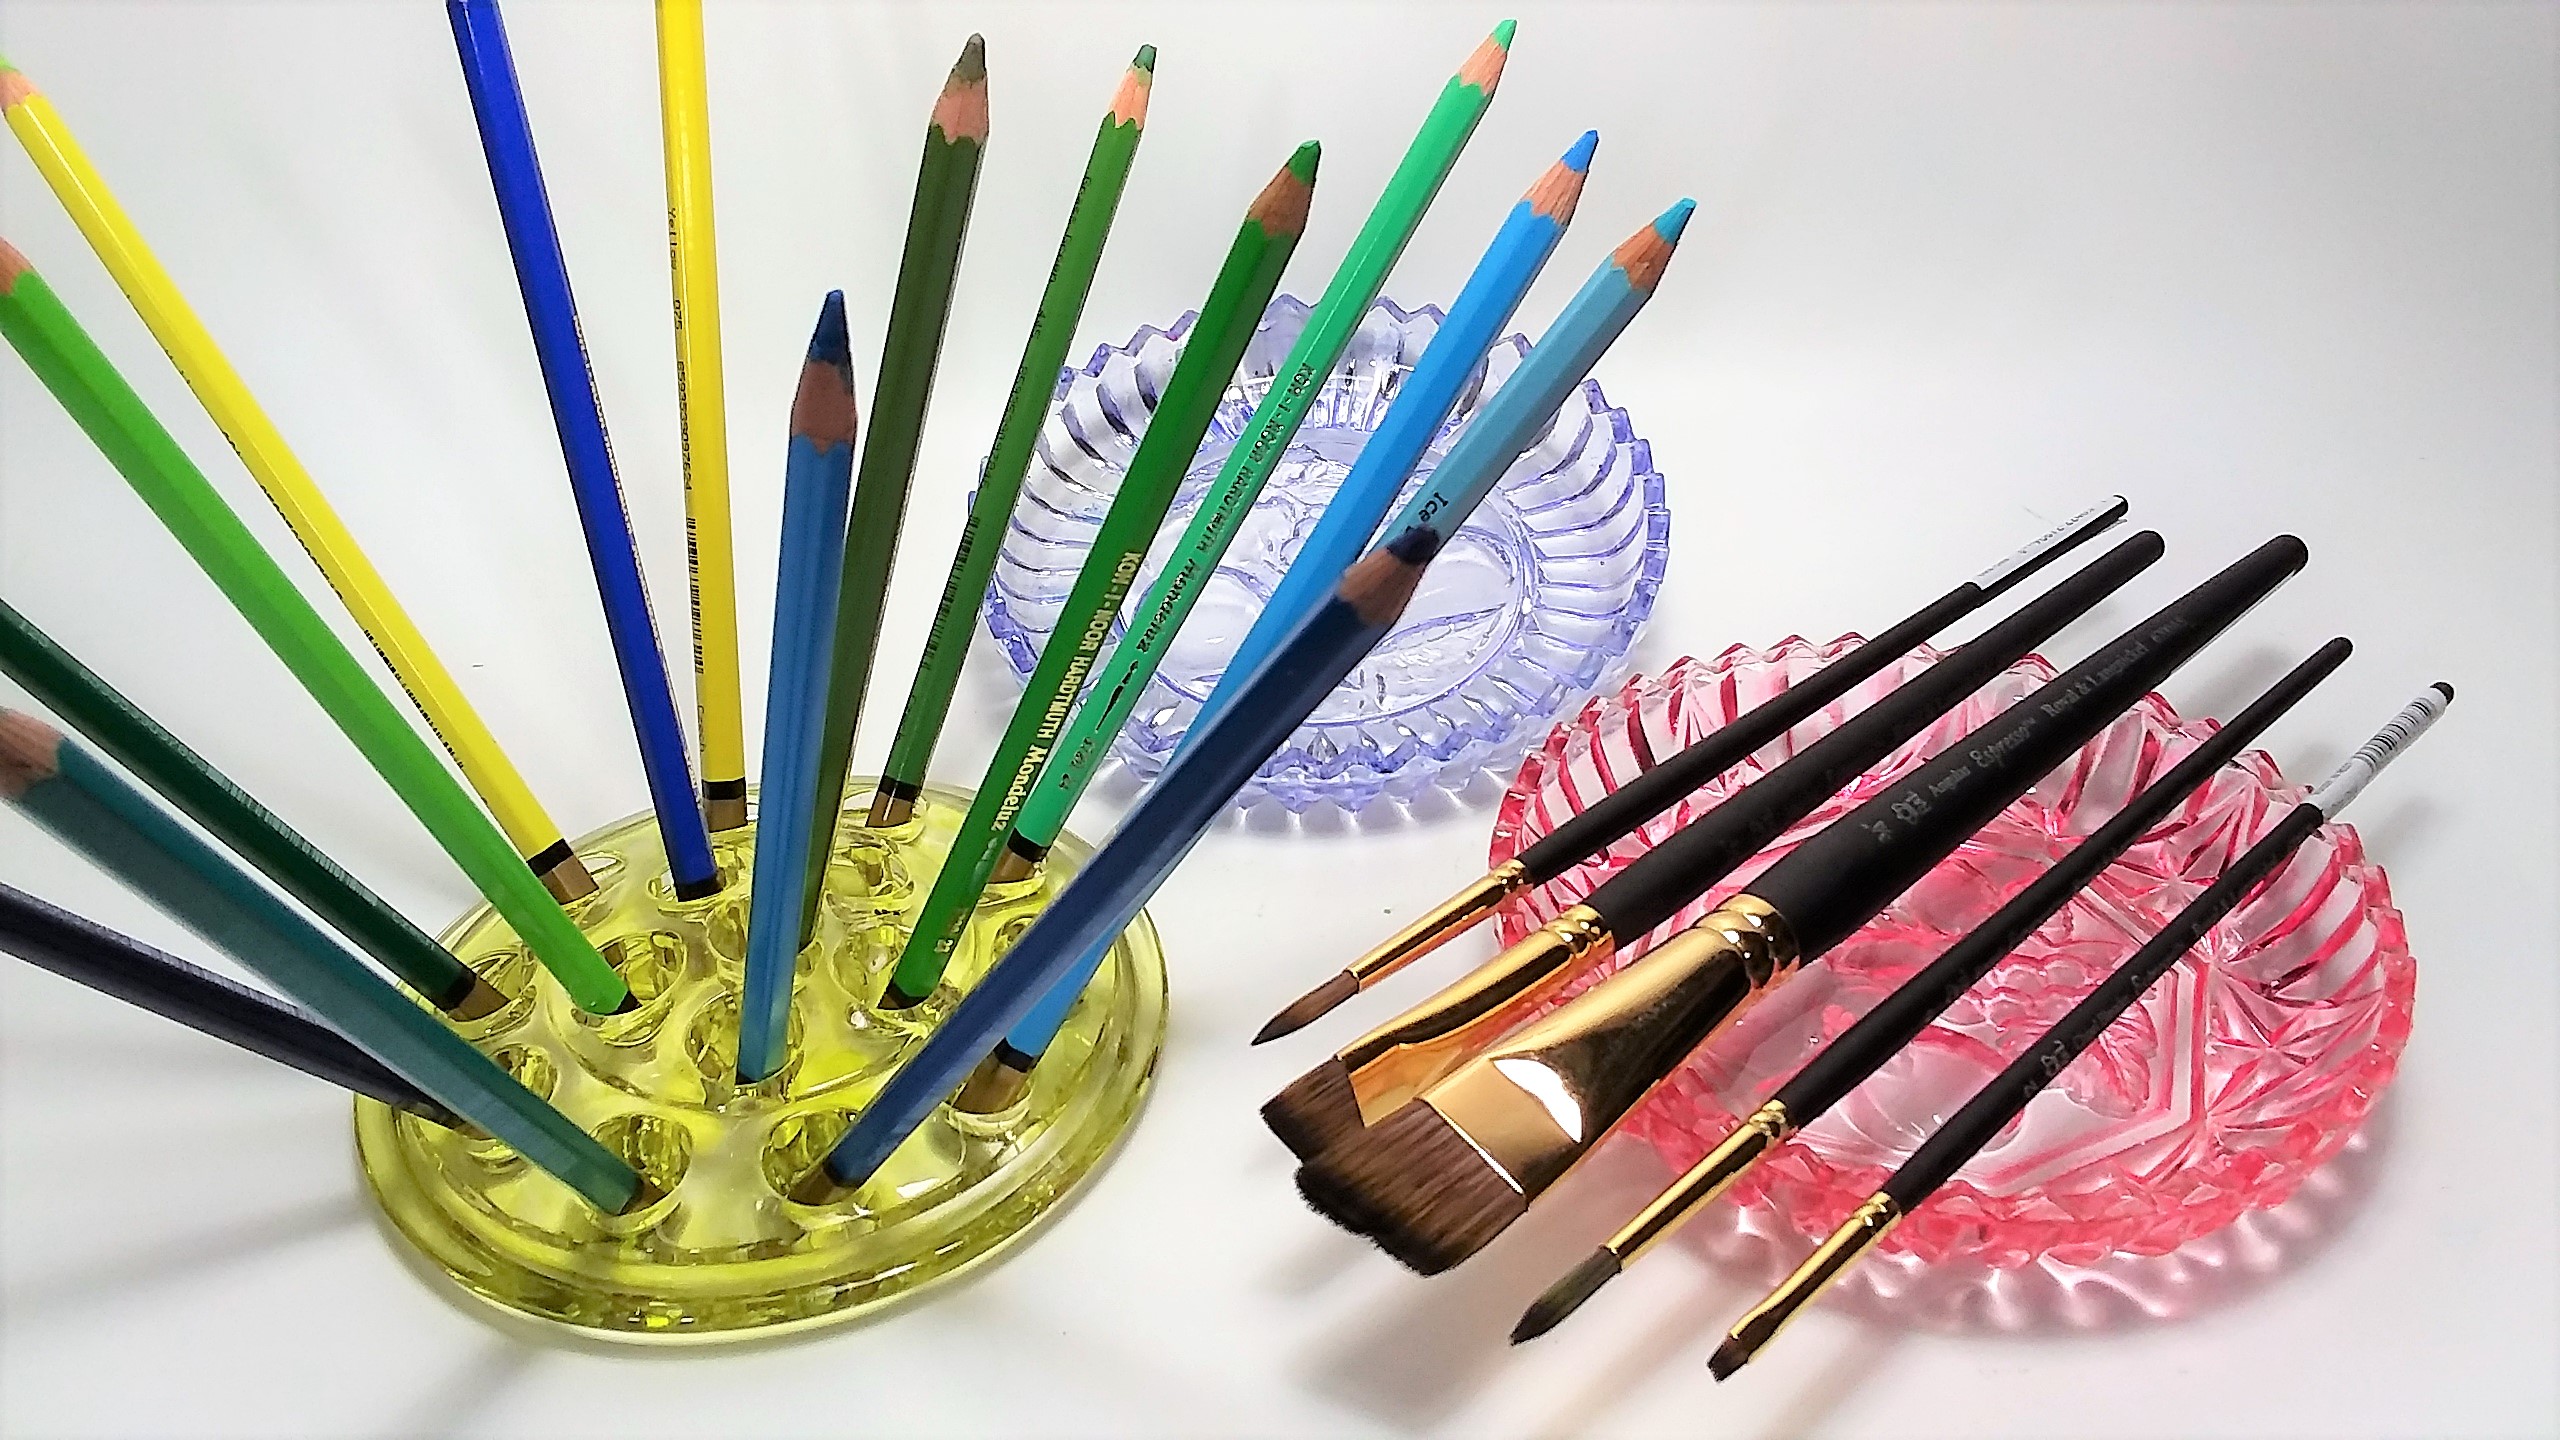
I got tired of my watercolor brushes rolling off my table as I worked and also It’s better (according to experts) to dry your brushes flat rather than in a cup so I thought I would like a brush rest. Since I am cheap frugal I decided I could probably find a really funky colored glass ashtray at the local antiques mall that would be delightful (and cheap) for this job. Believe it or not I only saw one ashtray at the antiques place and it was not delightful but I did find two shallow clear pressed glass bowls with fluted edges that would do the trick. Best of all was the price $1.25 for the set! Score!
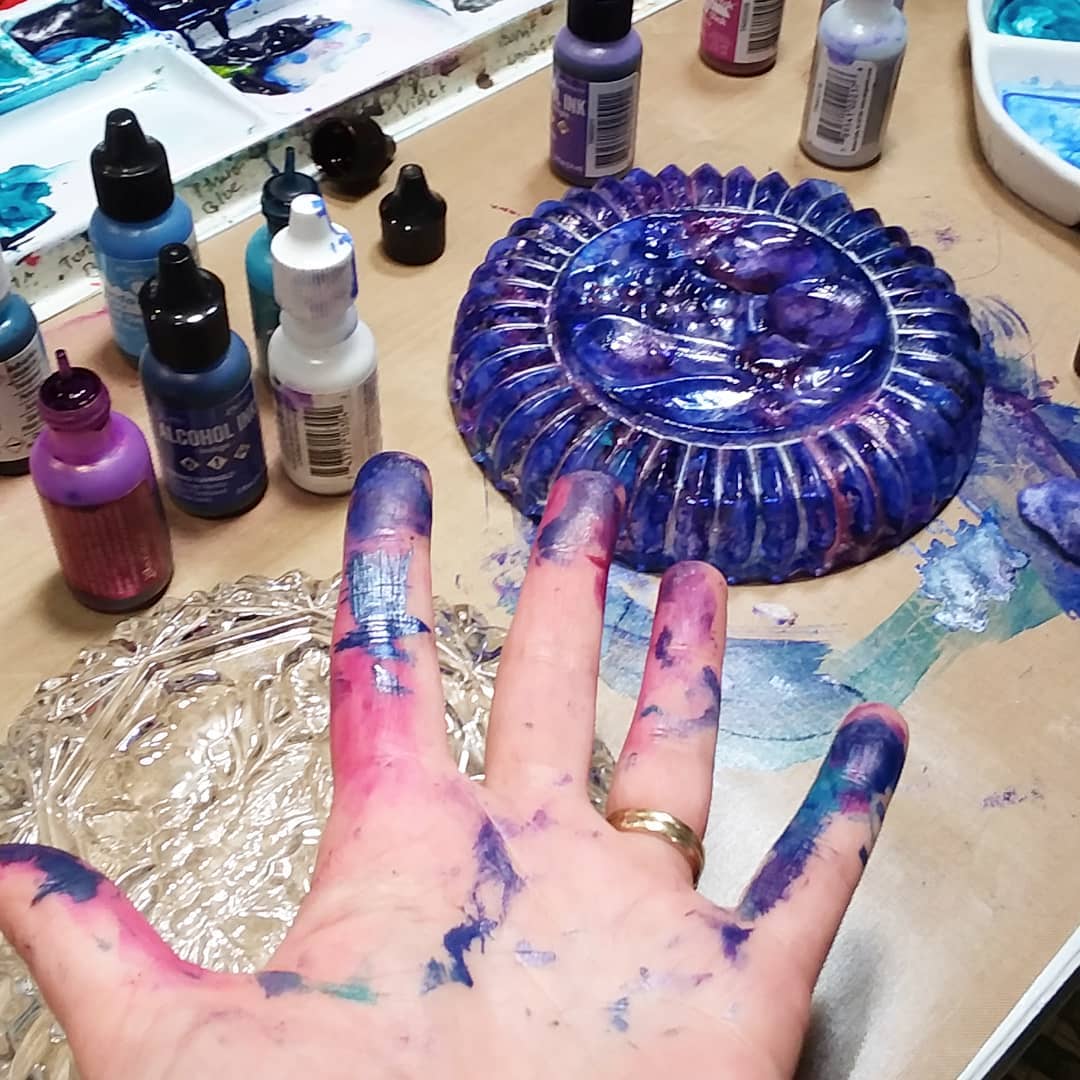
Above you can see the lovely tinted glass I eventually ended up with. I loved the technique so much I also tinted a glass flower frog (I have two of these large clear ones so I figured “why not?”) and that can hold pencils or crayons that I am using in a project so I can keep track of what I use. Originally I thought I would try to get a really rich deep color but after using a bunch of ink I was really unhappy with it.
As I went to clean off the thick ink it left behind a tint and it was beautiful! Sometimes you have to go through that “Hot Mess” to get to the good stuff! Want to try this for yourself? Watch the video and see how!
Supplies! *Amazon affiliate links used
Some clear class objects *items with a cut, pressed or embossed design work great!
“Rubbing” alcohol in a spray bottle (*I used 70% from the drugstore, grocery store or dollar store)
Small square of craft felt and q-tips for applying color *I make my own craft felt applicator but cutting up 9″x12″ sheets of acrylic craft felt into 1″ squares, you can also buy them cut into squares by Ranger but they are more expensive
*You might want rubber gloves, LAVA soap will remove all of the ink from your skin but your fingernails can get stained!
Directions:
1. Wash the glass and then wipe it down with rubbing alcohol to remove any fingerprints.
2. On the underside of the dish (or inside of a jar or vase) dab or wipe on the ink using a small piece of craft felt. You can use a Q-tip to get into any nooks and crannies. If the color is too dark add some alcohol to the blending felt to dilute the color.
3. Let dry before displaying.
*You want to do this on the bottom or inside of the object because alcohol ink can have a dull look on the surface, this way the shiny class will be on the outside and the glass will appear to be colored all the way through. You can even put water in the jar or vase after it is colored, just take care when cleaning it by washing with a soft cloth.
This is not food safe and you really should hand wash these. If you change your mind about the color or want the glass to be clear again you can wash off the ink with alcohol.
One thing I forgot to mention in the video…
I got this question a lot on YouTube when I posted this video: “What can I use to seal the ink?” I want to be able to remove the ink if I want a new color so I did not seal it with any top coat. This ink is waterproof and should be fine with normal wear and art room splashes. Since I have colored beads and pendants with alcohol ink I noticed that the color can wear off with a lot of rubbing. Also I have used alcohol ink on coasters and it definitely needs more protection so what I would recommend if you are sure you do not want to be able to wash it off is to spray a coat of Krylon Triple Thick Glaze over the ink. It still is not food safe though. I hope you give this a try, it is really addictive and the results are so pretty! Happy crafting!
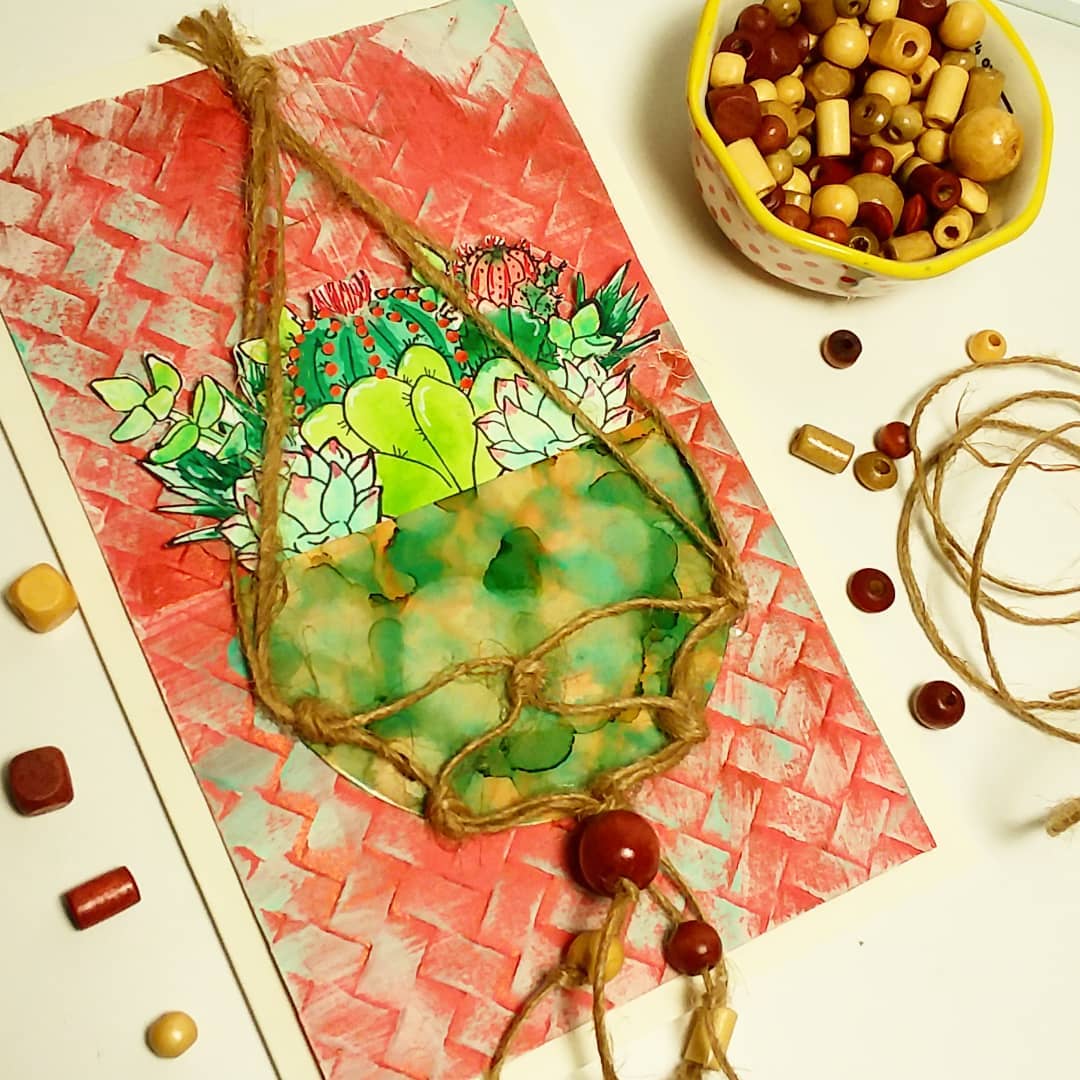
Hi friends! I love retro crafts and one that I love seeing in macrame. Now, I have never done any serious macrame (but I did make a couple of groovy plant hangers a few years ago and they are still in use today!) but I am going to use it as inspiration for today’s card.
I love how we can get different effects from ink and paper. Today I’ll show you how to get a glazed ceramic look from alcohol ink and glossy cardstock too! Watch the video to see how.
Sponsored by Rubber Stamp Tapestry!
Get your instant 20% off coupon code and become a Peg Stamp VIP here. Your 20% off coupon code will be immediately emailed to you plus you’ll get the deepest discounts available, free shipping coupons, and sale notifications and you will find out first when we release new products.
The VIP email is sent once a week and always includes a wonderful deal and fabulous peg stamping tutorials by me, Lindsay the Frugal Crafter and other designers.
This card features many techniques so even if you have no desire to create a card like this you can use the know-how to craft something cool for your next card! Thanks for spending some of your day with me and til next time happy crafting!
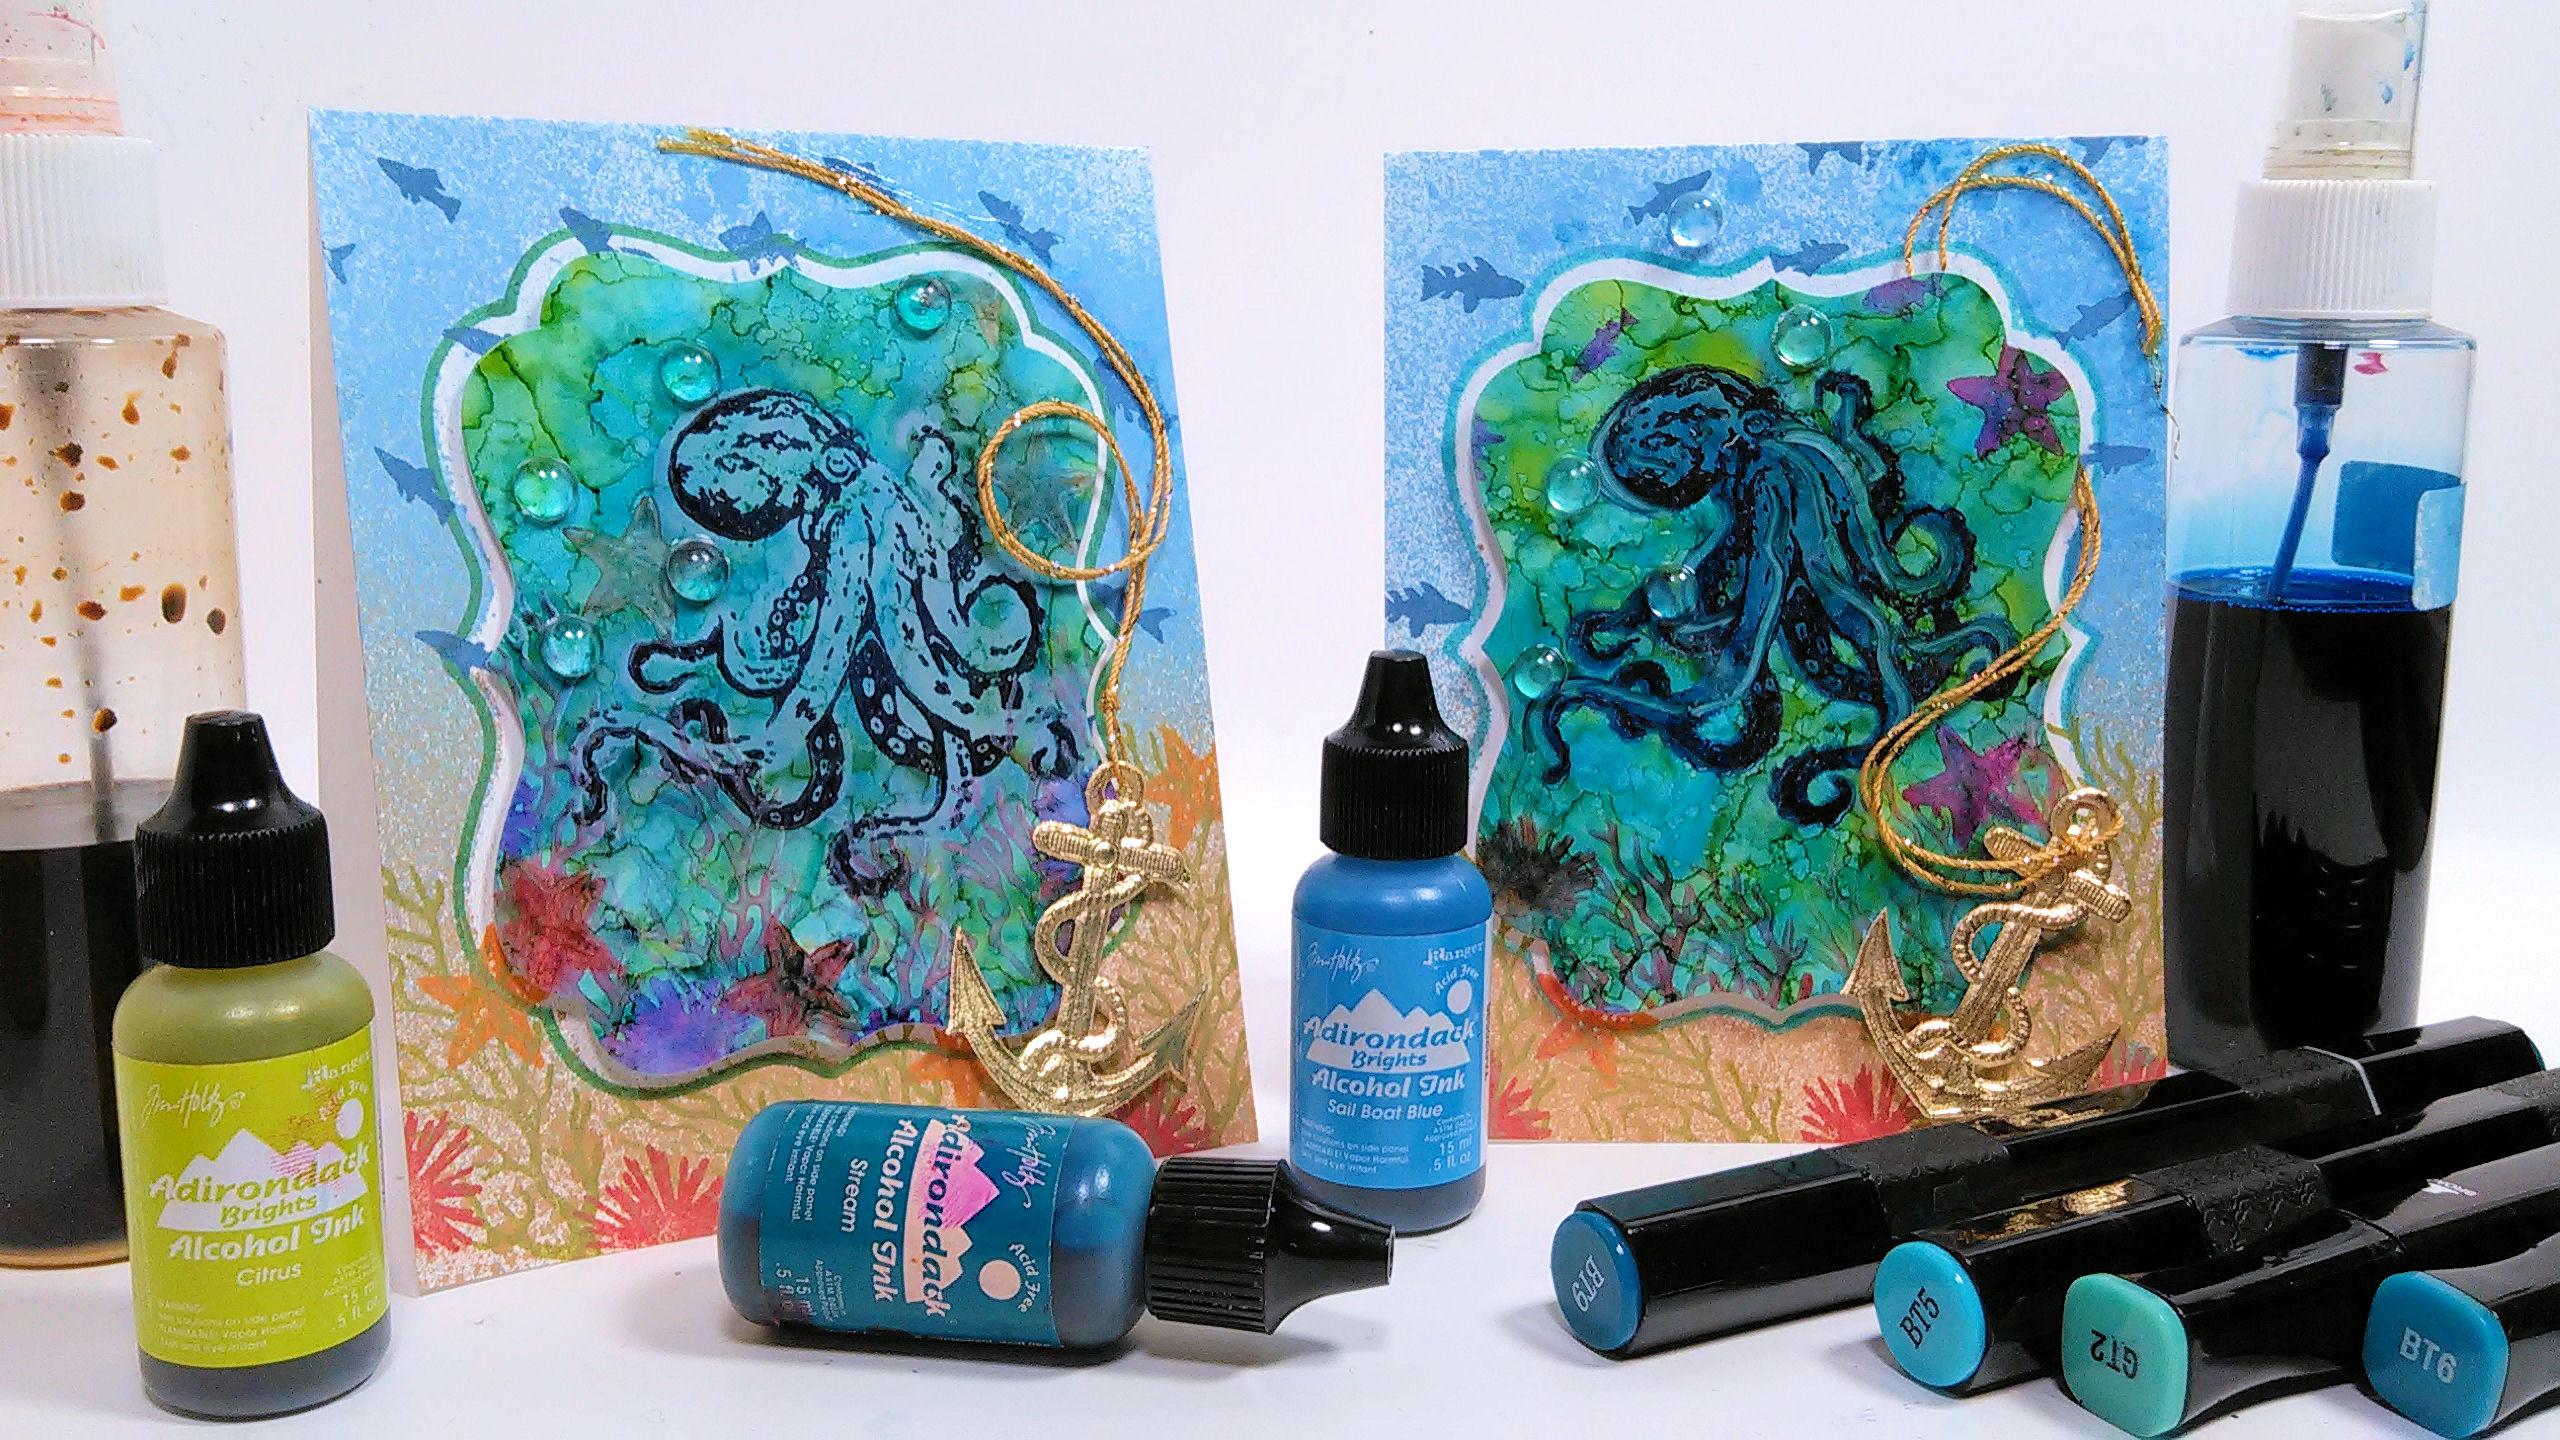
Hi friends! Today I have a really fun project using alcohol ink on YUPO paper! You can use either liquid alcohol ink or alcohol ink markers (BTW the sale links to snag the 24 packs of Spectrum Nior markers are now working! You can get the four original 24 marker packs for $20 each and the two NEW 24 marker packs for $24 each and there are NO Duplication between any of the 24 or 6 packs sets so you can build your collections budget allows.) Thanks to everyone letting me know there was a problem with the links yesterday and being so patient while it was resolved:) You are the best!
If you don’t have YUPO paper don’t despair! You can use vellum/parchment (modern vellum is not really vellum, it is a plasticized paper) you can also use glossy cardstock for a similar effect or if you are feeling brave try this on any light-colored non porous surface like tile coasters or white dominoes. Watch the video for full instruction!
White craft felt*Cheap acrylic craft store stuff is fine:) To make my ink blending tool I simply glued the hook side of Velcro to a small wooden block, the felt naturally sticks to it:)
Alcohol or Alcohol ink Blending solution *The strongest you can get, I use denatured alcohol. SSS, Amazon
Spray ink, I make my own with liquid watercolor and water in a spray bottle but these from Lindy’s Stamp Gang are affordable if you don’t want to go through the trouble:)
Clear “drops” for bubbles (get the clear ones and you can color them with alcohol markers or inks if you want other colors! You get a TON in a bag LOL!)
Ranger Archival Ink: Consumer crafts $4.27 a standard size pad, SSS $5.99 a pad but they also offer minis and sets, Amazon *Note, the ancient page ink I used in the video is the same kind of ink as ranger archival. I looked for these inks and the only place I found therm were really expensive on amazon, I think they are discontinued so I recommend getting Ranger Archival because you can get reinkers and they are more affordable.
I hope you enjoy experimenting with alcohol ink on yupo paper, if you don’t have Yupo try whatever glossy paper you have or even acetate sheets or vellum. Art is all about experimenting and having fun so make some time for arts and crafts today! This post contains affiliate links, when you shop via my special discount links you help support the free content on my channel and get great deals, thank you and happy crafting!
Hi friends! I made cute stands for my business cards to match my new craft fair packaging. All you need are dominoes, alcohol ink and hot glue.
Watch the video to see how easy this project is:
I worked on editing some if the footage I took of my booth at the craft fair so I can have a recap for you in a few days. I’m also going to have some giveaways coming up so make sure you check back every day:) Thanks for stopping by and til next time happy crafting!
Here is a video to show you how! You will also learn how to make your own jump rings. I apologize the vaguely obscene hand gestures I made when explaining how to properly open and close a jump ring, but I bet you won’t forget the right way to do it! 😀
Here are the earrings I made in the video:
If you have any questions about this project just leave a comment and I will get back to you. BTW I have a video on showing how to make beads from plastic bottles too, it’s a moldy oldie from a year ago with my old camera but still worth a look if you want to check it out here. You gotta love free beads!
Thanks for stopping by and til next time happy crafting!
Well, hello there folks! I have been playing in my studio and wanted to share a quick and easy project I made. First I printed out some digital stamps from the Fancy Flower set from Lindsay’s stamp Stuff, then I had a photocopy made so I could transfer them on to tiles. Wouldn’t thse make a cute Mother’s Day gift?
I colored the tiles with my new ProMarkers, it was so easy! Here is a video showing you how to do it:
Here are close-ups of my favorites:
EDITED TO ADD: the background on this tile was done by coloring it with a blue marker, then dabbin the same marker randomly on top. If you marker is not juicy enough you can use a q-tip to drop denatured (or rubbing) alcohol on top for the same effect. Just play around until you like the look!
And here is a peek at the Fancy Flowers digital Stamp Set I used:
With easter on its way I thought you might want a handy little basket to make so for this weeks freebie I give you a basket and notecard, click the pic to download.
It coordinates with my new Basket Bonanza set, 6 baskets in all including a covered picnic basket (that is my favorite!)
Phew, what a week! It has been so hectic around my house lately, I’m glad to finally have a chance to slow down and just breathe. My favorite way to unwind is to play in my craftroom. While I was in the dentist chair Monday I had an idea: I wonder if I could make some cool embellishments in my clay molds with hot glue…ya know what? I sure can!
I used some digital stamps from the Love Grows and Posh ‘n Trendy sets as focal points on my card. the pretty double-sided paper is from GSD Studios, I couldn’t pick which side to use so I cut the paper a little longer than I needed, punched the edge and folded it back on itself to make a pocket and stitched it with my sewing machine, I great way to fully use your double-sided paper {It’s just too pretty to hide the backside!} I used Copic markers as my coloring medium.
Tip: If your papers and embellishments don’t quite match try tinting them with the markers you colored your stamps with as I did here. I colored the red {punched} bird with markers after seeing the paper did not show up too well and the sentiment that looked to stark when it was white. I also used them to color my hot glue charms.
To make some nifty hot glue embellishments you will need:
Make sure you use silicone molds because the glue will stick to ceramic or plaster and it will melt plastic molds (Don’t ask me how I know.) 🙂
All you need to do is lay the mold on a flat surface and squeeze hot glue into the molds. Let cool completely, the large the mold the longer it will take. The letter tiles took a minute but the Celtic knot took more like 5 minutes to cool.
There are a few ways to color your embellies, you can use alcohol ink, or alcohol ink markers. My Copics worked great and they matched my card perfectly! After I colored them I drybrushed a little acrylic paint over it to bring out the detail. You could just paint it with 2 coats of acrylic paint if you want a solid opaque color too.
Variations on a technique:
Try writing or drawing with your hot glue gun on a silicone mat to make a custom title or embellishment for you next scrapbook page.
Make fake “wax” seals by squirting out a gob of glue on a silicone mat and pressing a rubber stamp in it. Leave the stamp in the glue until it is cool then peel off the glue. Be sure to ink up the stamp with clear ink or glycerin first so the glue does not stick. This looks amazing!
I love all that you can do with hot glue! With Valentines day on Monday you might be scrambling around for ideas for cards and classroom favors. Here is a look at the sets I used today and some other sets you can use to make quick and easy valentine projects:
Now let’s see what the Lindsay’s stamp Stuff DT has cooked up this week, I bet we’ll see lots of LOVE!
Howdy folks, I hope you had a safe and fun 4th of July. We took the kids to see the fireworks for the first time and it was amazing, I even took 70 pictures of fireworks and most of them came out well! The challenge at oriental stamp art this week was fireworks so I thought I would do a tutorial video on painting some (I say painting but it is super easy, you need not be an artist!) here is a card with one of the papers I made. I will show you a scrapbook page later this week using the big firework paper. The dragonfly and sentiment rubber stamp is from About Art Accents and the little swatch of paper in the lower RH corner is from the Grunge Flowers CS from Nicecrane Designs (it covers up a stamping boo-boo 😉
Stamps: About Art Accents, Paper: Gold pattern 9DCWV), Inked Background (see video) Swatch on right (Nicecrane), Markers: Copic, Ink: Memento
So, wanna see how I made the “fireworks” paper I used on this card as well as two other fun techniques? Well have a gander at my new video:
Do try these easy techniques, they are fun! Thanks for stopping by and til next time happy crafting!