Howdy folks! Yesterday I shared my bottle cap resin creations. The clear polyester resin took 3 days to cure at 69 degrees and 66% humidity. I used 15 drops of hardener to 1 oz of resin as the package directed for items 1/8″ thick. Today I am showing you my first cast resin pieces. I used the same ratio or 1oz resin and 15 drops hardener (catalyst) and I added a pea size dollop of green acrylic paint and some pearl ex to the mix. I think I was supposed to add the color and pearl to the resin before hardener but I forgot and added it after. No big deal, but the pearl-ex probably would have mixed in better, I had some lumps as you will see in the silicone mold. The cast resin took 5 days to cure, it was hard 24 hours after pouring but it was sticky for days. I tried a few different molds. The one that I liked the best was Casting Craft, it was smooth and the resin cured quickest in here:
I had a duplicate mold of this one by Makin’s Clay so I decided to risk using it. It seems sometimes resin could be permanent in some plastics. This worked great and it took maybe 12 hours longer to cure than in the Casting Craft mold. I am excited because I have lots of this brand!

I LOVE the detail from the Martha Stewart silicone molds but they stayed sticky the longest. I know if the polyester resin is exposed to air (not touching the side of a mold for instance) it takes longer to cure or may remain sticky and maybe the matte finish of the mold affected the cure time. It has a slight tack to it at day 5 but it is getting much better each day.

Please note! Before I poured the resin in the molds I washed the molds, dried them, sprayed them with Casting Craft mold release/conditioner and let that dry overnight. Already this procedure is more work than anything I would ever cook, geez Louise, but I was determined to use up this expensive supply that has a shelf life 🙂 After all the pre-show prep I mixed the resin, poured it and left it alone. That is the hard part. Really. I kept visiting my resin (don’t do that) and touching it to see if it was sticky (hence the fingerprints on the back) and sometimes I’d take it outside and put it in the sun because I read somewhere it could speed up the process but I don’t think it did a lick of good. I feel like the weirdo who plays classical music for his plants. Really, you should pour the resin and leave town for a few days, that’s your best bet! 🙂 I’ll let you know if I discover anything else about this fascinating medium. I reckon the epoxy resin is a much more user friendly and forgiving resin but I will not be trying that until I use up this bulk can of ever-loving polyester stuff. That’s it for me today, thanks for stopping by and til next time happy crafting!

Thank you for sharing. I have seen the Martha Stewart stuff in the stores and wondered what the process would be, thank you!
🙂
LikeLike
I know this turned out to be a very fiddly process for you, but I think the results are absolutely beautiful. I even like the “lumps”. I think it gives the pieces the look old glass sometimes has with tiny imperfections. And I LOVE that you were able to get such rich color. Really cool!!
LikeLike
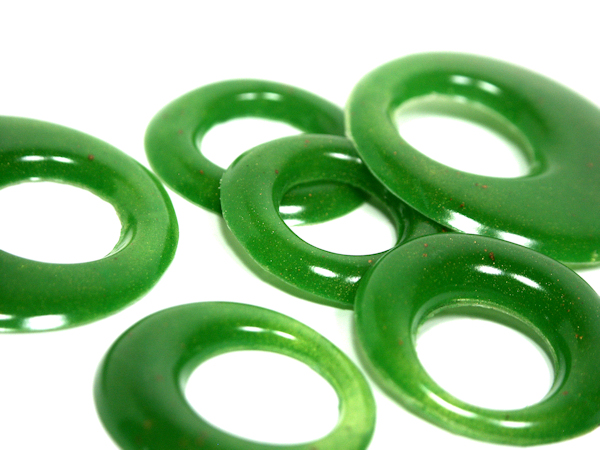
Those are all gorgeous, Lindsay. They look like Chinese jade of the finest variety! I have never tried casting resin, and didn’t know about the different kinds. I’ve heard of epoxy resin but not the polyester kind.
Shoshi
LikeLike
That seems like a lot of work. I don’t know how I did this in my special ed class and have it dry. We did ponds of plaster of paris That was a long time ago.
LikeLike
Really nice details. Thanks for sharing:)
LikeLike
Great look !!! And just love this green !! No matter for the pearl-ex it is fine to me ! Good job.
LikeLike
Just think of all the beautiful things you will create, embellish, etc. with your experiment!!!! Love the rich color and elegant, And expensive look you created! Woo Hoo for Lindsay!
Paper….and resin….Hugs,
Jan
LikeLike
What perfect timing for me! I purchased a box of Easy Mold 2 weeks ago and have collected a few frames to mold and am anxious to try this new adventure. I’m so glad you have blazed a trail for me. I have only done plaster casting so this will probably raise my anxiety a few notches. Thank you soooooooo much for sharing and keeping such good notes to pass on. I REALLY appreciate it, and oh yes, thanks for being so BRAVE……
LikeLike
Wow! These are really beautiful, especially the frames. I’m not usually a fan of green but these are gorgeous! Great job, Lindsay!
LikeLike
I am sure glad it is you trying this out and not me, I would have given up right after the preparing of the molds 🙂
LikeLike
I think they turned out to be beautiful. should be able to sell them at your next craft fair.
LikeLike
I’ve heard on some sites that you can bake it in your oven at a low temperature or use a heat gun to help it to cure. There are also groups on facebook that can give you some help with issues
LikeLike
the site that has supplies and lots of tips is http://www.resinobsession.com I have no affiliatioin with them, but you might want to check them out.
LikeLike
Thanks for your great comment, Lindsay – yes, I decided from the beginning that I just HAD to have a sink! I’ve got a wash-basin tucked in a corner in my present room (now totally denuded of stuff) which was a pain to get at as there was always stuff there, and also too small to be much use. I shall have shelves for storage all round, and on the wall there will be a small microwave for dyeing and other techniques, with the sink and water supply right there.
As for your kitchen floor, well, better late than never, I suppose! However, it shows where your priorities lie – quite rightly in another room in your house, i.e. your studio!!!
Shoshi
LikeLike
Hi my Love, I know I’d be checking their progress also…. I love how your pieces turned out. The frames, the corners, and the others are all awesome. Thanks for taking your time to experiment for us. Love them all. Love Ya’ Patricia
LikeLike
Wow I have been following you on your adventure with this resin and I must say you are brave, to be honest I am waiting to see all your testing before I go out and try this myself. Plus I am waiting to try this just before a trip so I won’t be tempted to play with the unset pieces. LOL. By the way I have been playing with my own homemade gelli plate and loving it. I have a post on my blog this coming Friday about it and I say that you were my inspiration, and I included a link to your blog. http://annmakes.blogspot.com
LikeLike
Love the outcome but too fiddley for me – I think I have lost the crafty- patience-gene. I want quick and easy these days. Glad you did the experiment and now I don’t have to!
LikeLike