Lovely, Easy & Frugal: Chalk Cards {Stamp School!)

Hi friends! If you have some chalk in your craft stash I encourage you to try this tutorial!

18121986_10209021529680860_506774388144632268_o

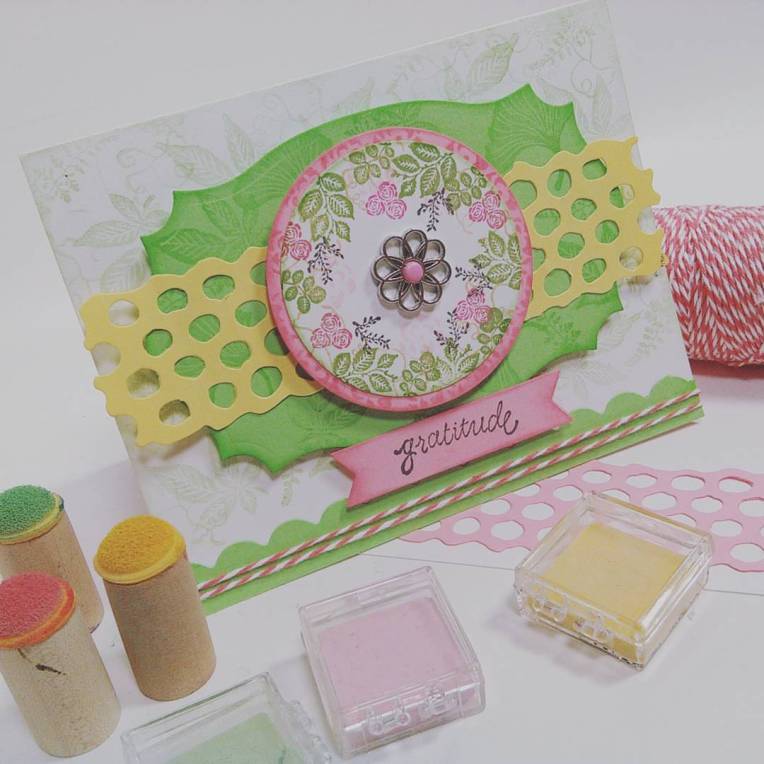
You are going to want decorator chalks (they come individually or in a palette like eye-shadow) or chalk pastels, not chalkboard chalk for this technique. You will also need something to apply the chalk with, I used daubers from Darice but I also like to use small white pon-poms, Q-tips or even make-up sponges. If you have tried something else that works let me know in the comments!

This video is sponsored by Rubber Stamp Tapestry! Use coupon code: LINDSAY17 – 20% off peg stamps and peg stamp sets on orders of $10 or more. Coupon expires July 3, 2017

Supplies:

Directions for applying chalks:
1. Stamp image with Versamark ink.
2. Dab on chalk with a sponge, pom-pom or q-tip
3. Rub with applicator to set. You can wipe off excess chalk with a tissue.

You can also use this technique with mica powder too, simply brush it over the clear stamped image with a soft brush and the shiny stuff will stick to the wet ink and leave a pretty shimmy design, it works best on black cardstock. Thanks for stopping by and til next time happy crafting!

Chalks are Cheap! Chalks are Versatile! Yay for Chalk!

Hi friends! In today’s stamp school tutorial I am going to share some ways to use chalk on your cards!

chalkblog

You can use chalk pastels, decorator chalk (the chalk in little cakes like I am using today) or even eyeshadow! Watch the video to see how!

The stamp I am using is from our sponsor Art Neko, mention “thefrugalcrafter” to get 10% off your order or free shipping on orders over $50, whichever is greater.

Supplies:

  • Stamps (Art Neko) Eiffel Tower Grunge single stamp or available in the Springtime in Paris set
  • White cardstock
  • Chalk (pastels, decorator chalk or powder eyeshadow will all work)
  • Cotton swabs or pom-poms (for applicators)
  • Paper towel or tissue
  • Ribbon
  • Adhesive
  • Script embossing folder (Sizzix)

Directions:
1. Cut standard cardstock to 5 1/2″x8 1/2″ and fold 2 1/8″ from each side to create a gate-fold card.
2. Emboss two 2″x5 1/4″ panels of white cardstock using an embossing folder. Rub chalk on the embossed panels to color. adhere panels to gate-fold flaps.
3. Stamp the Paris collage stamp on the remaining cardstock with clear ink and dab with chalk, then rub over with a paper towel to lock in the color. Trim or die cut the panel as desired.
4. Wrap ribbon around the closed gate-fold card and tie in a bow.
5. Adhere stamped panel to one side of the gate-fold only so it will open.

Lastly tonight I wanted to send out love and good wishes to my friends Audrey and Moya who just got married on Saturday. I was honored to attend their wedding and I wish them all the best! That’s what the card was white and romantic like LOL:) Thanks for stopping by and til next time happy crafting!

Metallic Stamping with PanPastels & Stamp Winner!

Hello friends! Well, the last time I looked at a clock it was lunchtime. Ever had a day like that? That’s fine, I like busy days once in a while and I love days when I get to announce winners! I got over 500 entries on the Artneko giveaway post and the lucky winner is…. Ruth Pfinder! Ruth, check your email! OK, I’m gonna keep this post short but I do have a fun technique video using clear embossing ink and metallic chalk. I am using the metallic PanPastels Hubby got me for Christmas but you can use whatever you have. Watch the video to see how it is done:

Video! Sorry, email subscribers, I still can’t get the video thumbnail to show up in email so you’ll have to see it on my blog:( 

Did you like the triple looped bow? If you want to get your paws on one of the handmade wooden bow making jigs my husband makes than you can email me at artstudiosofbangor@yahoo.com and I will send you a PayPAl invoice and ship one right out to you! Thanks to the several people who ordered today already after watching the video, it is very much appreciated;) The butterfly stamp I used is by ArtNeko and papers and cardstock are from the scrap bin. Thanks so much for stopping by and til next time happy crafting!

Are you ready to color! {and stamp too!}

Hello friends! I hope you are having a nice Friday! I feel like I have been bouncing from project to project this week but I have to tell you I love it! I’ll be starting my Mixed Media art Journal series on my blog tomorrow, I’m calling it Mixed Media Fun and each video will explore a specific technique or supply. I hope you check back for that! Today though, I have a couple tutorials for you on how I made the stamped panel for this card:

DCF 1.0

I love the Flower Fairy stamp collection from Crafter’s Companion, I bought EVERY unmounted stamp set they offered on sale at Custom Crops a couple years ago and I am so glad I did because you can’t find them all anymore! There are a few (probably the most popular ones) sets of cling mounted flower fairy stamps available directly at Crafter’s Companion but they don’t have the massive amount of stamps that the original unmounted sets had and they are more expensive because they are mounted. But it is an option if you are looking for something similar and missed the boat.

DCF 1.0

In the first video I will show you how to color the fairy using watercolor pencils and a blender pen:

I love the way she turned out but I did not like the white background so here is how to stamp a background without masking. You will need a clear embossing inkpad (or glycerin and a make-up sponge) chalk pastels and a pom-pom or Q-tip to apply the chalk, have a look.

You can get the set of chalk I used here at Custom Crops along with other color sets and the last time I checked they were on sale!

DCF 1.0

I stamped the sentiment right on the background with purple metallic ink and then used embossing tinsel (OK show of hands, who has been stamping long enough to remember embossing tinsel, turns out it ages very well since I bought mine 8 years ago at a yard sale LOL!) to give it a bit of bling.

DCF 1.0

I decided on an easel card because I wanted a little bit more space to decorate and the floor of the card gives me that opportunity.

DCF 1.0

I decorated it with orphaned die-cuts that were sitting in the use-it-or-toss-it-basket, don’t we all have one of those? I hope you try these techniques and if you do share it on the facebook page, I’d love to see it! Have a great night and til next time happy crafting!

Stamp Huffing, Chalk Backgrounds & OSA Sketch #227

Howdy folks, Today I made a card using several products I bought at the Stamp Show last weekend:

DCF 1.0

I used stamps and dies from Local king Rubber Stamps, A background stamp from Rubbernecker and ginkgo eyelets from the $1 bin at Eyelet Outlet. I also used this weeks sketch at Oriental Stamp Art.

DCF 1.0

We have a month long technique challenge at Oriental Stamp Art too, this month it is stamp huffing. I made a quick video on how it is done. You need dye based ink pads and/or watercolor markers, it is a really pretty look.

I used the first stamped image as the focal point on my card and the second generation image (2nd huff & stamp) on the rectangle in the background. I die cut/embossed the focal image as well. I am not typically a fan of dies to match stamps (it just makes me feel a little too lazy) but the intricacies of this stamp plus the fact that the die embossed the image too sold me on the set (the buy 4 get one free deal at the show helped matters too!)

DCF 1.0

I used one of my favorite background techniques, poppin pastels, on this card with a big tapestry stamps I scored on clearance at the stamp show from Rubbernecker. Look how easy the technique is, you can do this with any stamp or ink up a bunch of smaller stamps to make your own background. Any soft chalk will work for this!

One more tip!!!! OOPS envelopes!

Have you ever made a mistake scoring an envelope and you have an extra crease where you don’t want it? That happened to me with this one but I did not want to waste the paper so I folded the envelope right (I have 2 mistake creases in it) then ran it through my die-cutter in an embossing folder (basket weave from Darice) and you cannot see the mistake, only a pretty texture!. This might be best for giving the card in person in case the texture fouls with mail sorting equipment. Anyone know how an embossed envelope would fair in the mail? That’s it for me today. I’m glad I had as chance to play with my new goodies from the show. Til next time happy crafting.


I’m a Chalk Chick & WOYWW!

Boy, I love Wednesdays because I get to snoop around to other crafters desks and not feel one bit self conscious of my housekeeping skills! 😀 Yes, it is time for my weekly “Craft Hoarding Enablers Group” AKA What’s on your Workdesk Wednesday! Last week I was taken aback by some beautiful PanPastel work done by Jackie at Scrap Bang Wallop (love that name!) and I wanted desperately to get that look…the problem being that I do not have Pan Pastels. They are expensive and they look absolutely brilliant but alas, the do not reside in my stash. No worries, I have regular pastel chalks though so I decided to try to get a similar look with them:

The trouble I was having with my cheap student grade pastels (SMI brand I paid $15 for a box of 48) was that they would not stick to my smooth cardstock (well, duh, I always use pastels on rough paper) so I had to use fixative (OK ,I used hairspray 🙂 ) but the color was still not bold enough. I reckon the pan pastels are just super saturated and they would color anything but I never tried them. So I decided to play around with a damp sponge and it worked! Check out my video to see the technique…I’ll warn you, I’m a little more giddy than usual in this video!

Was that fun or was it just me? You can also stamp with clear embossing ink and use a dry sponge or pom-pom to apply chalk over the stamped image and it will stick to the stamping, that technique is called poppin pastels. Also you can stamp an image and pick up color with a water based blender pen and use that to pick up chalk and paint with it. Chalks are awesome! Here is a look at the chalk backgrounds I made:


Thanks for stopping by and if you want to see what other crafters are up to check out WOYWW! Til next time happy crafting!

Crafty Fun with Eyeshadow and Hot Glue!

Have I mentioned lately how much I love the Dollar Tree? Of course I do not love the cheap crap that is imported from China that breaks the second you get it home but it can be a treasure trove of inexpensive crafting supplies. The trick is to keep your mind open and look beyond using the items for their intended purpose. Case in point-shimmery eyeshadow! When I saw this in the cosmetic isle I couldn’t believe how much it looked like Pearl-Ex (one of my favorite crafting supplies) and at $1 a pop i had to try it out. See how it looks on the butterfly on the upper right of the card:


The nice thing about the loose shimmering eyeshadow is that it comes with a brush in the cap and it is in a spill proof jar. And yes, it is cruelty free (not tested on animals) I always look for that when shopping cosmetics.

Here’s how to use it:

  1. Stamp image with clear embossing/watermark ink.
  2. Use the provided brush to tap the powder on the design and then brush it around to cover well.
  3. Now take a larger softer brush (any soft brush will do) to brush off the excess.
  4. If desired you can add a fixatif to seal down your design.


After making this wonderful discovery I ran into my sons cub scout leader and she wanted to make the boys some “good deed coins” and she wondered if I had any ideas. This is a great idea for kids, they start out with the coin in their right pocket then when they do a good deed they put it in their left pocket. Here is what I came up with:


I think these would also look great on a card or scrapbook page! Here’s how to make them:

  1. Squeeze a dime size dab of hot glue on a silicone mat.
  2. Ink up a stamp with clear or pigment ink and place in the glue puddle.
  3. let dry completely then remove glue from stamp.
  4. Dust the “coins” with shimmer eyeshadow.
  5. Seal with clear spray paint.

I used a green hot glue stick for the coins. I was voiding the green glue out of my glue gun and since I hate to waste I made some hot glue dew drops and used them on my card as embellishments. I played along with the sketch challenge at Oriental Stamp Art this week.

Thanks for stopping by and til next time happy crafting!

The Softer Side of Stamping…

 Boy, after weeks of rain we are being spoiled by wonderful warm sunny weather. That means more time outside and less time in my dungeon of a basement craftroom. Still, I need my daily crafting fix so I took a few minutes…7 to be exact and made this card and video so you can see how easy it is to squeeze a few minutes of stamping time in daily during the busy summer months.

Stamps: Large Butterfly, swirls (Tattered Angels), Text background (Stampfrancisco), Frame, sentiment, small butterfly (Papertrey ink)

 This card only uses a few supplies, a half a sheet of cardstock, chalk pastels (AKA decorators chalk) and a couple of colors of ink, some stamps and a clear embossing ink pad or glycerin. See how easy it is to use clear ink and chalk to make the above card:

This card qualifies for the following challenges:  Cheerful Stamp Pad , DDH Challenges, Cards For Men, Incy Wincy Designs, KB Cute Monday , Make it Monday, Stamp with Fun, Stamps & Fun = Creativity, The Outlawz , Dream Valley Challenges, Allsorts, 2 Sisters, Inspire Me Fridays, and Flutterby Wednesdays

Thanks for stopping by and til next time happy crafting!

Fun With Wheel Stamps and More!

Happy sunday folks. Today in most of the US we set our clocks ahead (an extra hour of daylight yea!) and when that happens Spring is sure to come soon! I am very excited because tomorrow I get to pick a winner for a brand new set of ProMarkers so if you have not entered for this awesome prize may sure you do today on the give-away post. Here is a card I made using Promarkers, wheel stamps, chalks, rainbow ink and the freebie digistamp from Thursday’s post, video to follow.

Supplies: Digital Stamp (Lindsay's Stamp Stuff), Rubber Stamps: Pink Persimmion (button), PSX (sentiment), Stamp Wheel (Stampin Up!), Ink: Inkadinkado (clear), Klaidacolor (Rainbow), Color medium: Promarkers and Chalk

Here is a video showing you how to make this…sorry it is so long, I knew it was a mistake when YouTube gave me permission to post videos longer than 10 minutes because I can talk all day!

Ane here is a close up of the card, yes, I know it is loud and bright but aren’t we all sometimes? 

 Thanks for stopping by and til next time happy crafting!