Hi friends! I have been very inspired to create wedding projects this spring because I have a couple of friends getting married! I think many young people are first introduced to DIY while planning their wedding as either a way to save money or inject their personal style on their special day. Todays project will help you do both. This tutorial is created with a beginner in mind so my apologies if it moves a bit slower but I am hoping it will make it helpful to any beginners. Also since this project is great to batch out you can use the same design for Christmas cards or anytime you need a bunch of cards.
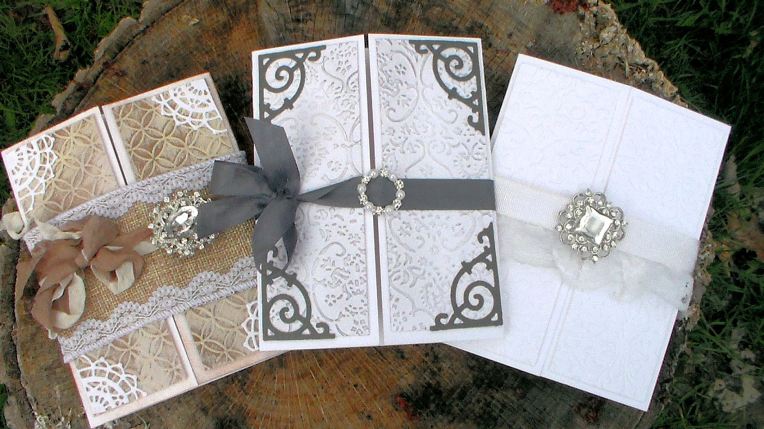
The supplies you need for this project are simple and inexpensive so I urge you to seek out quality items because it will make the cards feel really luxurious. The cardstock I am using is 110# Recollections cardstock from Michael’s, a ream of 100 sheets is about $13, that will yield enough cardstock for 150 cards with embossed panels with extra. You could get 50 reply postcards from the extra if there were no mistakes. Please note that all 110# cardstock is not the same, the Georgia Pacific 110# is much flimsier. For a wedding get the good stuff and at a big box store you can use a coupon. The other splurge is the embellishments but they are surprisingly affordable too. The buckles I am using are less than a dollar from Totally Dazzled and if you use the coupon code FRUGALCRAFTER you can save an extra 10% bringing the cost of your DIY wedding invitations to about a buck a piece. Don’t wait, the coupon code is only good through June 15th, 2016! To buy a custom invitation with layers, embossing, vellum and embellishments like this would cost $5 each or more! I’d rather spend that money on a honeymoon!
Don’t be overwhelmed, watch the video to see how easy these are to make and glean some helpful tips!
Let’s get started!
Supplies:
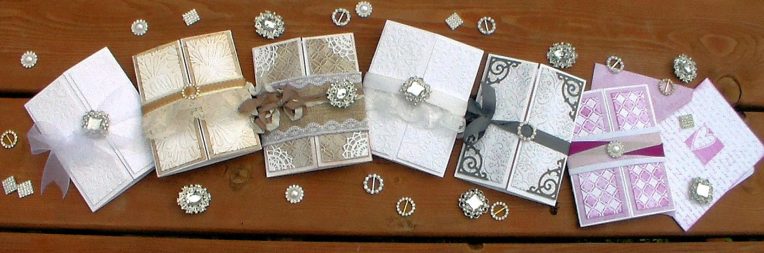
- Rhinestone slides, buckles & charms (Totally Dazzled)
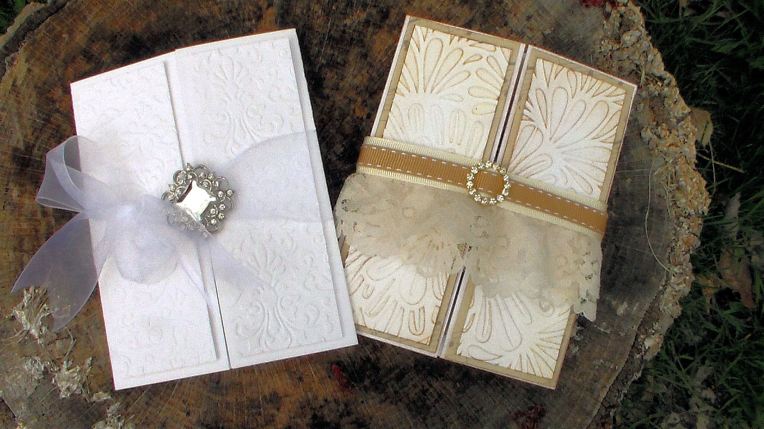
- Heavyweight white cardstock (110# Recollections brand)
- Embossing folders and die cut machine (or purchase embossed cardstock)
- Ribbon, lace and assorted trims
- Foam adhesive and double stick tape
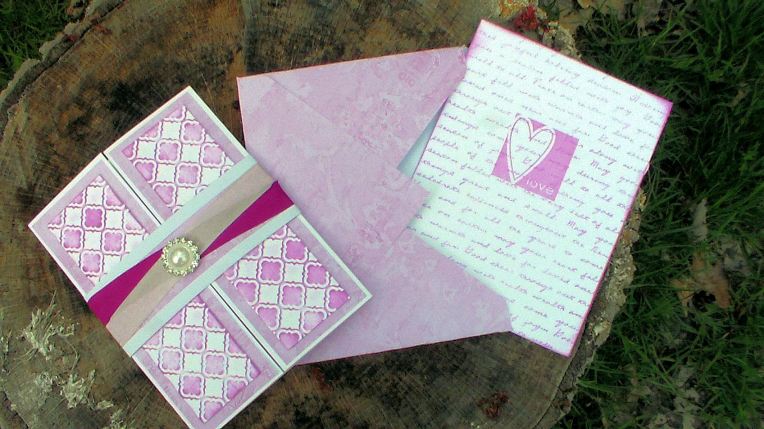
- Vellum (A pack of 50 ink jet vellum is $10 at a craft/office supply store)
- Brads
- Ink and patterned paper (optional)
- Corner dies or punches (optional)
Directions:
1. For each gate fold card you will need a 5 1/2″ x 8 1/2″ piece of cardstock. Score and fold 2 1/8″ from each side to create the base.
2. Trim embossed cardstock to 5 1/4″ x 1 3/4″ and adhere to each panel with foam tape.
3. Print wedding invitation words on vellum and attach to inside of the card with brads. Tip: attach to patterned paper and glue the paper in the card.
4. Add a rhinestone buckle on a length of ribbon, wrap around card and tie with a bow.
Tips!
- You CAN print on vellum with an ink jet printer, just give it a few minutes to dry before using.
- Batch it up! Do all of the card base folding in one sitting, emboss all the panels in one sitting, do all the glueing at once. You want to do this assembly like style to make it quick and easy. Gather those bridesmaids and groomsmen and put them to work. (pay them with beer and pizza, just keep the food away from the invites LOL!)
- Don’t worry about “rules” this is YOUR day, use the colors and motifs you like, nowadays anything goes! One of the prettiest wedding color schemes I have seen was my nieces Sarah’s wedding and it was green, black and orange, it was stunning!
- Don’t go crazy if this is your first time crafting. Stacking ribbon and inking embossed panels can look great but every additional step can add a lot of time when making a big batch of cards. If you don’t think you will do a lot of crafting after the wedding opt for pre-embossed paper or a pattern paper you like instead of investing in a die cut machine and embossing folders. Better yet, see if you have a crafty friend who has a die cut machine you can borrow!
You’ve got this! Start early and don’t let it become stressful, if you are not already a crafter it may lead you down the road to a wonderful new hobby and if not at least you can say “I did it myself!” and that is an awesome feeling! Congratulations on your special day and til next time happy crafting!
Sponsored by Totally Dazzled
PS Do you know someone getting married? Please use the handy sharing buttons below to share the love:)
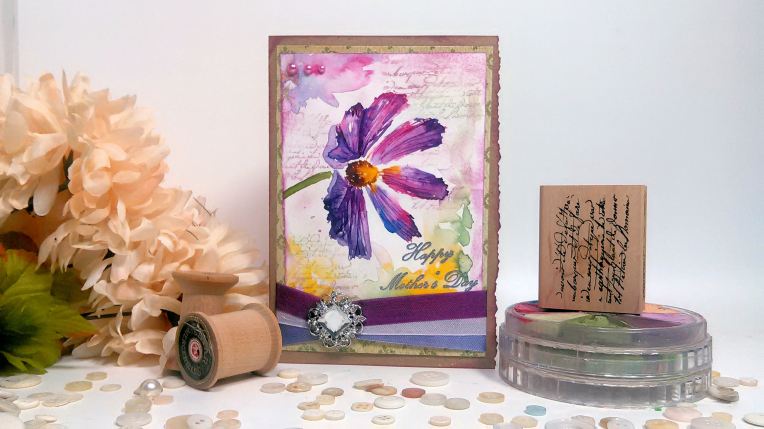
PSS Below is the card I made my mom for Mothers Day, these Totally Dazzled buckles are great for ANY card-making occasion not just fancy weddings!

Dee Wooten dabw@me.com
>
LikeLike
Wonderful! Thank you so much for this video! I was asked recently about doing wedding invitations and now that thought is not so scary. 🙂
LikeLike
I can’t decide which one ist best!
When are you going to show us how you painted the cosmos?
LikeLike
I am thinking of demoing them during the live show on Friday.12:30pm ET
LikeLike
Since I can’t easily get to the nearest Michael’s to where I live, I checked on Amazon and the Recollections 110# cardstock is nearly $30 for 100 sheets. Do you have any experience with Neenah 110# cardstock?
LikeLike
I think you can order the cardstock from micheals for $13 a ream and there are often coupons you can use online. If you are getting Neenah you need to get the 110# Classic Crest, the 110# index is the same as the 110# GP from Walmart, I made that mistake thinking index would be thick like an index card but alas no. It is still fine for stamping but for nice sturdy cardbases get a nice heavy card, for weddings anyway. I think it is probably pricier than the recollections.
LikeLiked by 1 person
Hi Lindsay! You did a great job as always! If I don’t watch I feel like I miss something in the day. Even old posts. Sometimes especially the old posts. Sometimes I need to see and hear the “old Lindsay”!
Does that make sense? I miss the rambling easygoing just having fun and not hurrying. Just kind of a feel of joining me for the day!
I don’t mean that as a slam or anything cruel-like I said-I don’t miss a tutorial. I just like you r old ones too. They feel homey and comfy!
Thank you for all you do and I will continue to watch every day like I have for years!!!
You feel like a friend! Have a great day!!
Sincerely,
Teresa 🙂
LikeLike
Hi Teresa, Summers coming, that means no time to edit so you will have some “vintage Lindsay” to look forward too, in fact I have a couple of “one take wonders” coming up this week LOL!
LikeLike
Great tutorial and not just for a wedding invitation. I’m glad you showed all the steps,, many card makers just getting started need good reliable information.
LikeLike
I love the cards! A little FYI, when I’m embossing and want a little color highlights I will go over the embossing folder with distressed ink or chalk ink before I emboss which will transfer the color as I’m embossing. Since I’ll be using the same color on all embossed pieces I don’t have to stop and clean the folder until I’m finished. This saves me a lot of time.
LikeLike
Love these! They are so elegant and so-able. Great video. Now if the girls would get boyfriends I could start planning! HA!
LikeLike