Hi friends. I am super excited to share today’s project with you, an inexpensive, custom, refillable planner! Did I mention is was cheap to make?
I even made the jump last night and moved everything over from my month at a glance calendar, I love having more room to write “to-dos” in the week at a glance book as well as having the monthly calendar pages for other projects and events coming up. Best of all I was able to put as many pockets and sections as I liked which was the problem I had with other planners, some things were redundant and it just looked like you were creating more work for yourself if you used it. I think a planner should make you more efficient, not less. But, there is room to get creative! Watch the video to see how I made it, you can whip one of these up in about an hour and I bet you have most of the supplies already!
Video!
Supplies:
- Mini 3 ring binder (I used an Avery brand one that I picked up for $1 at Mardens but they will be $5-$7 at an office supply store)
- Small week at a glance planner (Dollar Tree with the back to school stuff)
- Patterened paper
- Lamanator or contact paper if desired
- Washi tape
- Paper clips
- Ribbon
- Adhesive
- Free printable calendar pages from Scattered Squirrel
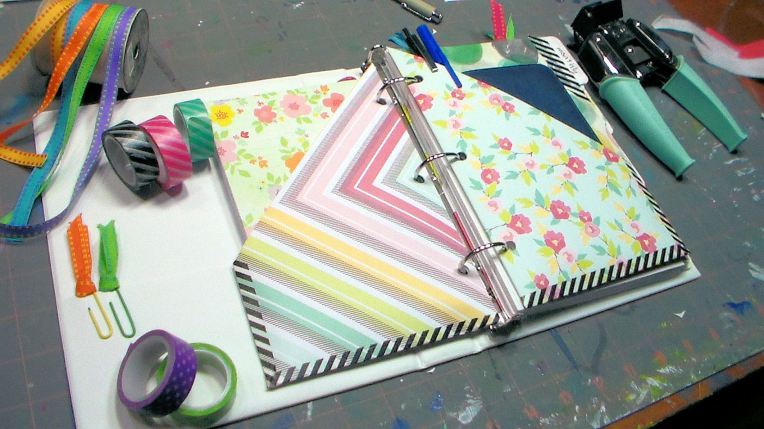
I made pockets to hold things like pens, my checkbook, receipts and project notes (I communicate with my clients via email mostly so I simply print out emails and put them in the pockets.) I had the habit of making notes and leaving them on my nightstand, in the car and at the computer. This binder is small enough to bring around with me and if all I need is the week-at-a-glace I can take it with me because it is removable. I could never get into using a calendar on my phone or computer, I need to write it down, even if I never look at it again if I write it I usually will remember it and the planner will ensure that I remember it BEFORE t is too late LOL!

I am not new to using a planner, I have used a month at glance for a couple of years, it was the only way to keep all of my freelance projects mapped out, I have slowly progressed from random notebooks and sticky notes to everything in one place and I like it! Now, if only I could get my house this organized. Baby steps 🙂 Let me know what you think and if you plan to give this planner a try. I only had to spend $2 to make this, the rest of the stuff was in my stash. I have been asked by a lot of people to make a DIY planner since the cute, popular, scrapbook company ones cost $50-$100. I hope you liked it! Thanks for stopping by and til next time happy crafting!

Love it! Not only very practical, but also such a cheerful & pretty design – puts the joy back into organizing! Thank you.
LikeLike
I am definitely into the planner craze. Thank you so much, Lindsay, for sharing your ideas……Linda E.
LikeLike
Luv the pockets, Thanks for sharing Lindsay
LikeLike
I love this! I’m making one for myself and my sister. The Scattered Squirrel is a neat website! Thanks for the address.
LikeLike
Thanks for sharing this with us…I want to make one for myself and maybe has Christmas gifts too…love this very personal design…makes it all worth the effort…
LikeLike
pretty everywhere to look in there! love all the colors and patterns!
LikeLike
Hi Lindsay 🙂
What a fantastic DIY Planner; It is colourful, easy to make and it will be a joy to use. Thank you!
Best wishes.
LikeLike
Me and planners don’t work, but I function well with Evernote on my phone, so no worries. Glad to see someone talking sense and making a cheap planner. These people who spend $100 on planners could’ve gotten a ton of paper crafting supplies for that kind of money 😉
LikeLike
Awesome planner! This is exactly why I watch your videos…you come up with such brilliant ways…I am definitely gonna make this kind of planner…Love it!
LikeLike
Cool. Love the pretty papers and different washi tapes.
LikeLike
Awesome looking planner!! Glad to know I can make one for cheap. It’s crazy how some planners cost more then $30-50!?
LikeLike
I have designed my own planner for a couple of years now. Mine cost just a little more – I design the week page in word and then have it printed and bound at a local copy store. I love the blank backs to the pages so I can write notes.
LikeLike
Love it, its exactly what I have been looking for and the best part is I can Taylor it to my likes. Thank you for sharing.
LikeLike
Reblogged this on MAYMAYCRAFTS and commented:
Here is a frugal take on the new planner craze! Lindsay knocks it out of the ballpark as always.
LikeLike
Thank you! This is such a simple explanation of something I sometimes complicate.
LikeLike
Like you Lindsay, I’ve used dollar store planners, but I think I could be more organized if I got a formal one. It is so tempting to jump on the planner bandwagon, but the cost is crazy! Thanks for thinking it through and creating a doable, very useful and cute planner w/o spending a lot. Cute washi details – even on the pens!
I found YouTube video ideas to create pockets, folders, pen holders and book marks. Finally bought a laminator, so in ready to rock 🙂 Thanks Lindsay!
LikeLike
Hi Lindsay – What do you think about making a Faux-dori (DIY Midori Travel Planner)? Could you create one for less without buying fancy tools and share? I’m thinking I’d like an art one for drawing, painting and mixed media.
LikeLike
love it and love YOU! would love to see what you do for your family’s calendar. anything tutorial worthy?
LikeLike
and, maybe I missed it, but where did you find the colorful calendar printables?
LikeLike
I’m afraid not, it is a store bought calender (or the free one from the oil company LOL!) that is pinned to the wall and I write all of the kids stuff on it. Nothing fancy but it works:)
LikeLike
thanks…. did you see other question above? where did you find calendar printables that you used in this planner? so cute!
LikeLike
they are from scattered squirrel, link above, they are the 2015 monthly ones split to 2 half pages.
LikeLike
DOH! thank you. 🙂
LikeLike
Awesome planner idea Lindsay! 🙂
-Grace
LikeLike
That is such a clever appointment/organizer. Also, I’m thrilled to find out that the 3 whole punch can be adjusted to different sizes. I had no idea it could be done and there have been so many times I could have used that very helpful tip. Thanks so much.
LikeLike
I love this planner. So easy, Thank you so much
LikeLike
I want to say a BIG Thank You!!! I have been ready to pull out my hair trying to decide what planner to buy this coming year. Last year I spent about $50 on an Etsy planner, which was nice but then I ended up not using half of it. I have been desperately trying to find an alternative planner that I like and would use. Somehow this past year I ended up using two different planners at the same time. I have actually used the cheap $1 planner from dollar tree before as my yearly planner. I have always seen and wondered what you were supposed to do with the cute mini binders like you use in the video. I never knew that you could adjust a hole puncher to fit the holes on the mini binder.The mini binder is so cute!!! Genius!!!! I cannot wait to make my own!!! And for super cheap!!!!
LikeLike
What gorgeous prints ! Perfect for staying organized and be inspired!!
LikeLike