My First Time Working With a Scrapbook Kit!

Hi Friends! Do you ever get in a creative rut? Maybe you have trouble coming up with fresh new ideas with the same old supplies. I go quite a while between buying scrapbook supplies and stores where I live never have the new stuff so when Edith at Scrapbooking With Me Boutique asked me to be the guest designer for September and use the new kit I jumped at the chance. BTW they are having a Labor Day sale through Monday, prices reflect the discount, no coded needed:) Here is the layout I made with the kit featuring new 2014 My Minds Eye Paper and die cuts, stamps, stencils and more:

crazylayout

On the video I will show you all the techniques for making these pages, we will make a page start to finish using the contents of the kit plus white cardstock, adhesive and 4 colors of gelatos from my stash:

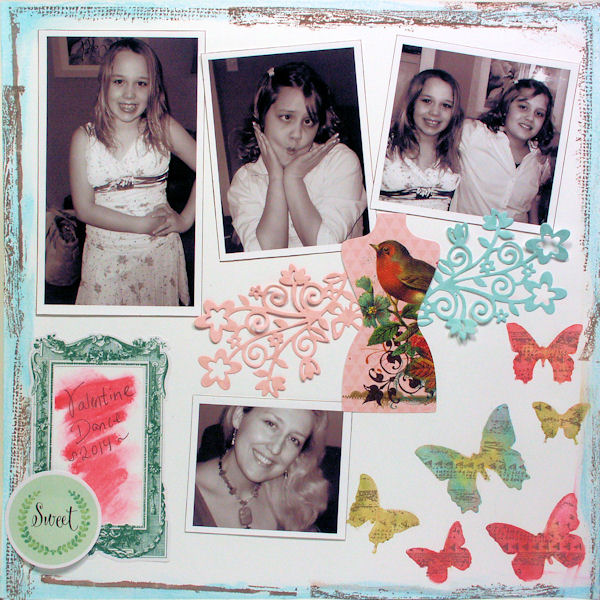
Here is a close up on the page we made in the video:

DCF 1.0

And the other page:

DCF 1.0

If you are looking for a way to inject some fresh inspiration into your scrapbook pages check out the Scrapbooking with Me September kit. You can also visit their facebook group too or check out their store in Vinemont, Alabama. Here is a look at what you get in the September kit:

10411066_10203358096487132_5431727317951093506_n (1)


These scrapbook pages came together really quickly (for me) and I love the way they look! No work, all fun. I think I will have to try kits again and I hope you do to! Thanks for stopping by and til next time happy crafting!

Another Card with a Doily on it!

I’m making sure I get my money’s worth on that Cheery Lynn doily die I bought at the stamp show last month LOL! Today I snuck down to my craft room while the house was quiet and made this card using the sketch from Oriental Stamp Art:


The lantern stamps are from BoBunny and they set was another stamp show purchase, it was a steal of a deal at $3! The card came together quickly because All I had to do was stamp the lanterns on cardstock and then from paper scraps and piece it. All the paper is from a 6×6 My Minds Eye pad. The thank you stamp was one of my first ever stamps I got 12 years ago by PSX. So my tip for today is to mix the old with the new and let your creativity blossom! Thanks for stopping by and til next time happy crafting!

You’re a Doll!

I got 2 sketch challenges done today, not bad for a Monday, eh?

Stamps: About Art Accents, Paper: My Minds Eye, Clip Art: Lettering Delights, Ink: Colorbox Chalk Amber Clay

The first card uses the sketch over at 2sketches4you, I love to “do” the sketches over there because it is a nice warm up to my other artistic endeavors and I can usually guarantee that I will get one thing made on a Monday:

Stamps: About Art Accents, PAper: MME, Clip Art: Lettering Delights

Also over at Oriental Stamp Art (a fabulous yahoo stamping group) there was a layout challenge, I think it was supposed to be a quick and easy one but, well, I did not get mine done in under 10 minutes LOL!

Stamps: About Art Accents, Paper: MME, Clip Art: Lettering Delights

All of the stamps I used are from About Art Accents, They have a fabulous selection of Asian themed stamps as well as wonderful vintage Christmas stamps, fairies and some teacup mice that are so sweet that you will get a toothache when you see them and if you buy 2 mice you get one free (they are next on my list LOL!)

The Kokeshi dolls are clip art that from lettering delights, I love how all of it works with the pattern paper from My Minds Eye.

That’s all for today, that’s for stopping by and till next time happy crafting!

2 New Cards {2sketches4you}

Happy Friday folks! I got a chance to play with the sketches from 2sketches4you and here are the cards I came up with:

Paper: MME, DCWV, Digi-stamp" Lindsay's Stamp Stuff, Rubber Stamp: SU!, Lables: Scrapnfont, die cuts: Cricut, Ribbon Dollar Tree

I used Laura’s Sketch 30 as well as the versatile bonus sketch. I printed the cupcake digital stamp on yellow cardstock and colored them with prismacolor pencils (see yesterdays post for a tutorial) then trimmed it and adhered it with foam tape. On the other card I cut a flourish with my cricut but I didn’t like the color so I flipped the paper over and inked it with whispers vanilla ink then I added one of my crocheted flowers, a ribbon and a stamped sentiment.

This card was made with Laura's Sketch #30
This card was done with Kim's bonus sketch.

Thanks for stopping by and til next time happy crafting!

Here for You!

I played with my “Friends 24-7” set from Stampin Up! a bit more and came up with this super quick card:

stamps/cardstock/ink: Stampin Up!, pattern paper: MME, American Crafts

First I layered the 2 pattern papers and stamped over both of them and colored my image with colored pencils, then I used my Scor-Pal and Scor Bug to make the stitching holes (way easier than using a ruler on a foam pad and it is accurate!) I traces the holes with a pen, added the sentiment and used a stampin around wheel to make the border at the bottom along with another row of pierced holes. This card only took a few minuted and used up scraps left out on my craft table, I call it productive cleaning;)

Till next time happy crafting!

Slacker Housewife Card

Here is another card that would be suitable for mother’s day (or anytime you want to give a fellow mom a laugh 😉 I used this weeks sketch from 2sketches4you, a Crafty Secrets stamp and an Erma Bombeck quote for this card. The best part is it only took a couple of minutes to make!

chore1

This is printed on the inside of the card. Font: Cityscape

Whenever I want to make a funny card for a girlfriend I look for a quote by Erma Bombeck, she was a great American humorist right up there with Mark Twain IMHO, If you have never read anything of hers check out “At Wit’s End” You will laugh so hard you might pee your pants! She is that funny and never mean, that is hard to do!

Well, I’m off to do a little birthday shopping for my hubby, Happy Cinco de Mayo (Hey, an excuse to make Margaritas, what’s wrong with that?) and till tomorrow Happy Crafting!

Make your own double-sided paper!

I LOVE double sided paper (esp. Bo Bunny, Cosmo Cricket and K&Co.) I like to use it on cards where you can see the opposite pattern peeking out from the inside. But sometimes the opposite side of the paper isn’t quite right, of course I could head down to the local scrapbook store to see if they have paper that is just right or I can make it myself. Guess what I am going to do 🙂 . If you are like me you have stacks of pattern paper lying around, many with 3 sheets of each design and you could scrapbook 3 lifetimes worth of photos before you made a dent in your stash…I’m not the only one am I? Anyway to make double-sided paper simply find two sheets of pattern paper and adhere them back to back with a glue stick. That is what I did here:

Stamp: Lindsay's Stamp Stuff, Pattern Paper: My Minds Eye (blue), DCWV (pink), clear stamps: Inkadinkado, Cardstock Georgia Pacific (whitw), SU! (green), Twill Tape: Home Sew, Brads: Miss Elizabeth's
Stamp: Lindsay's Stamp Stuff, Pattern Paper: My Minds Eye (blue), DCWV (pink), clear stamps: Inkadinkado, Cardstock Georgia Pacific (white), SU! (green), Twill Tape: Home Sew, Brads: Miss Elizabeth's

The two sheets of pattern paper are sturdy enough for a card and this way I can use two patterns that I like from different paper companies. The stamp is one I designed called Flourished Chickadee (only a buck folks and you can print and use it as much as you want!) and boy it is so quick to use. I scribbled some watercolor crayon on the image, blended it with a SU! blender pen, trimmed it and added it to my card. I used natural twill tape as a ribbon, it is super cheap if you get it in bulk at homesew.com, they even have white cotton ric-rac there that you can dye to match your projects with reinkers and every once in a while they have free shipping. check them out.

That’s all for today, till next time happy crafting!

A lovely rainy Tuesday…

…I’m serious, the kids slept in so I had time to layout a bunch of cut fruit before they woke up so they could make fruit kabobs for breakfast (And I got a cup of “quiet coffee” yay!) When I picked up the girls from school we went to the natural food store to get eggs so we could dye Easter eggs tonight (they are currently boiling) and then we went to the library. While they were at school today I got a chance to make a card using the sketch from the 2sketches4you blog:

Stamp: Lindsay's Stamp Stuff, Paper: MME, Die Cuts: Cricut, Punch: Fiskars

Using sketches is really growing on me, I think when I realized that you don’t have follow the sketch exactly I started to really enjoy it. I like this sketch blog because it is fun to see how others interpret the same sketch. I used the leftover My Minds Eye paper that I used on the layout “on my mind” last week and a new digi-stamp I designed for the card.  BTW I am having a call for design team members, click on the tab at the top of the page for details. Oh and get this, the stitching (except for the bit on the edge of the lace to hold it to the card) is fake! I threaded slivers of white cardstock through some of the buttons then glued them on the card and the sewing on the white paisley paper was done with my Cutterbee piercing bugs on a foam mat then I drew over the holes with a red pen. Easy and quick! To color I used Prismacolor pencils and a Prismacolor colorless marker, then I used a pom-pom to add light blue to the background.

Well, the egg timer is about to go off and I want to give the eggs a chance to cool before my oldest gets home so we can dye them! I’ve had a box of egg dye on the kitchen counter tormenting the kids for weeks, they can’t stand the antisapation! Speaking of eggs I have a fun freebie for you tomorrow…staytuned! Also, Tonight (in the states) ABC is running the Charlie Brown Easter Special at 8pm or 7pm depending where you live. Til tomorrow happy crafting!

Feeling Sketchy?

I am! Remember yesterday I was talking about not having the crafting mojo this week? Well, after I posted I was surfing the net and ended up at Becky Fleck’s Page maps site and typically I don’t “do” sketches but there was a contest to use  her sketch and do a layout with the theme “whats on your mind” and the winner get a huge…I think Becky called it “obscene” amount of My Minds Eye products! Well, you know how I love free stuff and I love MME paper so I grabbed some I had on hand and did the sketch, here’s how it turned out:

Layout by Lindsay Weirich, Paper: My Minds Eye, Die Cuts: Cricut, Font: Georgia

The picture was taken at the family Valentines Day dance and my kids’ school in February (yay, I have a recent pic of myself, how often does that happen moms?) and I love my daughters sweet face in this pic. I used my Cricut and the Accent Essentials cartridge for the die cuts and random letter stickers for the title. Wow, I used stickers and no stamping on a layout! That’s a first! I have some fun craft news to share with you tomorrow so I hope you will check back then, until tomorrow happy crafting!