Snapdragons in Watercolor & 10 Giveaways!

Hi friends! I have another (or should I say 10) giveaway for you today but first I am going to show you how to paint this picture of snapdragon flowers:

snapdragonfinal

Here is a pattern you can print out and trace on your watercolor paper. I recommend graphite paper but if you do not have that you can scribble a pencil on the back of your printout and trace. You can also see my DIY graphite paper tutorial here.

snapdragon_pattern_Lindsay_Weirich

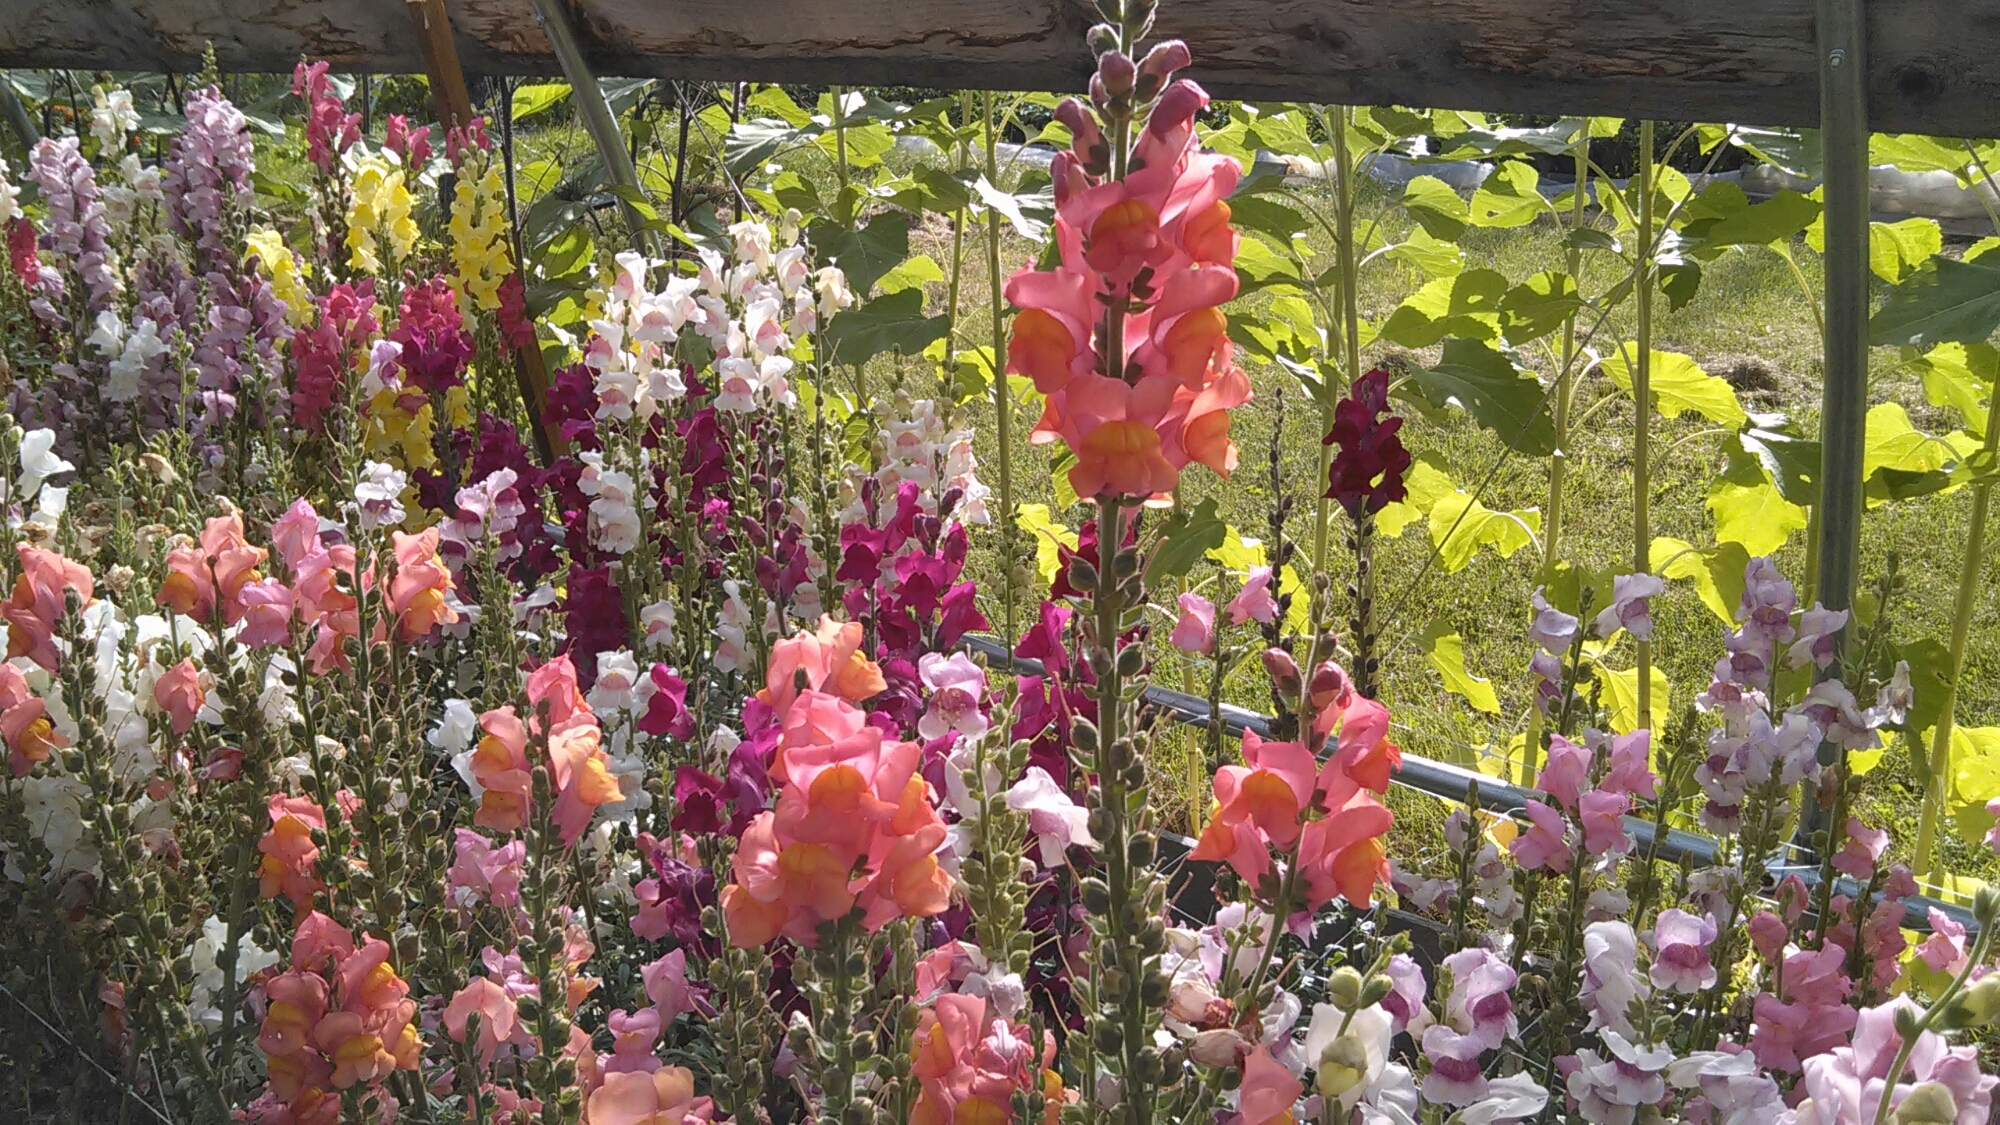
And this is the reference photo I took at the Common Ground Fair this year. I created the pattern because all of these flowers might be confusing to deal with. This will provide color reference though.

wpid-wp-1443289888722.jpeg

And now, here is the video!

You can find the products I used at our sponsor Jerry’s Artarama!
Turner watercolor 18 color set-5ml tubes (List $150 SALE $29.99!)
Mimik Kolinski Brushes (vegan synthetic)
Mimik Squirrel (the large grey handled wash brush I used)
Brush Stand
Arches Watercolor Paper (up to 65% off list on all sizes of blocks!)
Palette

This painting is part of the Creative Arts Collaboration #ThinkPinkArt collaboration and in honor of Breast Cancer Awareness month Jerry’s Artarama is giving away 10 pink wristwatches. Leave a comment below and I will select 10 winners at random next Saturday. This contest is open to US residents only so just let me know that you live in the US in your comment to be eligible. I want to thank you for spending some of your weekend with me tonight, take care and til next time happy crafting!

Let’s Draw a Reindeer!

C’mon, why not? I will be teaching the 4th graders at my kids school how to draw a reindeer as well as make a reindeer craft next week so I thought I’d practice with a video tutorial for you. I used a slightly textured lightweight paper, a vine of charcoal and a kneaded eraser but please feel free to substitute with pencil or chalk or crayon. Let’s draw!

If you want more drawing tutorials just let me know, this was fun to film, I don’t know why I never made one before. Thanks for stopping by and til next time happy crafting!

Stamping Off Technique & a Stamp Giveaway!

Gosh, I hope you are not getting tired of the stamp giveaways LOL! I have some lovely Thanksgiving stamps to give away from About Art Accents.  BTW this stamp set retails for $19.99 but is on sale for $7.99 plus $1.50 postage, that is less than half price even with shipping! All you have to do is leave a comment and I will pick a random comment next Friday as a winner, simple huh? This giveaway is open to EVERYBODY!!! Here is a card I made with some of the giveaway stamps:

DCF 1.0

I belong to the yahoo group Oriental Stamp Art, there are challenges going on all the time. This months technique challenge is to ‘stamp off’. I made a quick video demonstrating the technique as well as putting the card together. Yes, the card is made in 7 minutes. I also included a lot of beginner and money saving tips in the video.

I think we forget some of the ‘golden oldies’ when we stamp. By using limited supplies you can really stretch your budget as well as your creativity! If you have any questions (and to get entered in the prize draw) be sure to leave a comment. Thanks for stopping by and til next time happy crafting!

Pandora Style Paper Beads!

Howdy folks! I have been playing with the idea of making Pandora style paper beads. I had bought some metal bead cores (you can get a pack of 500 for less than $5 with free shipping on Ebay) and made some glass beads but when you get many of them on a bracelet it can get quite heavy.  So why not paper? Here is a bracelet I made with the beads I made:

DCF 1.0

It was a joy to wear too, I love the sound the beads make with they move and the bracelet is so light! The beads don’t really take all that long to make either. I do the assembly line style: roll a bunch, glaze a bunch and glue in the bead cores. Here is a video to show you how:

See it was easy! I used ultra thick embossing enamel (UTEE) to glaze mine but you can use clear embossing powder as well, it might take an extra coat or two but that’s no big deal. I found a size 9 (5.5mm) knitting needle is perfect if you are using cardstock or thicker scrapbook paper but if you are using book pages or magazines go up to a size 10 (6mm) knitting needle. Also if you are using thinner paper you will need 3-4 strips rather than the 2 I used. If you can’t find bead cores you can use sewing or scrapbooking eyelets. Bead cores are cheaper overseas through the seller 8 Seasons ebay though. If you have any questions on this project or just want to let me know what you think you can leave a comment below. Thanks for stopping by and til next time happy crafting!

Werewolves & Watercolor

Hello friends! I just got back from running with my neighbor again (my second run..er, jog with bits of walking here and there of the day might I add) and it is beautiful out with the full moon lighting the way. Well, it was good until I thought about werewolves and I couldn’t get to her house quick enough and right before I got there a deer jumped out into the road.  Luckily I realized it was a deer (and not some scary werewolf) or I would have dropped dead of a heart attack that had nothing to do with my fitness level.  So now I am having a cup of decaf tea (instead of wine-go health!) and finishing up some computer stuff. I have been doing a lot of watercolor painting this week and I finished up this painting yesterday. I have this project as a PDF tutorial in my shop with step by step photos and instructions in case anyone wanted a more complex project than what I have been doing in the free videos.

DCF 1.0

My tutorials for sale contain a PDF printable set of instructions (The beginner kits have lots of step by step photos) a printable pattern and a high-resolution picture of the finished painting (heck, you could print the painting on watercolor paper if you did not want to bother painting it LOL!) It only costs $3, what a deal!

[end shameless plug]

I had a few great questions in the comments after the last two free watercolor painting videos so I decided to answer them in a quick {ish} video tonight:

If you had a question that I did not think of just leave a comment and I will get back to you:) Well, that’s it for tonight, my runner’s high is wearing off…now I’m mostly hungry. Thanks for stopping by and til next time happy crafting!

Glitter Cosmos Earrings and Display cards!

Hello Friends! I might as well call this an “inspired by pintrest” project because that is where I got the idea, I had seen lots of glitter resin jewelry being pinned and I really wanted to try it. Here are some of my first pieces:

DCF 1.0

DCF 1.0


Then I got creative! I grabbed my silver, turquoise and purple glitter from Papermart (only 99 cents a tube too!) and some silver dry tempera. Dry tempera is a children’s craft item, you mix the powder with water to make washable paint for kids. I wanted to see if I could color resin with dry tempera and yay! It worked! Best of all it doesn’t add any moisture to the resin so it cures well! I love how it looks like outer space, hence the name “Cosmos Earrings”.

earrings2

I will also show you how to make the fun mesh window display cards in the video.  This is a great beginner resin project so don’t be scared, give it a try!

I really love wearing my fab new earrings!

linny_earrings_blog

You can find all of the fabulous supplies I used and more at Papermart. Thanks for stopping by and til next time happy crafting!


Let’s make a card with pressed flowers!

Hello friends! Last week I showed you how to press flowers in the microwave. Today I’ll show you how to use them in a card:

DCF 1.0

I used this dress form stamp from Lost Coast Designs. This is a great image because you can use it on a steam-punk card or a very ladylike card as I did here! The trick to using pressed flowers on your cards is making sure you have adhered them well so they don’t peel back and get damaged. Watch the video to see how:

OK, the video was a bit silly but you get the idea! And, wonder of wonders I found the A2 kreate-a-lope I lost yesterday, it got closed in a stamp binder. When I cleaned a stamp and put it back I found it! Go me! I win the day! I used it to make the envelope for my card then I used another 3″x3″ envie inside the card to hold a secret note! Best of all someone can put the note in the mini envie and the card can be reused, I love up-cycling!

DCF 1.0

You may notice that I dressed the card up a  bit from what the video showed, I used the rulers background (also from Lost Coast Designs) to add in some background (Yes, I know, I should have done that before gluing in the flowers but, hey, nobodies perfect) and a sewed on a  scrap of ribbon and glued on some die cut buttons.

DCF 1.0

That’s it for me today! Thanks for stopping by and til next time happy crafting!

Pretty Paper Pom-Poms!

Howdy folks! Today I am going to show you how to make a paper pom-pom gift topper and tag using supplies from Papermart!

DCF 1.0

We will use Twisted Paper Cord, Large Shipping Tags, and Bakers Twine. You will also need scissors, stamps of your choice, ink pads and hot glue. Watch the video to see how it is done!

If you want to make this project more masculine simply use other colors such as orange, brown and navy blue. This little extra adds so much to the presentation of your gift! thanks for stopping by and til next time happy crafting!

Happy Memorial Day!

The sun is shining! The floor solvent fumes have dissipated, the kitchen floor is not done but I did manage to de-sticky the original floor that was exposed, I’ll wait til the kids are back in school to remove the remaining tiles and adhesive, no need for all of our lungs and brain cells to suffer LOL! P.U.! I plan to get outside and enjoy this sunny day! Before I do I want to share a simple necklace I made last month but never got around to posting:

DCF 1.0

I used 3 strands of tiger tail. I put the large glass beads on first then strung on e beads in red, clear and blue and loosely braided them before securing the ends with crimps and a toggle clasp. Very summery. Very Maine.

DCF 1.0

That all for me today! Thanks for stopping by and til next time happy crafting!