Sketching Orange Slices in Marker!

Hi friends! Today I played with markers and it was fun! This was actually supposed to be posted for Sketchbook Sunday but I got busy and didn’t realize I forgot to blog it until 10pm and I was too tired to type.

56927166_10213941733242874_6116640828073967616_o.jpg

I was inspired to sketch these oranges because they looked so cool sitting on the cutting board. I accidentally bought Cara-Cara oranges instead of navel oranges at the store last week and this was the last one. None of us are a fan of this type orange hence it was still on the table after the kids left for school. So before I tossed it out to the birds (the crows like them apparently) I thought I would draw it. It also gave me a chance to try out a new set of markers I will be using for an upcoming tutorial.

Supplies (affiliate links used)

I am excited to work more with these markers. It’s ice to try something different once in a while and see where that takes you. I find when I do this I come back to my other work more energized and refreshed. It’s like cross-training for your crafty muscles LOL! If you have a suggestion as to what flower to draw for the in-depth marker tutorial please let me know in the comments below. thank for stopping by and til next time happy crafting!

Homemade Embellies for Pennies!

Phew, what a week! It has been so hectic around my house lately, I’m glad to finally have a chance to slow down and just breathe. My favorite way to unwind is to play in my craftroom. While I was in the dentist chair Monday I had an idea: I wonder if I could make some cool embellishments in my clay molds with hot glue…ya know what? I sure can!

I used some digital stamps from the Love Grows and Posh ‘n Trendy sets as focal points on my card. the pretty double-sided paper is from GSD Studios, I couldn’t pick which side to use so I cut the paper a little longer than I needed, punched the edge and folded it back on itself to make a pocket and stitched it with my sewing machine, I great way to fully use your double-sided paper {It’s just too pretty to hide the backside!} I used Copic markers as my coloring medium.

Tip: If your papers and embellishments don’t quite match try tinting them with the markers you colored your stamps with as I did here. I colored the red {punched} bird with markers after seeing the paper did not show up too well and the sentiment that looked to stark when it was white. I also used them to color my hot glue charms.

To make some nifty hot glue embellishments you will need:

Make sure you use silicone molds because the glue will stick to ceramic or plaster and it will melt plastic molds (Don’t ask me how I know.) 🙂

  1. All you need to do is lay the mold on a flat surface and squeeze hot glue into the molds. Let cool completely, the large the mold the longer it will take. The letter tiles took a minute but the Celtic knot took more like 5 minutes to cool.
  2. There are a few ways to color your embellies, you can use alcohol ink, or alcohol ink markers. My Copics worked great and they matched my card perfectly! After I colored them I drybrushed a little acrylic paint over it to bring out the detail. You could just paint it with 2 coats of acrylic paint if you want a solid opaque color too.
  3. 

    Variations on a technique:
  • Try writing or drawing with your hot glue gun on a silicone mat to make a custom title or embellishment for you next scrapbook page.
  • Make fake “wax” seals by squirting out a gob of glue on a silicone mat and pressing a rubber stamp in it. Leave the stamp in the glue until it is cool then peel off the glue. Be sure to ink up the stamp with clear ink or glycerin first so the glue does not stick. This looks amazing!

I love all that you can do with hot glue! With Valentines day on Monday you might be scrambling around for ideas for cards and classroom favors. Here is a look at the sets I used today and some other sets you can use to make quick and easy valentine projects:

 Posh'n Trendy StampsValentine Party Add-onValentine Party Printables & SVGFreebie: Vintage Sheet MusicA Lttle Lovin' Clips & CuttingOoh La La SVGPretty Packaging SVGCupcake Carrier SVGFun Favors SVGBox Bonanza!SweetTreat SVG3-D Mailbox TemplateLove Grows Here Digital Stamp SetEnvelope Bonanza!

Now let’s see what the Lindsay’s stamp Stuff DT has cooked up this week, I bet we’ll see lots of LOVE!

Margie Visnick

Tracey Allen

Leanne Garner

Tamara Bennett

Micki Harper

Karin Martin

Rhonda Walker

Diane Bove

Thanks for stopping by and til next time happy crafting!

She With the Most ____ Wins!

Happy Monday folks, back to a normal routine for me, the kids are back in school after spring break and I am back to work, today the Lindsay’s Stamp Stuff Junior DT has been challenged to make “girlie” projects. I chose to use the new Crafty Tools & Puns digital stamp set to make a few cards for some crafty friends:

Digital stamps & Envelope template: Lindsay's stamp Stuff, PP: BoBunny, DCWV, Markers: Copic

The envelopes were quick and easy to make with the Envelope Bonanza templates, I cut the SVG templates with my Cricut and SCAL software but printable versions are in the kit too. Here are close-ups of the cards:

I wrapped a strand of yarn around the card for an easy embellishment!
I treaded a length of twine through the buttons, a very chic look right now, try it:)

Here is a peek at the set:

Now let’s see how the junior DT did with the Challenge:

Cheryl Gorka DT Coordinator

Karin Martin

Jennifer Bliss

Rhonda Walker

Thanks for stopping by and til next time happy crafting!

A new Video and Freebie!

Hi folks! I’m going to keep todays post as short and sweet as possible, I’m not feeling too well today so I am posting then back to bed! I wanted to make sure I told you about the big Lindsay’s stamp Stuff Birthday Party we are having here next week: We will kick it of with a 3 day blog hop where we will give away 19 LSS stamp sets, a 3 day Virtual Crop where there will be a freebie each day {sign up at the MyGrafico Community to play along} and lots of fun. It kicks of right here Tuesday! More details on this post.

Now on to the projects, I use the pincushion from the sew pretty stamp set to make this:

I colored the pincushion on the box with Prisma markers and the one on the card with copics, I love them both! See how I did the background in the video!

I love the bright colors I get when I use markers on white cardstock but then I am left with a white background, see how to “Faux Mask” and colored the background with chalk in this video {My hand is not even in the way!}

Here are some close-ups of the projects:

Digital Stamps: Lindsay's Stamp Stuff, Paper: K&Co
I used twill tape rather than ribbon in these projects for a vintage feel.

And now for the freebie! Here is a cute teapot that matches the stamps in the Teariffic stamp Set from Lindsay’s Stamp Stuff. Click the picture to download:

Enjoy a "spot of tea" for free!

Here is the matching set called Teariffic:

9 stamps for only $5

OK enough from me, let’s see what the rest of the LSS DT came up with this week:

Shannon Neparko

Margie Visnick

Lisa Jurecek

Tracey Allen

Melissa Craig

Leanne Garner

Tamara Bennett

Cindi Hooks

Micki Harper

Rebekah Doak

Thanks so much for stopping by and be sure to come back on Tuesday for the big blog hop and crop, thill next time happy crafting!

Copic+Chalk is really cool too!

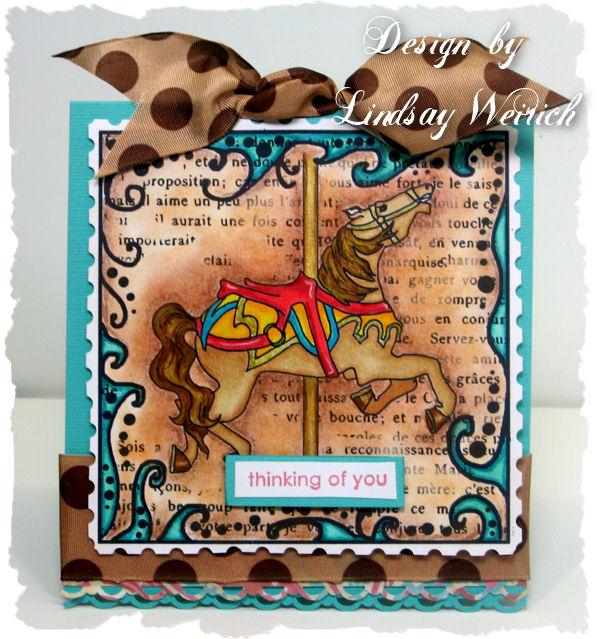
Hi folks, yesterday I showed you some card where I used colored pencil over Copic Markers. Today I want to show you how nice chalk looks over copic markers on this card using my Carousel Horse digital stamp from Lindsay’s Stamp Stuff:

Digital Stamp: Lindsay's stamp stuff, chalk: Generals pastel pencils and Sargent chalk pastels, Markers: Copic

First I colored the horse and the swirls on the frame with markers then I colored the background with tan chalk then I added a deeper brown shadow next to the horse with chalk pencil and blended it outward. I also added the white highlights on the saddle with a white chalk pencil. You can’t see it in the photo but I added Spica Atyou glitter pen (thanks Shannon!) to the gold pole and reins.

I like doing a chalk background because it gives you time to blend and if you really mess up you can erase it, I spent A LOT of time coloring the horse and i love how it turned out so I did not want to risk ruining it by coloring the background with the markers 🙂

thanks for stopping by and till next time happy crafting!

Egg-cellent cards and freebies!

Wow, I never tire of egg related puns! Kinda odd seeing as I am a vegan and haven’t eaten an egg in over 15 years LOL! There is something about a pastel colored Easter egg that just makes me smile 🙂 I designed the Cute Easter Digital stamp set in hope that it will make you smile too, here as my latest batch of cards from this set:

Digital Stamps: Lindsay's stamp Stuff, Colored Cardstock: Co'ordantions, doublemates, DCWV, White cardstock for stamping: GP Image Plus, Punch: SU! & Martha Stewart (bird)

I am still smitten with my new Copic markers. I was having a hard time getting a large area blended smoothly though and I wanted a blue background on this card, I do not have the copic airbrush system but I have an actual paasche VL airbrush that I haven’t used since my kids were born so I dragged it out put some denatured alcohol and a few drops of “stream” alcohol ink (ranger) in the fill cup and sprayed me a nice smooth background. The only problem is it is so smooth I might as well have printed it on blue paper LOL!

This is my favorite card of the batch. I am getting this Coopic blending thing!

I printed my basket 2 times on white cardstock, I colored one and trimmed it closely. The other one I trimmed in a 4.5″x6.5″ rectangle and airbrushed it with blue then colored the basket with grey and adhered the other colored basket on tip with foam dots:

I had lots of fun coloring all of the elements on this card. I needed a little somethin’ in the top corners and I designed a photo corner svg to go there, download is below as a freebie as well as the word art used on these projects! To make the grass I simply used scissors to snip fringe from two strips of green paper and taped them on under my basket.

I used 3 shades of blue markers to color the large egg quickly!

I also fringed the green paper on this card. The cloud is a nesting SVG file from Penny Duncan that I cut with my Cricut and SCAL software and ren through my big shot, there is a tutorial on embossing with the cricut and big shot here if you want more info. The mat on the card below is also embossed with one of penny’s files:

A quick and simple card!

Now for the freebies! Click here to download 2 simple photo corner SVG files. One has scored edges that you fold back over the edges of a photo. (it is the one I used in my project) and the other is a glue on photo corner.

Here is another EGG-stra for you: set of word art stamps to go with my Cute Easter set. Click on the picture to download 🙂

6 handy stamps for you! *LD Adornment font licensed from http://www.letteringdelights.com

Here is a peek at the Cute Easter stamp set, Think of all the projects you can make!

Only $5 in the Lindsay's Stamp stuff Shop!

Now lets see what the talented Lindsay’s Stamp Stuff DT has for us today:

Rebekah Doak *February Guest DT

Janet Rossi her last week snif snif:(

Margie Visnick

Lisa Jurecek

Erin Bailey

Tracey Allen

Melissa Craig

Leanne Garner

Tamara Bennett

Cindi Hooks

Micki Harper

Thanks for stopping by and til next time happy crafting!

Signs of Spring {and a freebie!}

This week I asked my junior DT to make projects with the theme “Signs of Spring”. I played with my Fancy Flowers digital stamp set and my brand new Copic markers that my mom gave me for Valentines Day (yes, I am spoiled rotten!) and made these…oh while you are thinking of spring don’t forget that holiday and winter products are 50% off in the Lindsay’s Stamp Stuff shop!

Stamps: Lindsay's stamp Stuff, Markers: Copic

I printed my digital stamps on cheap Royal Bright satin photo paper I bought years ago at Sam’s club, this paper was awful for photos but I love the way it worked with my markers, it has a smooth pearly finish (I’m so glad I didn’t toss it!) the card bases were made from the pretty colored file folders I bought at Sam’s Club last week, in fact all of the paper besides the yellow and the white photo paper is the smead file folders, frugal!

Stamps: Lindsay's stamp Stuff, Markers Copic

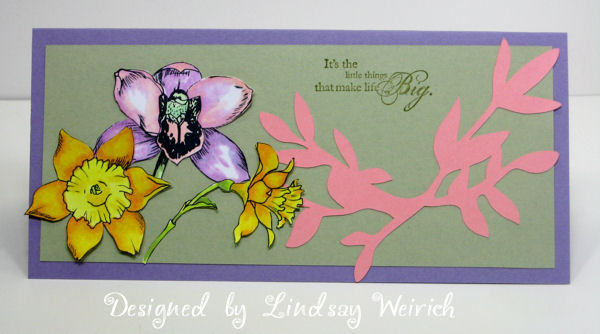
This card with the daffodils is my favorite, I’ll probably look at it next week after I get more experience with the markers and say “yuck” but for now I am pleased 🙂

Stamps: Lindsay's stamp stuff, Markers: Copic, Die cuts: Cricut (storybook)

I just realized that the paper I printed the 3 flowers on for the above card is GP Image Plus Cardstock (Sam’s club $7 for 250 sheets) and I love how the colors blended, of course next week that might be a different story 🙂

I was having a lot of fun coloring, I wish I could get the background to blend, experience!

This next card I sent to Mom as a thank you for the markers, she bought herself a set too and is counting on me to teacher her how to use them, I better practice!

Stamps: Lindsay's stamp stuff, MArkers Copic, Punch: Stampin Up

Here is a look at the Fancy Flowers set:

And here is a new set in the shop just in time for spring called Birds & Branches:

Now how about a freebie? These printable bingo cards will have your projects ready for spring!A Freebie for you, see download links below!

Click to download the Spring bingo cards in Black, Pink, Lavender and green. Then just print and trim, easy peasy. To use these in digiscrappping simply open the file and crop the card you want and copy and paste it into your layout, also easy!

Now lets see what lovely springtime projects the Lindsay’s Stamp stuff designers have for us:

Kristen Hamlin

Karin Martin

Jennifer Bliss

Cheryl Gorka

Cassandra Cushman

Tanya Johnson

Thanks for stopping by and until next time happy crafting!

Get out that vellum!

When I fist started scrapping there was noting lovelier than the sheer pristine sheets of vellum lining the shelves at my local scrapbook store. In fact I routinely used my 50% off coupons to buy packs of the white vellum at JoAnns. One time I hit a great sale of 12×12 embossed vellum at 10 cents a sheet and yet I bought a ton….OK so now what? I have a lot of vellum, isn’t it time we brought it back in style again? I think so too!

My sister got married this fall and as a gift I made her an album of the shots My husband and I took. This is the intro page. I used stamps by The Rubber Cafe to emboss the design on the vellum.  Make an embossing pouch to emboss easier, how to here. I stitched a pocket at the top of the page to hold a note to the bride and groom. My sister should be opening her album today! They return from their honeymoon today and it is waiting for them! I hope they like it! *By the way, I just got word that The Rubber Cafe will soon be carrying Copic markers at a price even The Frugal Crafter would love!

See this Layout "From the Heart" in the December issue of SNR!
See this Layout, "From the Heart", in the December 08 issue of Scrapbook News & Review!

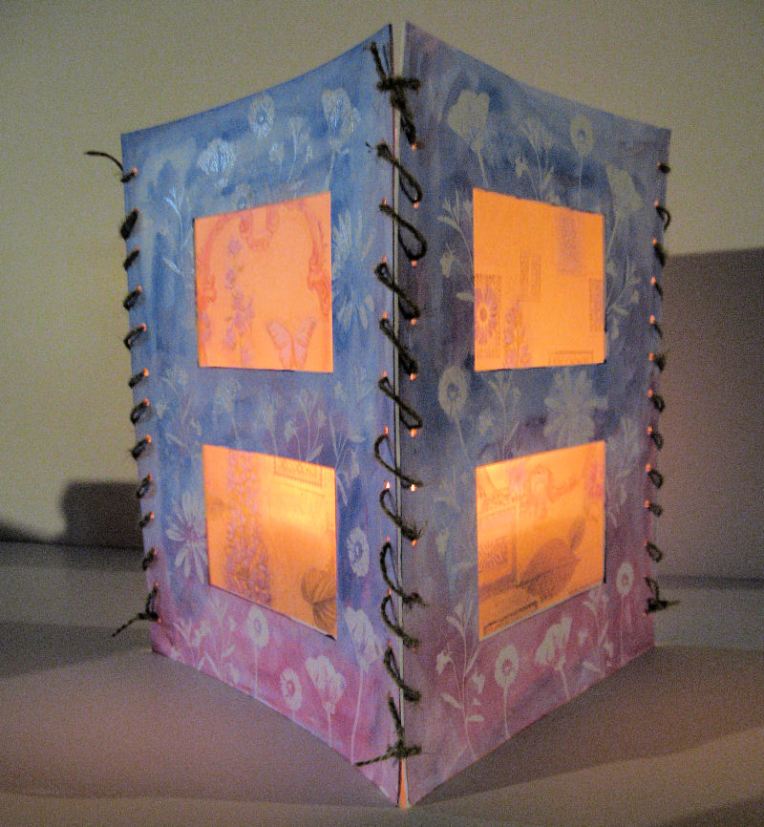
As for the printed vellum you can use it as a luminary. Here I took 3 picture frame mats and placed the printed vellum behind the “windows”, then punced holes in the side with my Crop a Dial and tied them together with twine. Inside I placed a large jar candle (no open flames please!)  it is beautiful when it glows!

K&Co
Project by Lindsay Weirich 2008, Vellum: K&Co

Other used for vellum:

Print journaling spots on them, trim closely and they will be ready to go the next time you scrap. Look in digital kits you already have to find some or check out DB boho frames & DB frilly Frames at scrapnfonts.com, they are still on sale I think!

Copt this look! Sheer Journal sots from Maya Road

Are you expecting? Make you birth announcements ahead of time the print the details on vellum with the baby arrives and attach to the cards with ribbon or brads (thanks to Nicolle who just had baby Lily this weekend for that tip, she is a cutie!)

Got more tips? Leave a comment, lets use up our stash!

Faux Copics, Faux Nestabilities and Free SCUT Files For You!

Hello there! I’ve been playing around with an idea I’ve had for a while…or as long as I’ve been seeing the adorable crafts made with Nestabilites dies. If you don’t know what they are they are dies that emboss and cut. For lovely examples check out Olena’s blog. They are however expensive and you need to buy one in each size that you want..Boo! So being the frugal goddess that I am I figured out how to get the look for free:

Bic Mark-Its
Stamps: Crafty Secrets, Color: Bic Mark-Its

I used my Faux Copic Technique to color the cute little witch and my cricut with SCAL software to design the card. Here is another Card I Made using these techniques:

Card by Lindsay Weirich copyright 2008

To cut the cards with the cricut you will need SCAL software, and the free font Halloweenies and the SCUT files: Click here for card 1, Click here for card 2.

To get the look of “Nestabilities” all you need is a stencil and a stylus. A stylus is what you use for embossing by hand, it has a little metal ball on the end so it impresses the paper without poking through it. I use a large one and a small one but if you don’t have these you can use a dried up ball point pen for the small one and a bone folder in place of the large one.

Faux Nestabilities Materials
Bic Mark-It colors for card

Here’s how: Rub the back of a piece of cardstock with waxed paper. Lay it down waxed side up on a stencil (I’m using a deluxe design color blocking template as my stencil. It’s nice to bring them out of retirement LOL!) With little pressure and with the large stylus trace your shape. If you press too hard you may rip your paper, esp with the thick DD template, thinner templates like brass or the cheap purple ones wal-mart sells are actually better for this! After you traced it with the big stylus gently trace it with the small one or a nice crisp impression. There you have it, no machine, no dies, just a simple stencil and you have the look of “nestabilities” for a fraction of the price. The thing I love about using the colorblock templates is that there are so many sizes in one template! And by using Bic Mark Its instead of Copics you save a bunch there too!

Thanks for stopping by and until next time Happy Crafting!

Lindsay