A Freebie for Easter! {let’s make cards!}

Hi friends! I love looking through stacks of vintage postcards at antique shops. People used to send cards all the time, especially on holidays such as Easter. Today I have a free template (printable PDF and SVG cutting files) for you to create four cute cards that won’t cost a lot to make or send!

blogeaster

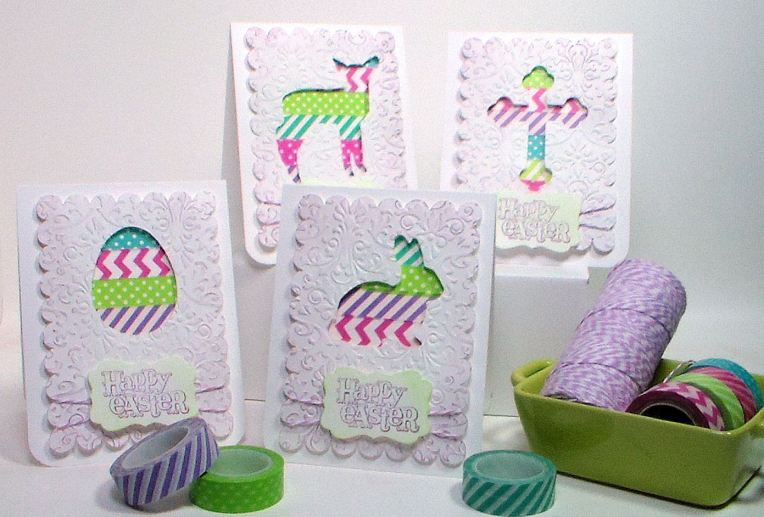
We will also be using washi tape and baker’s twine, two of my favorite supplies, from our sponsor Papermart. Watch the video to see how it’s done:

Supplies:

  • White Cardstock
  • Baker’s Twine
  • Washi Tape
  • Stamps and Ink
  • Sponges or color dusters
  • Embossing folder (I used a Damask pattern from Darice)
  • Foam Tape
  • Scissors
  • Free Template
  • Also a craft knife or die cutter for cutting the templates.

Directions:

  1.  Die cut the SVG template on a full sheet of white cardstock OR print the PDF template. If hand cutting I recommend using a craft knife to cut out the windows on the cards and then cutting the scalloped frame with scissors. You will have 4 scalloped papers with windows.
  2. Emboss the papers with an embossing folder if desired. You can also stamp a sentiment on the paper if you want to keep it flat (unembossed.)
  3. Center the window on a card base and trace the window with a light-colored pencil.
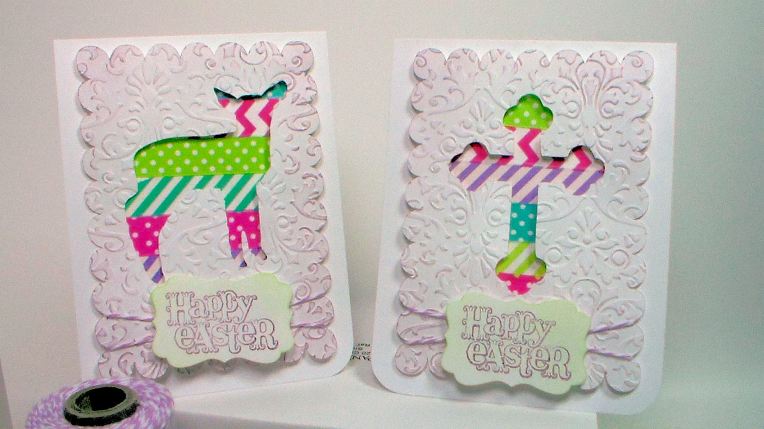
  4. Apply washi tape over the traced image.
  5. Apply foam tape to the back of the window.
  6. Wrap the panel with baker’s twine and adhere to card base.
  7. Stamp an Easter sentiment on a label die cut (not included) and adhere over twine with foam tape.

SAM_2482

Thanks so much for stopping by and til next time happy crafting!


Easiest Bows Ever!

Howdy folks! A couple weeks ago I asked my husband to make a stick of wood with some holes for dowels so that I could tie bows on it. He obliged and I liked it so much I asked if he would be willing to make more to sell. He said sure and I made this video and listed them here in my Shophandmade shop. Here are the Bow Making Jigs in action:

The original jigs were made from an extra walnut and maple chess board he had made. The thin strips of hardwood were glued on Plywood and strips of that were on a cherry base. I loved the way it looked but the amount of orders we received in the first two days completely used up our supplies! Then we started branching out into better woods, here are the new bow making jigs in walnut and maple.

DCF 1.0

They are hefty at a pound a piece and are very easy to use not to mention pretty enough to leave out. We kept the price the same but had to charge a bit more for shipping due to the weight.  You can buy your very own Bow-making jig for $20 plus $6.75 S&H in my shop! (international shipping is more, sorry 😦 ) Bust since I HATE charging so much to ship it I decided to throw in another bonus, you will get my Pretty Packaging and Box Bonanza SVG & Printable template set, an $8 value,  with this purchase along with the $4 of free digital product you earn ($1 for every $5 spent in my Shophandmade shop) normally. The template set and free product of your choice will be emailed to you so be sure you look for my email after ordering.

bowfreebie

So, if you want a beautiful hardwood USA made bow-making tool made lovingly for you and shipped with the utmost care please check out the ones my hubby made! Thanks so much for enduring my shameless promotion tonight and til next time happy crafting!

DCF 1.0 DCF 1.0

Patriotic Platform {shoes?}

Howdy friends, wow, it has been super busy here! I have so many projects in the works but none completed right now so I thought I’d share these quick tags I made using dies from Cheery Lynn Designs:

DCF 1.0

I cut the steampunk shoe out of 3 colors of cardstock and pieced them together on text paper and there they sat in a pile for a month. While cleaning last weekend I found them again and put them on a tag. There. I finished something. Now I feel quite virtuous. So, go ahead, finish something! It feels so good! Thanks for stopping by and til next time happy crafting!

Flip it, Flip it good!

Howdy friends! Have you ever heard of a flip-flop, swing, flip it or swivel card? The idea has been around in the stamping community for ages and I have examples here (with a tutorial to make it with a paper trimmer) and here (to make it with a plastic template) but I got really excited when I saw dies to make them with fancy shaped windows. When I saw that the dies cost $30 a pop I decided that I would try to do it with the thin dies I already have. It is easy really, all you have to do is make a jig for your die-cutter and I will show you how in today’s video:

Can you imaging paying $30 for 1 die that will cut one shape in one size for a very specific kind of card? No way! I can get a set of nesting dies for less than that and 2-3 sets if they are on sale and they can be used for other things too! Now I can make a swing card in any shape and size I have a thin die for, cool huh? In the defense of the $30 Flip-It dies they are thick Movers & Shapers dies and if you were making a ton of cards the same shape and size (think wedding invites or owning a stationary business) it would be a good buy because you could cut several sheets of cardstock at once. But, for the occasional cardmaker or hobbyist I think making your thin dies work a little overtime is just fine. Oh no, I am drinking the thin die Kool-aid…I’ve crossed over to the darkside…will this insanity ever end? LOL! Thanks for stopping by and til next time happy crafting!

Tips for Tricky Dies!

Hello Friends! I made a comment last week on Ask a Crafter that I did not care for detailed thin dies but in the spirit of fairness I decided to figure out how to cut them properly and I will share my results with you in this video:

It’s still a lot of work but at least I won’t waste any more paper. 😀 Thanks for stopping by and til next time happy crafting!


Green Sneakers Template Winner!!!

Happy Monday! We have a warm rainy day up here in Maine, no point washing the floors with the muddy dog tracks that will abound today so that means a little more creative time for me! I’ll be back in a bit with a crochet project (perfect for a rainy day!) but first I wanted to share out Green Sneakers winner and her lovely comment:

Wow! This is such a great site. So much to send our imagination into orbit. I would chose the Portfolio Template and the Kreate-a-lope Envelope template. My 94 yr old mom would have a ball with these. Something we could do together, when she is not making cards.              ~Sharon Hannifin

Aww, I love that she makes cards with her mom. Sharon, check your email for prize details! Last Monday I asked me readers to choose what Green Sneakers Templates they wanted to win and I have to say it was an enabler-fest, I kept finding myself checking out the templates you guys were picking, I have quite a wish list myself now LOL! I guess I should take advantage of the 20% off coupon that Green Sneakers is offering: Lin20 but I better not wait (and neither should you) because it is only good til Thursday the 21st! Below is a pic of some of the envelopes you can make with the Kreate-a-lope rip and flip envelope templates. If you don’t have an easy way to make envelopes I cannot recommend these highly enough!

Thanks for stopping by and til next time happy crafting!

Pick Your Prize,Make a Gift Set & 20%off at Green Sneakers!

Howdy friends and happy Veterans Day! Today I have an exciting giveaway for you from the fine folks at Green Sneakers. Whenever I host a giveaway I always hope the person who wins really likes their prize, well I won’t have to worry this time because you get to pick your prize! How cool is that? Go to Green Sneakers and find 2 templates you would most like to win, then come back here and leave a comment mentioning your picks. If I draw your name next Monday you get the templates you chose. Neat huh? Perhaps you would like to win the A2 Kreate-a-lope and Portfolio templates I used in my tutorial today:

DCF 1.0

…or maybe you want something completely different. It is up to you! And to sweeten the deal they are offering a 20% discount to any of my readers who want to place an order! Use the code Lin20 as many times as you want between now and November 21st.  Please note: You must log in and use the coupon code to see the 20% savings.You can tell your friends too and make sure they come by for their chance to win or use the coupon to get a head start on Christmas shopping! Check out their kits and specials for additional savings.   Alright, now for a video tutorial so you can see these wonderful templates in action:

I think these DIY card kits would make a fabulous gift or craft fair items. It is also a chance to use some of those embossing folders we crafters tend to collect…or is that just me? I think I will make some in wild bright primary colors (hubby’s idea) for children’s cards and some with more sentiments. I am considering taking special orders for these and bringing them to my next craft fair, I think they are a super gift (but I don’t want to sell out of my stash because I plan on giving some too!)

DCF 1.0

You could also use the portfolio to make a painting studio on the go, put a small palette of paints and a waterbrush on one side and cut watercolor paper on the other, instant art studio!

DCF 1.0

Use this idea with the supplies you have in the colors you like. I’m sure you can make a perfect stationary set for anyone.

DCF 1.0

So, to recap: Visit Green Sneakers and check out the goods, leave a comment on my blog letting us know what TWO templates you want if your name is drawn. That’s it. Easy Peasy. If you feel the urge to shop use the coupon Lin20 to save 20% on your order. This contest is open to U.S. residents only, sorry for any inconvenience:) Good luck! Thanks for stopping by and til next time happy crafting!

A Back to School Project!

Howdy friends! Today was the first day of school, all 3 of my kids had a good day, they all had nice teachers and friends in class and only a little homework. I, on the other hand, had homework. Beginning of school year paperwork to fill out, my goodness, I mean they have been enrolled in this school 5 years now, why do I need to do this each year (times 3 kids) hello, computers!?!  But I got it done and if that is my biggest complaint today life is pretty good! So, last night when I made out the kids lunch slips and lunch money checks I noticed that I was running low on envelopes so I thought I would make some cute lunch money envelopes to send in:

DCF 1.0

I used pages from old books that were in bad shape and headed to the dumpster before I rescued them.  I used my new Kreate-a-lopes to make the envies, stamped on them and done! Here is a video to show you how, it would have been shorter if not for my gabbing:)

I did want to mention how awesome the Kreate-a-lopes were and how nice the inventor of the templates is. If you want to help him grow his business of envelope and other innovative crafting templates you can visit his Kickstarter page here. Here are a few envelopes I made in seconds with the Kreate-a-lopes I have:

DCF 1.0

Of course during my envelope binge today I misplaced my A2 templates…you know what that means, time to clean the craft room.  Unless I get distracted by something shiny which will probably be the case since I made like 20 glitter rainbow resin pendants today…oh wait, I bet it is stuck to something with resin! Fun fact, you can clean unfortunate resin spills with nail polish remover (don’t ask me why I know this…) Luckily these template are very durable LOL! Wow, another rambling tangent today, go figure.

DCF 1.0

Thanks for stopping by. If you have any questions simply leave a comment and I will get back to you. Til next time happy crafting!

DCF 1.0

Pressed Flower Fairy Cards!

Happy Monday folks! It is a quiet day here as my kids are enjoying one of their last days of summer vacation. there is a lot of lounging going on! I took advantage of this downtime by printing my summer photos and playing a bit in my craft room. I made this card with the flowers I pressed in the microwave last week:

DCF 1.0

I’m afraid if I put the flowers away I will forget about them so I plan on using them up! They were so quick to press that I can make another batch when I get more flowers.  I made the envelope with my Kreate-a-lope and i used the leftover paper and a panel of white to make an insert because the purple cardstock i used is kinda dark to write on. Also I clipped it inside because that way the card can be reused!

DCF 1.0

I made an envelope seal to match my project, it was really easy! Take a 3″ long piece of clear packing tape and gently pick up a pressed flower with it, then press a punched circle of paper behind that, trim around the circle leaving a 1/8″ border of tape (so it will be sticky on the edges) and stick it on your envelope to seal it shut! You can make a bunch of these in advance and store them on waxed paper if you like! Another idea is to lay your flowers on your scanner and scan them and print them on sticker paper or labels and you will have custom envelope seals without having to use up your flowers!

DCF 1.0

Here are the steps I used to make the card. I might do a video on this, if anyone is interested let me know. First I inked up my fairy stamp, except for the skirt, and stamped. The fairy stamp is the Christmas Fairy from Crafters Companion. Then I recommend you color the fairy (I actually stuck the flowers on first but it will be easier if you color first!), i used Promarkers and Copics. Then ink the background if you like. Add drops of clear glue all over the back of your flower, little drops, and press it on your card. Add clear glue where you want glitter and then sprinkle on transparent glitter. I stamped stars around the wand because I stuck my inky finger on there and have to hide the boo-boo but I like it!

DCF 1.0

You can use glitter glue if you prefer, I am stickle-impaired so I used dry glitter.

DCF 1.0

Well, that’s it! I think I will try and motivate my crew now and hit the grocery store. Fun Fun! At least I was good and cleaned before I played in my craft room (the rest of the house that is, the craft area is a hot mess!) so I’ll be able to come home to a clean house! 🙂 Thanks for stopping by and til next time happy crafting!