Hi friends! I started this clylamen flower painting intending to do a simple ink and wash watercolor. I though, maybe a little gold ink, that won’t hurt anything, then I thought a samp would be nice and oh! What about a stencil? Yes!
So I am sorry if you were expecting a simple watercolor today (and you can do just that aspect of the painting if you like) but I did enjoy letting my intuition take over and create from the heart. I hope you enjoy this quite in-depth video tutorial. I hope it inspires you to grab your supplies and play too!
Supplies *Affiliate links may be used. Feel free to substitute with supplies you have on hand.
Watercolors (Renesans) Magenta, Sap Green, Cinnabar Green, Dark Hookers Green, Phthalo Blue, Raw Sienna
Swirl, text or pattern stamps *the stamps I have are discontinued, this is similar
Brushes: #6 round, 3/8″ filbert, 1/4″ angle
I bet if you dig through you supply stash will find supplies you have forgotten about (like my 15-year-old bottle of gold ink) that would love to be put to use. With mixed media art(or any art or craft really) the point is to take an idea and make it your own so see what you have and make something new! Thanks for watching and til next time happy crafting!
Hi friends! I couldn’t wait to play in my sketchbook this week. I decided to use my Grumbacher acrylic paper sketchbook because the paper is fantastic and doesn’t warp with layers of paint. It also works well for watercolor but I think it’s coolest feature is being able to remove a page from the book while you are working on it and put it back in afterward as I will do today. This is one of those projects where I enjoyed the process much more than the finished project and that’s how it goes sometimes but in a sketchbook you don’t need to be perfect or only stick to safe techniques, that ruins the fun! As yourself “what if?” and try it!
I also wanted to try some new supplies as several viewers asked me to try them out. The folks at Spellbinders/Jane Davenport were kind enough to send me a goodie box full of supplies from the Making Faces Collection of mixed media supplies and today I will put as many as I can to the test. I really enjoyed making this page and trying new things, I am not sure if anyone else will like it but at least you can see some new supplies in action and decide if you want to add any of it to your stash. I will go in-depth about what I think of each product (as well as substitutions you can use) below the video. Enjoy!
Non Jane Davenport Supplies (affiliate links used)
Let’s take a look at the Making Faces Collection. I don’t plan on reviewing all of the items in this line in seperate videos because there are so many but I can give you my impressions below. I will factor price and usefulness in my written reviews. Jane Davenport is the Maestro when it comes to selecting, inventing and packaging art products that we want to use. Her charming personality also makes us want to join in and create art. That said you probably have supplies at home that are very similar so if you want to do a project like this with what you have I will list alternatives but if you want to run out and get the cute new supplies I won’t blame you either:) I also wanted to mention that these are available at Michaels stores where there are often sales and 40-60% off coupons. I am using Michaels prices in the descriptions. You can also find these products on Jane Davenports website, the prices may vary as they are in Australian dollars but she does ship wordwide. *This is not sponsored although I did receive all of the Jane Davenport products in the review for free.
Let’s look at the cast in order of appearance…
Foundation Layers Stencil 3 pack ($12.99) These were high quality and very easy to use and make a front facing face. There are different options for noses, eyes and lips and you can selectively ink up the hair for different styles. I recommend this if you need help with drawing a face or if you just want to get that part over with quickly. The downside is that the face you make will only be forward facing and the same size but it’s a good start if you need it. there are 3 stencils and a canvas board in the pack. Tip: If you have no stencil you can trace a face from a magazine!
Colorsticks ($13.99) There are two collection of Colorsticks available: silky skin (neutrals) and Soul Window (bright colors) and they remind me very much of gelatos but these are way cheaper! These are probably my favorite product in the line and I find them to be a good deal and just over $1 a color full price and the container can be reused. These are water-soluble crayons that seem to fix themselves when dry. They are similar to any water soluble oil pastel you might have such as the Prima Oil Pastels, Crayola portfolio, Gelatos/Gel Sticks or Tim Holtz Distress Crayons. I did find other media layer well over this so they may be a bit less oily but the difference is small. I would recommend them if you don’t have a similar product in similar colors. They are a ton of fun and not too pricey!
Just a quick sidebar about gel/water-soluble crayons: Many products like this come in a plastic tube like a chapstick. Since they are not used up very quickly (I use products like this a lot and I don’t think I’ve ever completely depleted one) and it keeps the mess down I am not going to be a complete buzz kill here…..HOWEVER you can find plastic free water-soluble oil pastels that might leave your fingers a bit smudged but you will probably get more product out of them and they will cost less. Just something to think about:)
Matchmaker Set Acrylic Paint ($19.99) This takes the guesswork out of mixing skin tones. You get a 4oz bottle of a peach base color and then a 1oz bottle each of a highlight and a brown. You can use this to mix a solid color and paint an entire face in and then shade and highlight with other products or you can mix values as you go. This paint dries very quickly to a matte finish so I found blend the paint a challenge but take that with a grain of salt since I do not paint in acrylics often. Also the bottles have tips like fabric paint so you can easily apply the paint right to your page if you like. If that feature is not important to you a flesh/apricot/peach, brown and light pink/cream bottle of a craft paint like Delta Ceramcoat (also has a matte finish) would be very comparable at under $2 a 2oz bottle. Tip! To add more dimension to the paint you can mix with the Colorsticks! I like how the paint colors are simple and not intimidating.
Blend-In Blenders ($11.99) Surprisingly this was one of my favorite products. Each sponge featured different shapes and edges so I could use it with many colors at a time and keep them separated. There was even a very firm one great for stenciling. I found the shapes of these much more useful than the wedge cosmetic sponges I usually would use for this type of thing and they washed out well but they did stain. I would avoid using acrylic with these unless you are diligent about washing your tools right away. If you have art dedicated beauty blenders I imagine these are the same and I have seen similar beauty blenders at dollar stores and discount shops for $1-$3 but I haven’t compared them. I liked these a lot!
Palette Pastels ($19.99 -4 different colorways available) and Shimmer Pastels ($13-99-2 colorways available) These are similar to pan eyeshadow and Pan Pastels although they don’t seem to cover as well as pan pastels but that might be due to the softer blenders I used. I like that there are a lot of colors in a small space (honestly that is the reason my panpastels rarely get used on a mixed media piece) and they come in coordinating colors if you are unsure of what goes well together. Also, as always the packaging is beautiful and high quality (it doesn’t feel like the lid will snap off like cheap eyeshadows do sometimes.) Let me be really honest tho, a few years ago before investing in PanPastels I bought a cheap set of eyeshadows from target to see if they would work as well and used them on some projects and these worked just like my cheapies, that said the JD pastels, well the larger sets anyway, were not much cheaper and the case was more rugged so I’d say if you have cheap eyeshadow lying around that you aren’t going to use it will be comparable but if you need to go and by some get the JD because it will be about the same price. Also her pans are larger than the typical eyeshadow pans making them a better value if you had to buy new. I would recommend the Palette pastels over the shimmer pastels because you get way more colors for just a bit more money and there is a shimmery set. These are much softer and more pigmented that the tiny tins of pastels in her older collection.
Licence to Quill Pen ($12.99) *I am also going to lump the Ultimate pens ($8.99) in here two because side by side the nibs and ink seems the same, there might be more ink in the LTQ pen as it is bigger and the LTQ is nicer to hold. This pen is great, the nib is responsive and you can get fine to bold lines. I’d probably wait for a coupon since $12.99 is a bit steep for a disposable pen but it is really nice. I don’t have a brush pen exactly like this but the Faber Castell Pitt brush pen would be a suitable replacement if you have one BUT if you intend on going over pastels and paint I would go with Jane’s pens as it held up, kept a dark line and didn’t clog with the media underneath. My Pitt pen was not this juicy out of the box, but if you only want to use ink on clean paper or over watercolor it’s great.
Dramasticks ($26.99 per set of 6 and there are 2 sets available) Folks, I am really torn on this product being an eco-conscience consumer. First off these are a super soft oil pastel that make opaque marks. They are what I have wanted every China marker to be but never was. The quality is lovely, they work great and sharpen like a dream and I think if you had issues sharpening them you could freeze them for 30 minutes and sharpen for a fine point. However, these are encased in plastic instead of wood (why Jane why?) so you are literally sharpening off shavings when you use them. I have learned too much about microplastics to be cool with this which is a bummer because they are so nice to work with. Speaking of packaging the plastic insert that keeps the sticks safe in travel is useless when you get it home so into the trash it goes. The tins are gorgeous and nobody in their right mind would toss those so I don’t mind that at all but the plastics and the price give me pause because $26 for 6 pencils is kinda high. Although these are dreamy my conscious recommends a china marker with a peelable paper casing over this ONLY because of the packaging. I really hate to give this a less than stellar review tho…
Baton Blenders ($7.99 for 30) I liked these a lot because they are long enough to stand up in a cup and keep handy. Because there are so many colors you can assign a color to each blender so you can keep using them over and over again with pastels. I have used foam eyeshadow applicators for years with my pan pastels so there is no reason these won’t last a very long time assigning a color to each blender. You might even be able to split a pack with a friend. I recommend this as long as you are not treating them as a disposable product because that would be an unnecessary waste.
Velvet Pastels ($7.99 each, 8 colors available) These seems to be a very thin, matte opaque acrylic that is quite durable (I know this because I swatched some on my arm and it took a lot to wash it off!) and has a built-in applicator like a lip gloss. This product seems best to add little touches to a product. Coverage on a flat hard surface like paper is tough because the foam applicator seems meant for softer surfaces (hey, it worked great on my hand LOL!) so personally I will probably use this to add a touch of color to a 3D clay embellishment or something embossed rather than an art journal page. Also to consider: it seems to be a small amount of product in an elaborate plastic container and the price isn’t cheap. Given the mixed materials in this packaging it is unlikely to be recycled. I am so sorry to ruin all the fun things in life… Of course if you are just using this as a touch here and there it will probably last you a long time. I think any matte acrylic would be a suitable replacement and you can apply it with a Q-Tip if you want a similar applicator.
Magnetic Personality Brush Set ($44.99) This set features 4 very stiff brushes with magnets in the ends and a metal frame you can suspend them from or stand them up in. The stiffer filaments in these brushes make quick work of dissolving watercolor crayons and pushing around heavy body paint. The brushes are more suitable to acrylics because they are less absorbent and stiffer, I have no qualms with the brushes. The thought behind the holder is that after you wash your brush you can hang them to dry but after trying the hang the wet brushes they seemed too heavy to be held by the magnets and they fell. Hanging them while dry was not much better as they could get knocked out of the box very easily and they wanted to clump together due to the magnets. With these issues and the price I don’t recommend this product. It also takes up a fair amount of space on your table where 4 brushes could easily be put in a cup with other supplies. To be fair I am not a believer that brushes need to be dried upside down. The biggest culprit to swollen cracked handles and loose ferrules are letting your wood handled brushes sit in the water too long (like forgetting them over night and I did that yesterday when I started this project and no amount of hanging brushes upside down will correct that LOL!) Simply wash your brushes, wipe them dry and put them bristle end up in a cup. Or let them dry flat on a towel. No need for contraptions IMHO. Maybe I am missing something here, I mean you can use this as a riser on a shelf and you can put magnets on it to hold notes and stuff but it seems like an odd product to me. If I am missing something please let me know.
The Palette Hotel with Built in Penthouse Storage Stand ($29.99) This I really loved, it held almost all of the collection and it was easy to fetch out the supplies I needed quickly without spilling everything else out. At $30 this is an item to use a coupon on but it is very compact and functional. A great space saver! *This was not shown directly in the video but it was on my table holding all of my supplies.
In conclusion I really like the collection as a whole. These products are fun and inspiring and if that gets you to create then I am all for it. Keep in mind the prices I noted are MSRP in American Michaels stores. You will pay less if you use coupons or wait for sales. I urge you to be mindful of the packaging in the products and keep in mind what you have so you don’t buy the same color of paint or pastel in a new form if you don’t intend to just because the container is cute. As always Jane Davenport has delighted us with another beautiful and inspiring collection. We all have different tastes and styles so just because I like, or dislike something doesn’t mean that you will. You do you. Til next time happy crafting!
Hi friends! I hope you had a nice weekend, I think this is the longest I have gone without posting on my blog! I planned to share this photo of a recent painting I did on Sketchbook Sunday but I got sidetracked getting ready for a belated Thanksgiving dinner with hubby’s side of the family. It was such a nice time! Saturday while the weather was nice (perfect time to drag the large 20″x30″ painting outside to photograph it but I forgot LOL!) we decided to decorate our porch because is you wait until everything is covered with snow and ice it isn’t any fun and it’s 10 times harder! I will share photos of that after we have a pretty later of snow out, so far we have had a lot of icy slush.
This painting was another assignment for the class I am taking. For the painting above we were assigned to draw out subject and then collage elements of the design with rice and mulberry paper and then paint over it with watercolor. I worked from a photo I took of my son on vacation since all of my other paintings have been of my girls. I like the carefree modern vibe it has. My son is a “go with the flow” kind of kid so it fits his personality perfectly! This week is the final class and I have to get my assignment done so I will probably work on it today as my sore throat is back and I want to rest my voice so it doesn’t get worse. Luckily I already recorded my video for tonight so I can take a couple of days off if I need to. I am be so ready to be rid of this nasty cold! I think I might take this time without a proper voice to play with these surprise supplies that arrived last night! When Jane Davenport asked me if I’d like to try some new products that she had developed I had no idea what she intended to send. Have a look at the video to see her crazy generosity!
All of these products are manufactured by Spellbinders and are available exclusively at Michaels stores or Jane Davenport’s website. I had no idea Spellbinders made art and papercraft supplies! I have been a fan of their dies for years and I find this new endeavour very exciting! There is also a line of stamps, dies, markers, inks and storage available on Spellbinders designed by Jane Davenport for cardmakers too if you want to check that out. That die machine is the cutest and if my machine ever breaks that will be my pick! Spellbinders even has a Jane Davenport die bundle on sale for $35 as part of their Holiday Hoopla Sale, I don’t know how long the price is good for but they do have some nice deals if there was something you were looking for. Oh! I also have a coupon code if you are shopping on the Spellbinders website for 10% off: SBSAVE10 and that code ends on 11/30/18. *I checked the coupon code on some items and it seemed to work on sale items except for clearance and some bundles in the holiday hoopla sale. (I was surprised to see it work on some machines in the Holiday Hoopla sale so try it and see!) Links to Spellbinders are affiliate links.
That’s it for me today. I am seriously considering staying in my jammies all day with hot tea and a heating pad and exploring my new goodies, it will take my mind off my cold and the yucky sleety weather. I hope you are cozy and warm and hopefully healthy today and til next time happy crafting!
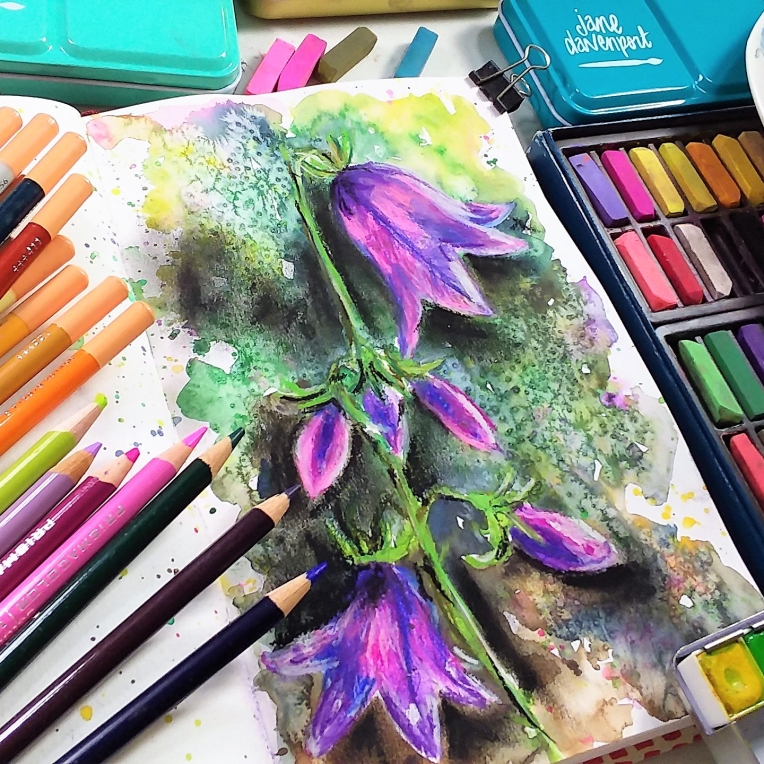
Hi friends! Today I am going to sketch from a photo I took in my sister’s garden. Isn’t it pretty?
Unfortunately I did not do it justice.
I thought about scrapping the whole project but I also think seeing someone work through problems in art is a valuable teaching tool and that is what you are going to see today. Me fixing many issues as they arise in a sketch. I hope you find it useful (or at least get a chuckle over my mishaps LOL!) Here’s the video!
Hi friends! Today I played with Brusho Pigment Powders. They are fun but there is a learning curve with them. Watch this in-depth video of experimenting and fun!
Sponsored by Smart Art, a wonderful monthly subscription art box company, Learn more or subscribe today!
I really enjoyed this box and I am glad that they send me colors of brusho I didn’t have already. I really need to explore this medium more if I want to be competent with it, I lack patience just letting the powders do their thing. I think it would be good to take a day and just play with these and work on a lot of paintings at once so I don’t overwork any. What do you think? Have you used these? Have advice? Let me know what you think and til next time happy crafting!
Hi friends! I just wanted to pop in today and let you know that Ever After 2018 starts in just a few days! See below for discount code!
Ever After is a magical 4 month immersive fairy tale themed workshop led by Tamara Laporte at Willoing.org. I am one of the instructors and my theme is wizard of OZ. My lesson will teach you how to paint this using watercolor, colored pencil and Pan Pastel.
There are several ways to take this course, you can do this year’s tutorials only, this years tutorials and style development lectures or bundle this years tutorials with other Ever After workshops. You can see all the options here. And through July 5th you can save 20% with coupon MAGIC2018!
I hope you will join m along with 15 other talented mixed media instructors for 4 months of magical fun on Ever After 2018! Happy Crafting!
Hi friends! If you joined us live on YouTube today you would have seen this painting unfold, if not you can watch the replay below!
I can’t remember the last time I had this much fun playing with acrylics! Yes, I said acrylics! I used other stuff too but the acrylics were the star!
I hope you enjoy this long real-time tutorial, if it’s too long you can click on the gear icon on the bottom of the video player (after you start it) and choose to speed it up. I know an hour and a half is a long time!
Below are the supplies I ended up using. *Amazon and Consumer Crafts affiliate links used. Consumer crafts has really great prices and they have 20% off this weekend in the paper crafting category so you can snag the stencils and gelatos even cheaper, use the code: SCRAP518 if you end up placing an order. Also I linked to the Studio 71 acrylics because I have used them and they are a great deal and much cheaper than Liquitex but if you prefer the Liquitex brand you can find them here.
Stencils (consumer crafts has the best price on stencils and I purchased the ones I used there) *plus a coupon for 20% off through 5/20/18: SCRAP518 on all papercrafts including papercraft stencils!
I ended up painting the edges of my panel white and then I mixed the violet paint I used in the painting mixed with white to make a lavender and I stamped a flourish design on the edges. I also stamped the corners with that stamp in white. This stamp is an old one from Tattered Angels but you can probably find a similar flourish stamp or stencil it. Foam stamps also work great for this, use what you have!
I hope you enjoyed this mixed media project, I sure did and it was fun to work on a rigid wood panel vs paper. I am going to hang this up in my kitchen! Hubby is repainting the cabinets white and I think this will look charming! So, are you going to give this project a try? I hope so and be sure to let me know how it turns out! Thanks for stopping by and til next time happy crafting!
Hi friends! I was doing to cleaning and reorganizing in the basement this week as it is finally getting warm enough down there to work more in my basement art area. One of the things I enjoyed about working in my tiny (but heated, yay!) office this winter was that I put a small shelf next to my desk to hold a full set of watercolor pencils, colored pencils, marker and pastels. I found I used these supplies so much simply because they were easy to get to. On the other hand in my larger section on my unfinished basement where I have space and tons of supplies these items rarely got used because I didn’t like to bother getting the tins off the shelf and I didn’t like the real estate the open tins occupied on my table. So I dug around in my “empty storage” storage (yes, since I decluttered most of my storage space is filled with boxes of empty boxes…I wonder if I am a container hoarder now, hmm…) and I found some clear acrylic gift shop displays a friend gave me a few years ago. I also moved my pastel drawers to my table.
The pastel drawers had some pastels in them but also gelatos, shallow stamps and some other odds and ends. I put the gelatos in the clear racks with a variety of other supplies I wanted handy. I put watercolor, pastels, specialty and standard colored pencils in the other rack and I unboxed some very precious soft pastels to go in the pastel drawers. I was able to clear out a cubby behind my desk and I put my pan pastel sets there because I really want to use them more so I need to make them easy to grab when I think of it because with me if I can simplify my process I will get more done and use more supplies. I am not done setting up my “within reach area” but I plan on filming a tour of it when I am done if anyone is interested, you can let me know in the comments below:)
I posted that photo on instagram the other day and many people asked me where I found the clear organizer and pastel drawers so I have some options below (may contain affiliate links)
Clear Acrylic storage with risers: The closest thing I can find are nail polish storage displays. Different sizes are available and some have dividers on each level and some don’t. Also check sizes before you buy as some are large and some are tiny and come with up to 7 risers. Measure your space before you order.
The spinning cubbies are from Harbor Freight. I have tried to move this off my table but it is so convenient to have andy and I reach for something in this spinning organizer every time I work. I saw this spinning organizer for $14.99 in Amazon and it will accommodate some taller items too, there is alos and extra $2 off coupon! You can also find a metal one like I have on Amazon but I think it is overpriced. I think the one I got in store at Harbor Freight was under $20. Also if you go to harbor freight I recommend their magnetic tool strips, I keep all of my scissors and oft used tools on that on the edge on a shelf behind me and I no longer lose my scissors!
Since I have all of this crafty goodness on my table I plan on doing some mixed media today! I am not totally sure what I am going to end up using but I will either update this post later or create a new one with all the supplies I used. I am thinking I might use one of my cradled wood panels, matte acrylics, stencils and pastels but don’t hold me to anything! You can watch the live stream or reply in the player below but if you chat live with fellow painters be sure to watch on YouTube!
I did see this pretty metal bucket of flowers that I think I want to use as inspiration tho, again no promises:)
One more thing!
With all of the talk about GDPR privacy compliance going on in the EU I thought it would be a good time to have a refresher on how my blog, school and website uses your information. I want to assure you that I only use info you provide for the intent you gave me. For instance if you comment on my blog you have created an account with WordPress to do so (you can see the WordPress privacy policy here) and I can see your email address in my blogs back-end. The only time I would use your email address is to notify you if you entered and won a giveaway on my blog and I would “CC” that email to the giveaway provider, for instance the marker company who was mailing you the prize so you could give them your mailing address to have your prize shipped. I never add people to mailing lists or share your information other than if you won a prize from a sponsor and they need to contact you to ship you a prize. The only instance that I would use your email is if you asked me a question in a comment and I felt it would be better to respond privately via email instead of in a public forum. If you are receiving an email when I create a blog post you have signed up to follow my blog. You can unsubscribe by clicking the unsubscribe link at the bottom of any email or you can switch to a weekly digest if you prefer. You can always manage your subscription if you look in the upper left hand corner of my blog (on a computer) or scroll down on your phone/mobile device and look for “Email Subscription”. I want you in charge of what stuff you get from me:) The other mailing list I have is my monthly newsletter and if you receive that you at one time opted in. If you would like to join it or unsubscribe you can do that here, or it is right under the email subscription box on my blog. As always there is an unsubscribe button at the bottom of any email you get from me. I always strive to do right by my peeps and if you have any questions about how your info is used on any of my websites you can find out more here for my blog, here for my school and here for my shop. I hope over the years I have earned your trust on these matters but it is always a good idea to do a privacy checkup with any websites you use regularly.
Enough of that boring but important stuff! I have materials to play with to get ready for today’s live stream, see you at 12:30pm ET! Happy crafting!