Hi friends! Can you believe I am still coming up with projects using white cardstock and ink? I really think it is important to exhaust what you can do with your supplies when you start a new hobby (cuz they are pricey!) and I also think it is fun to go back to basics because us experienced stampers can remember the thrill of the first time we gave a handmade card. Today I am going to show you how to make this one layer card and envelope.
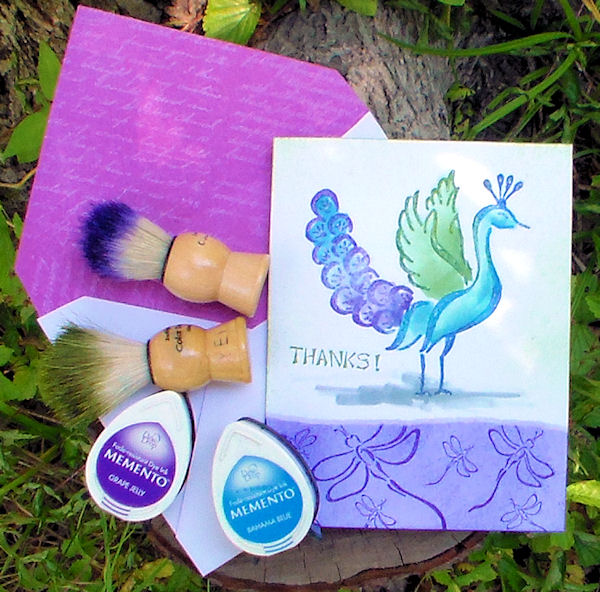
I like designs like this because you get two cards from a piece of cardstock and since they are flat they do not require extra postage (It’s kind of embarrassing when you send a stack of thank you cards postage due, don’t ask me how I know…) I am using my Memento inks (any dye inks will work) and beautiful stamps from our sponsor ArtNeko. If you order from ArtNeko make sure you mention me (the frugal crafter) to get either 10% off any size order or free shipping over $50, they will give you the bigger discount, they are great that way:) Be sure to check out the sale pages, there are lots of good discounts! Now, please watch the video to learn how to make the card!
Video!
OK stampers, did you learn a thing or two? Will you try this? I hope so!
Supplies:
White cardstock
Ink Pads (memento or any dye based ink)
Peacock stamp
Dragonfly stamps
Thank you stamp
Color Dusters (ink brush or use sponges)
glitter pen (Gelly roll stardust)
Envelope supplies:
Paper, a ruler and adhesive *Special thanks to my viewer Christine (from France now in Panama) for sharing this tip with me!
All instructions are in the video:)
A tip on color dusters, you can wash them with soap and water but they must dry before using with ink again if you want the soft look. I recommend getting one for each color family (one for greens, one for yellows, one for reds etc) so you do not need to wash them, in fact they work better as the ink builds up on them. You can use any long bristle stiff hog brush for this so if you have some kids paintbrushes lying around try them before buying these. They run about $1-$2 a piece. I think Joann Fabrics has them online too. I have even used stencil brushes for ink, video on that here, and it works very well. The point is try what you have before you buy!
Let me know if you have any questions in the comments below! Thanks so much for stopping by and til next time happy crafting!

Really enjoy this video very pretty card! Lots of wonderful tips Lindsay!!! Like the envelope idea brilliant thanks for sharing!!! Hugs Liz x
LikeLike
Hi Lindsay 🙂
Great card and envelope video. Thanks for sharing!
Best wishes.
LikeLike
Enjoyed the video !! Thanks for sharing the tip on making envelopes
LikeLike
The envelope tip will be added to last one I earmarked using the scor-pal and the drawing angle in the corner.
LikeLike
I love the Stardust pens. And totally agree with you that they are far superior to the Copic ones. They come in loads of colours and add just the right amount of sparkle.
And I make envelopes that way too 😉 I have a ton of templates and envie maker tools, but I always come back to this. Somewhere I have a recipe for homemade envelope glue too …
Cute card. I so wish some of the deals extended to us crafters outside the USA, but I get why they don’t.
cheers
MA
LikeLike
Hi Maryanne, are you sure ArtNeko doesn’t? They always shipped internationally when we did giveaways and I know the sell worldwide…She did not give me a restriction on the deal but I did not ask, would you like me to?
LikeLike
Pretty card . And Lindsay peacocks can fly. A friend of mine has some they are also very noisy.
LikeLike
Great job!
LikeLike
Love this and the fab techniques you shared. BTW, Peacocks can fly (I’ve seen it), but I suspect they cannot fly very far or fast; probably just from the ground to a modest height.
LikeLike
Really good video and lots of inspiration for people who are beginners in this area, really enjoyed it.
LikeLike
Great video I like the tip about the envelope. As for the peacock I think they can fly because one escaped from the High Park Zoo and evaded animal control officials all day by leaping around on rooftops is spending the night in a tree. It’s now safe back at the Zoo.
LikeLike
I really like the colors in this card!
LikeLike
Hi:
I love Stamp School, as I am a beginner. Two questions: 1) when do you use a blending tool and when do you use a water brush/paintbrush-with-water? 2) how do you prevent your card stock from getting soaked and warped?
Thanks!
LikeLike
I try and use the best tool for the job, ink pads, gelatos and chalk would be better with a blending tool while watercolor pencils are better with the blender pen or waterbrush. You can use the blender pen to keep the card from warping because the card won’t get too wet.
LikeLike
Thank you Lindsay for sharing that trick on envelope. Love it!
LikeLike
This sounds silly “aloud,” but this envelope tip may have changed my life. Also, love the faux ripped paper look!
LikeLike
as usual a great video!
LikeLike
I LOVE that envelope tip. It’s way better than the punch board. Thanks.
LikeLike
Love the technique, I have to try it
LikeLike
I watched this video when you first posted it. Today I was online searching for a way to make an envelope. Wow after several false leads I came back here to see what you had posted. Lindsey you are the only one that explained measuring the original card to figure the size. Thank you so much. Several said to take apart another envelope and trace it! Really? I made my card by just eyeballing what I thought looked good. They cried out for custom envelopes. Thank you so much.
LikeLike