LSS DT Wrap Up!

Happy Monday folks! I am very happy today, I have a free day (the kids are at grandmas!) so I can create til my heart is content, then tonight me and my hubby are going out to celebrate our 10th wedding anniversary! I am one lucky lady 😉

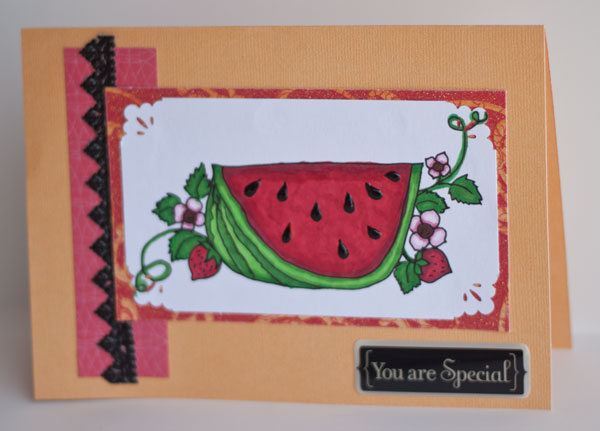
OK enough jibber-jabber let’s see what the Lindsay’s stamp Stuff DT has been working on for us lately, I have the pleasure this week of having Margie Visnick back as a guest designer, see the cute cards she made for us this with the Strawberries and Watermelon stamp set week:

 And another card using Funky Forest and All Around Sentiments:

Check out Micki’s cool Movie scrapbook page using Retro Movie Clips & Cutting Files and Retro Movie Stamps:

Movie-Star-Close-Up-3

Next up is Karin also using the Retro Movie Stamps, what a fun card!

Karin also made this “Chic” Hello card using the Posh n Trendy stamp set:

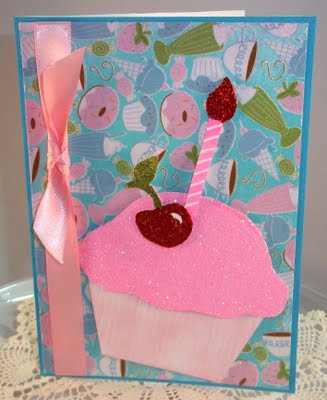
Diane has been busy this week, she made 4 cards this week using the Cupcake Carrier SVG set, you can see them all on her blog but this was my favorite 😉

Last but not least is Cassandra with a tag using the Vintage Sheet Music freebie and the Retro Movie Stamps sets.

Here is a look at the sets the designers used this week:

Strawberries & Watermelon StampsAll Around Phrases Digital Stamp SetRetro Movie StampsREtro Movie Clips & CuttingCupcake Carrier SVGPosh'n Trendy StampsFreebie: Vintage Sheet Music

Thanks for stopping by and til next time happy crafting!

Why the frog on the cupcake? {and a storage tip!}

I love making a custom card or tag the reflects the unique personality of the recipient. This tag was for my neighbor’s son on his 6th birthday, he is really into frogs:

I used the stamps Ribbit (Frog & Mushroom), Soda Pop Alpha (2 sizes), Vintage Cupcake, Carnival Alpha ( Small) and the little tag hole enforcer thingie is from Holly & Mistletoe. All stamps are from Pink Persimmon. I colored the image with my Promarkers.

Stamping tip: When you are stamping a word (like I did with the name “Brennon”) and you want it centered start by stamping the middle letter (in this case “n”) and work out from there, perfectly centered every time!

Storage Tip: Look for spice racks at yard sales, the bottles are perfect for storing buttons by color and they are so pretty sitting on your craft table!

Thanks for stopping by and til next time happy crafting!

40% off today at Lindsays!

Just a quick note to let you know everything at Lindsay’s stamp Stuff  at MyGrafico is 40% off today!

Here are some of the new sets I have in the shop:

Laundry Kids SVGRetro Movie StampsSewing Bits SVGFancy Cupcake Box SVG

And a few customer favorites:

Recipe Stamps & SVG Special!Bag Bonanza!Party Lantern SVGBuild A Blossom SVG3-D High-Heel SVGSummer Fun SVGGothic Arch SVGPosh'n Trendy StampsOoh La La SVGFun Fair SVGTeacher's Helper SVGSteampunk StampsSweet Treats 2Stampunk SVG TemplatesPeople Mix & MatchOn The Line StampsSeaside Sketches stampsPosies & Plant Pics SVGBox Bonanza!Envelope Bonanza!Sew Pretty StampsBirds & Branches Stamps

And don’t forget party kits!

Arcade Party PrintablesPizza Party PrintablesMovie Party KitBachelorette Party PrintablesBaseball Party SVG & Printables!Soccer Party KitBeach Party PrintablesMovie Banner & Wrappers!Ice Cream Party Kit!Arabian Party Printable & SVG

Thanks for stopping by and don’t forget the 40% off at Lindsay’s Stamp Stuff  at MyGrafico is only til midnight!

Lindsay in HD! {let’s make stamps!}

**** 7/18/11 FYI I was at Target today and they have sets of 18 foam blocks in the dollar spot. They have one pack with different shapes and one package that are all square. I know some of you were having a hard time finding the blocks to use in this tutorial. The Dollar Store often have them too 🙂 ***

Howdy all! I celebrated my 35th birthday on Sunday and my husband got me an HD video camera so I could shoot my crafty videos in style. The best part is that it has a better microphone so I no longer sound like I have a lisp in my videos. 🙂 Here is my first attempt with the new camera:

So, can you notice a difference? Did the video take longer to load? I am really curious as I had to buy new software to edit my video since it shoots in MP4 and my old ULEAD Video Studio Pro did not support the file but good news, Corel (my fave editing software company) purchased Video Studio Pro and the new version works beautifully with the MP4 files and it is similar enough to my old software so the learning curve isn’t too bad…just goes to show you can’t go wrong with Corel! Here is a close up of the card shown in the video:

Wath the video to see how I made the blue and rust stamps using an embossing folder and a foam baby block from the dollar store!

Thanks for stopping by and til next time happy crafting!

A simple “bleep bleep” birthday card!

Hello there, today I wanted to share a card/tag/envelope set I made for a birthday the kids want to this weekend, it only took minutes to make;


I like to test my stamps out on a scrap before committing them to a card. In this case the test scrap made a nice tag. I wanted to make a matching envelope so I simply used the same ink to stamp gears on the envelope too, easy peasy!

I used stamps from The Paper Studio (all but the flag which is Pink Persimmon and the tiny green alien and tiny beep, those are from Basic Grey) Ink was from Stampin’ Up (Real Red, Only Orange, Tempting turquoise, and basic black) the only coloring was on the flag and done with a yellow tombow marker.

Honestly, it took longer to write this blog post them to make the card!

Here is a tip though, the clear robot stamps are cheapies from JoAnns, to get them to stamp well I scuffed them with a fine grit emery board (or you can use an eraser) then the ink will stick properly to them;)

Til next time happy crafting!

Try this on your next card!

Happy Sunday folks! I had a lot of fun making this thank you card for my sister, she gave me a pretty glass ball for my birthday after remembering me admire the ones she had hanging in her house and realizing the one I used to have broke a year ago. I used the wrapping paper and tissue paper from her gift in my card, how about that for recycling?


OK so you probably want to hear about the trick I want you to try on your next card….OKthen, check out the fairy’s wings, the glitter is actually clear glitter nail polish from the Dollar Tree! I love this stuff, it dries in seconds and has a brush built into the cap and does not smear my ink. Nifty cool! I am always smearing my stickles because they take forever to dry, the nailpolish is cheaper too!


I used my Promarker Blender sets to color the fairy. The fairy stamp is from Crafters Companion, it is the Buttercup fairy and I used the smaller one in that set. I bought it from Costom Crops NAYY (not affialited yadda yadda) I should tell you that the Fariopolis sets are clear but the other flower fairy sets are real rubber sheets and you need to cut them out and adhere them to a block to stamp. There is no mention of that on their website. I prefer the rubber so it was a pleasant surprise but if you do not want to deal with cutting the stamp apart and mounting them stick to the Fariopolis line 😉 They are on sale for $5 each set now BTW, regular $10-I paid $6.50-still a deal tho 😉 Another tip: If you do get these stamps besure to save the packaging that comes with them because the designs are very “sketchy” and you will want them to refer to when you color.

Well that is it for me, we are hosing a cookout today so I’m gonna be busy but it will be a great time I’m sure! Thanks for stopping by and til next time happy crafting!

Gasp! A manly card :)

OK, so I am not known for making “guy” cards but I needed a birthday card for my nephew-in-law {is that even a title?} So I grabbed some kraft cardstock, my Promarkers, a wood grain embossing plate and some stamps and had at it!

Stampscapes stamp tips:

I bought this beautiful Stampcapes scenic stamp at a yard sale a few years ago but I’ll admit I had a hard time using it. These stamps have a lot of detail and there is a trick to getting it right!

    1. Use a brayer to ink up the stamp. I have 2 soft rubber brayers in my craft room: one for blacks and browns and one for other colors. Simply roll the brayer on an inkpad (I used Close to Cocoa by Stampin Up!) then roll it along your stamp. Repeat this a couple of times from left to right and top to bottom.
    2. Use smooth paper. You can use glossy cardstock or very smooth regular cardstock such as Neenah Classic Crest. Keep the stamp rubber side up on your table and lay the cardstock on top of the inked stamp and rub your hand over the paper. Just be sure not to move the paper as you rub.
    3. When coloring keep elements that are in the background (like the trees behind the cabin) dull in color and make the objects closer to you (like the grass in the foreground) brighter in color.
    4. If you need to add brighter, or lighter color to your design after coloring it with markers layer colored pencils on top for a spark of color and texture.

    A couple more tips:

  1. When you want to mat {layer} a piece of stamp art first punch a shape out of the center of the background layer. You don’t see the middle of the panel so it does not matter if there is a hole in it;) You can save these punch outs for a future project or make a matching gift tag! It will also cut down on wight when mailing, you might just save yourself an extra stamp!
  2. Leftover over scraps of paper used on the card can be turned into an envelope liner as I did on the top photo. Simply trace the flap of the envelope on the scrap paper (make sure you have a couple of inches below the flap so you can tuck it inside) cut it out and slide in the envie. Hold the tip of the liner in place with double-sided tape.
  3. When stamping oft-used sentiments such as the birthday definition be sure to stamp a few extra so you can have them ready to use on your next card, it is a time saver!

Thanks for stopping by and til next time happy crafting!

Fast & Frugal: A vintage card {made with scraps!}

Happy Friday! I can’t wait for the weekend, I am taking my girls on their first Daisy Scout Camp Out (to be honest, my first camp-out too not counting tenting in the back yard-wish me luck!) on Saturday then on Sunday we are hosting a cookout in honor of a few close together birthdays in the family {mine is Sunday, boy it comes quicker every year!} Here is a card I made for my Mother-in-Law who is also celebrating a birthday:


The card base is kraft cardstock. I used wrapping paper {saved from an early b-day present from my sister} as the background. I ran the wrapping paper through my BigShot on a fiskars texture plate for a soft emboss and inked the edges with brown staz-on as I was afraid regular ink would not dry on the pearlized glossy wrapping paper. I stamped on a leftover scalloped oval die cut left over from the batch of baby cards I made Wednesday and punched some ribbon slots on the side to thread some seam binding through (PS I got a 100 yard roll of that color from the closeout bin at sewtrue.com for $3, they got another shipment of the closeout hug snug in and the price went up a bit but it is still 50% off regular price!)


To make the double bow I tied a regular bow then tied another bow right on top! How easy is that!?! Then I made my own matching stick pins using 1.5″ strait pins and beads and poked them right through the know. The Dress form is from the Sewing Bits SVG set from Lindsay’s Stamp Stuff, I had cut it a while back and it was just laying on my scrap-pile with some embosslet buttons (whenever I have a scrap of cardstock 2″x2″ I die cut a set of these buttons. I got the embossing die from Stampin Up’, a splurge at $12 but I use it all the time!) Oh and I added a scrap of lace to the dress from to make a scarf and skirt.

Since this card is a bit oddly sized due to the dress form poking out I will place it in a clear envelope and attach it to her gift as a tag and card all in one! Here is a look at the Sewing bits SVG set I used to cut the dress form:


Thanks for stopping by, have a great weekend and til next time happy crafting!

A few “toots” and a CASE & Freebies!

Well, my mailbox has been busy this week! I was asked (along with fellow MyGrafico designers Cheri Wenger and Blackleaf Studios) to design a custom digital stamp for Paper Crafts Magazine’s special publication Stamp It! Cards. You can download all of our designs here. Gotta love free right?

I really enjoyed this issue of Stamp It! Cards, infact I found many ideas I wanted to try. Here is a card I CASE’d (CASE=copy and steal everything), the original card is on page 89 of Stamp It! Cards and it was by Agniesza Malyszek, her’s turned out much prettier than mine but I still like it 😉


To make the card I stamped the butterflies in Versafine black and heat embossed them with clear then loosely splashed watercolor over them. Honestly I got a little TOO loose with the watercolor and I’m not sure what I was thinking with the flourescent coral sentiment block but, hey, it was fun!

Tuesday I got the September issue of Scrap & Stamp Arts and I just about fell over to see my button cards on the COVER:

 SSA September 2011

BTW you can still get the July Issue of SSA with my marker review spreadsheet. Honestly, it is more than you ever wanted to know about Alcohol & Watercolor markers and extra ways to use them.

 SSA July 2011

Current Issue CoverOh and one more Pub…I have 2 cards in the July issue of Vamp Stamp News.


OK I think I just dislocated my shoulder patting myself on the back 😛 til next time happy crafting!