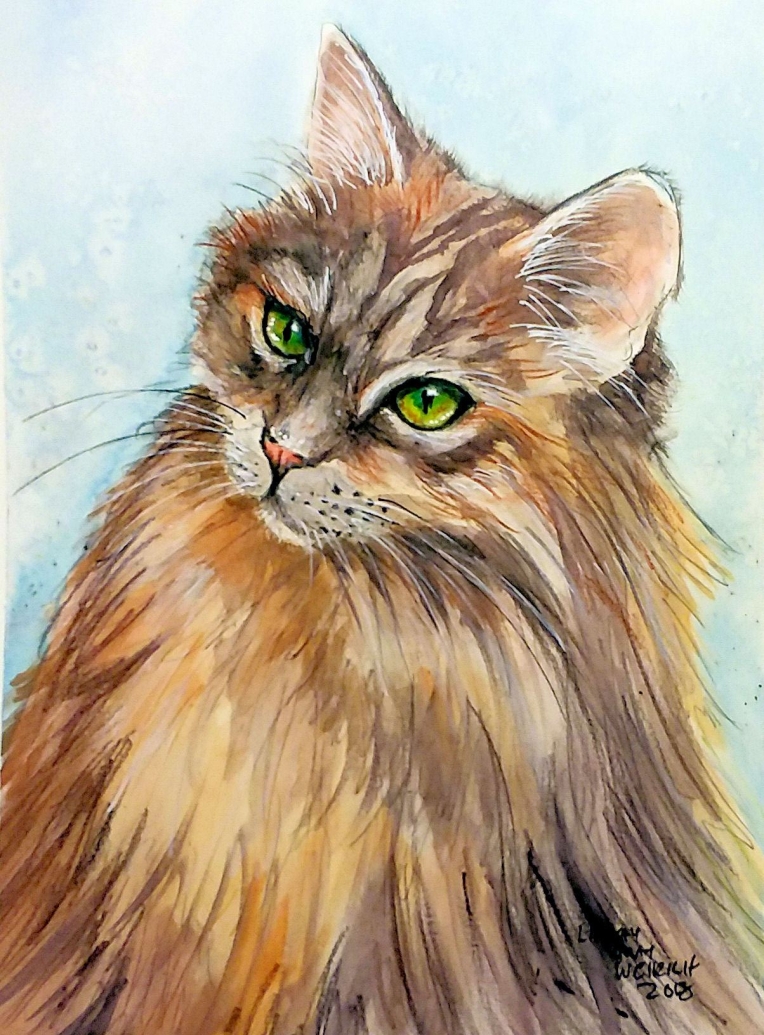
Howdy friends! I have seen bursting with excitement to share this project with you today! I have had a lot of requests lately to use watercolor pencils more. Watercolor pencils are versatile, portable and you can get an almost endless array of colors from just a few pencils! Today I will share a real time tutorial for painting this lovely long-haired cat (I think it’s a Maine Coon Cat) and share 25 tip to improve your watercolor pencil paintings!
Grab your supplies (or a nice cuppa) and enjoy the show!
Tutorial
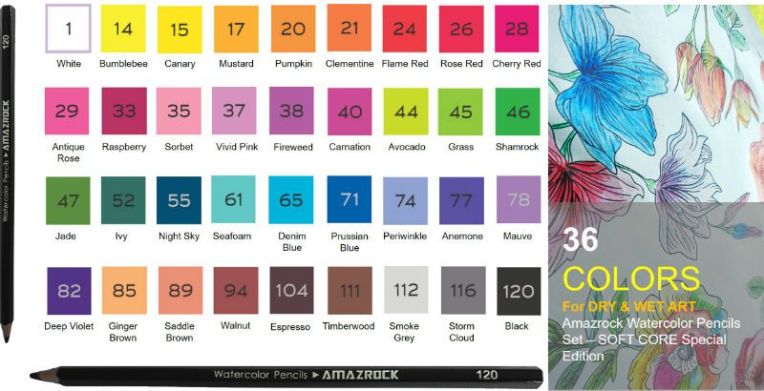
Sponsored by Amazrock! Amazerock is giving 3 lucky viewers a set of 36 watercolor pencils in a beautiful fabric storage roll. Click here to enter their giveaway!

Here is the product page where you can learn more about these pencils and purchase them on sale (there is even an extra coupon you can get if you scroll to the bottom of the page!)
Supplies:
- Watercolor pencils (Amazrock)
- Hot Press Watercolor Paper (Arches)
- Masking tape
- Board to tape paper to
- Pencil
- Water bucket
- Golden taklon paint brushes
- Plastic palette
- Pattern of cat you can print and trace
- Reference photo
25 Top Watercolor Pencil Tips!
- Use watercolor paper or a robust mixed media paper for best results.
- Choose the right surface for your project. Hot press paper is smooth like drawing paper but will withstand lots of water and aggressive techniques. Use this paper for botanical, portraits or any time you want a smooth line and lots of detail. Cold press paper is the most common paper with a bit of tooth or bumpy texture. Choose this if you want to add lots of layers. Rough paper is the most textures (as the name implies) and it great for landscapes and other subjects that have lots of rough texture where you want a more grainy or expressive look.
- Tape your paper down to prevent warping and it will give you a beautiful white border when you are done if you paint to the edge.
- You can tape your paper to any drawing board you have or use the cardboard backing from an old paper pad or use inexpensive lightweight foam core board for a lightweight option. You can also use plywood, Masonite or a free recycled paneling sample like I do! The plywood/Masonite boards are also good if you prefer to work at an easel as the extra weight will keep your painting from rocking as you work!
- Always test out new techniques or colors on a scrap of paper (use the backside of failed painting or cheap paper you want to use up for this!
- Start with an accurate sketch. Watercolor pencil (like watercolor) is transparent so you can’t simply cover up mistakes and erasing on your watercolor paper can damage it so you want to make the mistakes and corrections on your scratch/drawing paper. After your drawing is good you can transfer it to your fine watercolor paper with graphite paper or a lightbox/window.
- Make a palette for your watercolor pencils by sanding a cheap plastic palette. Color the pencils on the plastic and then wet the swatch of color with a brush and paint. You can also save broken lead on the palette and add water to make paint. No more tossing broken points in the trash!
- Alternatively you can pick up color from the tip of your pencil with a wet brush and create wet washes and watercolor effects that way.
- Remember anytime you wet the pencil lead you weaken it and it will break more easily so let it dry before trying to sharpen it.
- Sharpening tips! For a sharp point for drawing details use a handheld or electric sharpener. Turn the sharpener, not the pencil, to avoid breakage. To conserve lead for painting large areas use a craft knife to whittle away the wood and leave the lead intact for painting.
- Texture tips! You can add beautiful texture to watches you create with watercolor pencils, you can spray water in a wet wash,
- Add salt to a wet wash or
- Grate dry watercolor pencil lead into a wash.
- For a dark like thinner and darker than you can get with a pencil try scraping into the wet paint with the edge of a cut up credit card or gift card. Great for fur, hair and veins on flowers!
- Try not using water! You can draw and color with dry pencils on dry paper for a traditional colored pencil look! Try the hatching technique for fur, cross hatching for shadow or scumbling (aka scribbling) for textured effects.
- For darker details that won’t easily dissolve with water try drawing with a sharp dry pencils on wet paper, that’s called dry on wet.
- Use a wet on dry technique for stippling. Simply dip the tip of the pencil in water and dot on details (like the dots on the muzzle the whiskers protrude from.)
- You can also draw with a wet pencil on wet paper for bold expressive marks that will not easily dissolve.
- Build depth and dimension with glazes! Simply layer up veils and veils of color and shadow for realistic paintings full of depth and interest.
- Details are best on dry paper with a sharp pencil.
- Burnishing can be used to build up colors and create a smooth glassy look. To do this in watercolor pencils I suggest coloring dry on dry and liquefying the pigment with water. Then after that first layer is dry keep coloring with dry pencils until the grain of the paper is full of pigment and the color is rich and vibrant.
- Create highlight by scratching off the top layer paper with a craft knife. Just be careful not to cut too much paper away or cut through your paper! And don’t cut yourself!
- Mix your media! A white paint (or gel) pen will make quick work of bright elegant highlights!
- You can also add traditional colored pencil over a watercolor pencil painting as a final layer but be aware that watercolor pencil will not stick over traditional colored pencils.
- When your painting is done and it is time to remove your tape peel it back flat at a 45 degree angle to discourage paper tearing or heat the tape with a hair dryer to make it easier to remove.
I hope you enjoyed these 25 watercolor pencil hacks and apply them to your next watercolor pencil project! If you liked this be sure to share it with a freind or pin it on pinterest using one of the handy sharing links at the bottom of this blog post. 😀 Thanks for stopping by and til next time happy crafting!

Hello Lindsay,
Yes, that’s definitely a “Maine Coon” cat, I have one that nearly looks like the picture. His name is Tom, he’s not a pure breed, but does have all the personality traits, etc associated with the breed. They don’t call them the gentle giant for nothing. Tom is not super large, but is the most loving and gentle character I’ve ever seen in a cat and I have had several types of cats. I haven’t even watched video yet, but am sure it will be great. Few months back I bought a general’s pencil kit that has just 6 watercolor pencils and watercolor paper and booklet to learn from, I couldn’t even consider any of the other, more expensive watercolor color pencils with me just starting out. I hope you get this message. Take care.
Sincerely Becky B from Arkansas
LikeLike
Thanks Becky, try this with th pencils you have and you can always add in watercolor to fill in if needed:)
LikeLike
I sent you an email yesterday that said you told us what wedge brush to use but not the size. I was wrong. The size is in plain view on your video! My problem now is I cannot find a Size 8 Wedge Brush ANYWHERE! I tried: Amazon, Michaels, AC Moore, hobbylobby, Jerrys artarama and Dick Blick. Can you help me PLEASE??? Tricia Kelly
LikeLike
I bought the size 8 Beste Wedge brush at Jerry’s just before they stopped carrying it. You could always get a size 6. You can also look at other brands. Silver Brush calls them triangle brushes. Soho, Beste, Silver Brush are all companies I found carried them. Perhaps Lindsay could tell us the size of the bristles on hers to help with comparisons.
LikeLike
Jerry’s has the soho size 6, it is the only one in the soho range in it is great. The Best brand has seemingly discontinued the size 8 but Jerry’s has a Beste wedge in size 10. I Have an 8 and a 12 and I will tell you the larger the wedge the more work it is to control so I recommend going down a size, rather than up from what I used. Jerry’s also sells the wedges on Amazon if you prefer.
LikeLike
I loved your tutorial – you are a very good teacher and artist. Thank yu for all you do – you’re wonderful.
Pat M.
LikeLike
For the record, I tried sharing the contest on Facebook, etc. for more entries but it didn’t work. Hopefully one entry is all it will take to win! Fingers crossed.
LikeLike
whew! that was a lot of information to gather in only one viewing! I think my favorite tip, though, has to do with the pallet. It never occurred to me to rough up the plastic before laying down color. When I got done smacking my forehead, I was giddy with joy! Also, slow down, don’t try to do everything in the first pass. I have generally only used my pencils for small areas (cards), but I want to lay down the color and then add water and blend away. It is fun to do, but not necessarily the look I am after. Thank you so much.
LikeLike
Beautiful painting. Thanks for this fabulous video. I love that you really explain what you are doing, why and when you do it. I’m finding it so helpful not only to see how you do things, but why you do them and how it works or what doesn’t work. Thanks for sharing you knowledge and talent with us.
LikeLike
I sincerely loved this video and the list and instructions for the pencil
techniques. I printed them and will keep them for reference and practice. I don’t use my pencils enough. Now I am determined to
use them . Thanks so much for sharing your knowledge.
LikeLike
I just viewed your drawing if the “lets draw a cat” you are totally correct it us a Maine coon and looks like my Maine coon . I need your drawing. Thank you.
LikeLike