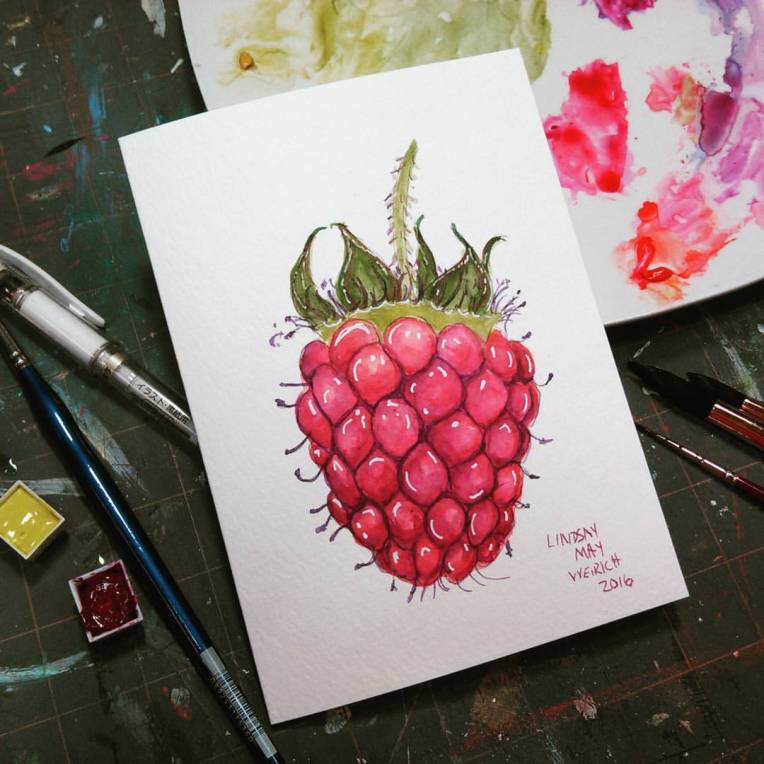
Hi friends! Please excuse me if I have more typos than usual in this post, I was up most of the night with a kid with a stomach bug (so much for getting one more beach day in before school starts.) 😦 Today I am going to show you how to use glazes or layers to build up color and detail as we paint a raspberry.
I am using a split primary palette, that means I am using a warm and cool version of each primary. The colors I am using are from the essential set from Daniel Smith but you can use whatever brand you have. See below for suggestions. If you don’t see a color you have just swatch out the color and look at it and see which way it leans. Honestly, I mix more by eye than color name and you will too as you gain more experience.
Warm red: Pyroll Red, Cadmium red, Scarlet, Pyroll scarlet (look for a red that leans toward orange)
Cool red: Permanent alizarin Crimson, Quinacridone Rose, Rose Madder, Magenta (look for a purple leaning red)
Warm yellow: New Gamboge, Cadmium Yellow, Indian Yellow (look for a yellow that leans to orange)
Cool Yellow: Lemon Yellow, Hansa yellow, Cadmium Lemon, cadmium yellow light (A green leaning yellow)
Warm Blue: Ultramarine (French Ultramarine), cobalt blue (purple leaning blue)
Cool blue: Pthalo blue, Prussian blue (green leaning blue)
Try and get the most clear and vivid colors you can because you can always dull them down but you can’t brighten a dull color. To learn more about a split primary palette view my free tutorial here or for a more in-depth tutorial check out this wonderful Craftsy class. I also wanted to mention that I enrolled in Anna Mason’s excellent Craftsy class Fantastic Fruit Texture and Form ans while her style is very different from mine I am enjoying how she builds up layers of tight detail. I have not got too far into her class but I have already found valuable take-aways (like picking up a small brush once in a while LOL!)
Video! *BTW I am also reviewing and demonstrating the use of a new light box, if you are not in the market for a light box you can skip to 8:45 for the real time painting tutorial. If you are looking for a light box this one has my approval!
Supplies:
140# watercolor greeting card *these are 3″x5″ but I used 5″x7″ in the video
Daniel Smith essential set watercolors (pyroll scarlet, Quin rose, Hansa yellow, new gamboge, pthalo blue, ultramarine)
Uniball signo white gel pen
*Note, instead of using the pen you can use masking fluid prior to painting.
Litup Light Box Review
I have to be honest, I was not in the market for a light table but I was intrigued when the company asked me to review this, I typically used transfer paper to transfer my sketches to watercolor paper and that seemed fine. I really did not think I would use a light table that much and they are typically $200-$400 for a decent size table that would be of use to me as an artist.
I was wrong, I can see myself using this every time I paint.
Pros:
Bright, even, strong light
Sturdy and well made
Easy to set up and use (plug it in, turn it on)
Long enough cord (about 5 feet)
I can transfer a light pencil sketch and use what ever I want (pencil, pen, marker etc) on my good paper and not be stuck with the colors available with transfer paper.
Price, it is on sale for $119.99 (comparable light table at my online art supplier runs $300)
Cons:
I really can’t think of a negative, I mean $120 is a chunk of money so make sure it is something you will use.
I did not think I needed this but now I am so glad I have it because I can transfer detailed drawings onto watercolor paper with no waxy lines, it will make pen and ink work a breeze too!
I asked about embossing with stencils and they said it should work just be carefull not to scratch the table, I think placing a page protector or clear plastic bag under the stencil will prevent this.
I also want to mention that I have not had this light table long so I can’t comment on how long it will last. The reviews on amazon are excellent though and it has an 18 month warranty.
I give the litup table a big thumbs up and recommend it to anyone wanting a light table at an affordable price. It is on sale for $119.99 (regularly $129.99) during back to school time. You can find out more here.
Disclaimer: I was not paid to do this review but I did receive the Litup light box for free. Links for the art supplies are affiliate links to Simon Says Stamp and I receive a small portion of the sale at no addition cost to you. Thank you for your support and til next time happy crafting!.

I like the raspberry! I always wondered what colors I’d need to mix that color. I never seemed to get it right because I neglected adding a warm red. My raspberry always looked like a bunch of grapes!
You mentioned being able to mix all colors from the split primaries. Have you ever showed us how to get yellow ochre, burnt sienna and burnt umber that way?
I’d HATE to rinse a brushful of Daniel Smith paint that often, they are so expensive! When I paint like that I use two brushes, one full of paint and another just with plain water to pull the paint around so I don’t have to rinse the brush loaded with paint all the time. It keeps my water cleaner too which is handy if I’m outdoors.
I’d like to know if it’s possible to paint right on the paper ON the light box without tracing any lines with pencil or ink first. Would it somehow ruin the light box or does the paint dry with hard lines? That would be useful for lettering but also for doing several color sketches to decide which colors to use without having to bother with sketching the same picture over and over.
LikeLike
I just wanted to take a minute to thank you for these fun little tutorials. In one tutorial you said something about feeling better when you take a little time and create something and that is so true! Now, whenever things just get crazy I take a little time to slap a little paint on paper and I find I do feel better! Of course I always enjoy your enthusiasm for art and the chattiness. Bottom line, you brighten my day so thank you!
LikeLike
I’m not sure where to ask this question, but here it is. If I use the link in one of your YouTube videos to buy a product (say from Amazon) and I end up wanting to purchase a different manufacturers product (i.e. From looking at other items that Amazon always shows) does that benefit you at all or does it have to be from the exact linked item?
LikeLike
Hi Katie, thanks for asking:) You can buy anything from a website after clicking an affiliate link of mine and I get a comission on anything you purchase there. I am an affilate with Craftsy, Simon Says Stamp, Hallmark Scrapbook as well as a few others but those are the main ones as I live in a state which dosn’t allow partisipation with big sites (like Amazon, Blick or Joanns so if you shop there click an affilate link or another blogger you want to support and know whatever you buy will help them out:) I really appreciate you taking the time to ask this, thank you for your support:)
LikeLike
Thanks for taking time over the holiday weekend to respond to my question so quickly! Ps your leaf tutorial today was a phenomenal color theory lesson!
LikeLike
Lindsey,
Thanks for your review of the Litup light box. I have looked at some in the past but couldn’t justify the expense.
When I click on your link, it goes directly to Amazon where they have the product at $129.99, not $119.99. Since this was just posted yesterday, is there a code or something needed to get the $119 price?
Thanks,
Joanna
LikeLike
Hi Joanna,
I looked the day the video came out and it was the 119 price. If I had to guess I would say the sale ended. I have never heard of amazon having discount codes either. Would love that though!
Best of luck,
Laurie
LikeLike
Not a code, itwas on sale for back to school time, they did not tell me when the sale would be done though:(
LikeLike