Howdy folks! I have been playing with the idea of making Pandora style paper beads. I had bought some metal bead cores (you can get a pack of 500 for less than $5 with free shipping on Ebay) and made some glass beads but when you get many of them on a bracelet it can get quite heavy. So why not paper? Here is a bracelet I made with the beads I made:
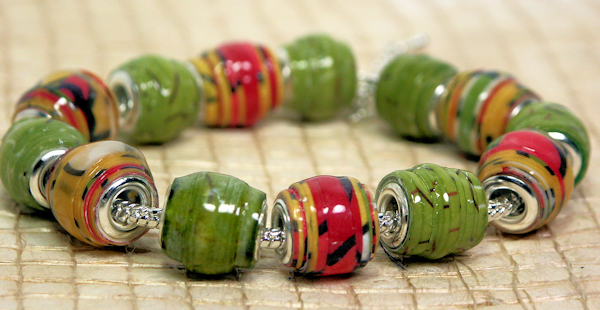
It was a joy to wear too, I love the sound the beads make with they move and the bracelet is so light! The beads don’t really take all that long to make either. I do the assembly line style: roll a bunch, glaze a bunch and glue in the bead cores. Here is a video to show you how:
See it was easy! I used ultra thick embossing enamel (UTEE) to glaze mine but you can use clear embossing powder as well, it might take an extra coat or two but that’s no big deal. I found a size 9 (5.5mm) knitting needle is perfect if you are using cardstock or thicker scrapbook paper but if you are using book pages or magazines go up to a size 10 (6mm) knitting needle. Also if you are using thinner paper you will need 3-4 strips rather than the 2 I used. If you can’t find bead cores you can use sewing or scrapbooking eyelets. Bead cores are cheaper overseas through the seller 8 Seasons ebay though. If you have any questions on this project or just want to let me know what you think you can leave a comment below. Thanks for stopping by and til next time happy crafting!

Love the beads. I will have to try some this weekend.
LikeLike
Lindsay you are a genius, what a fun thing to do.
Hugs Eliza
LikeLike
Your beads are stunning! They look like glass! Great video Lindsay!
LikeLike
That was really cool. Think I’d like to try that.
LikeLike
Amazing! I really thought they were your glass beads! I don’t do and jewelry making but you make me want to try.
LikeLike
They are amazing and you are a genius! Thanks – you just made my Christmas!
LikeLike
You would never guess they were paper. They look wonderful!
LikeLike
I agree – they totally look like “real” beads! I am amazed. I love the idea of using Gelli Print scraps to make them, so thanks for that tip – I’ve amassed oh so many prints that it’s fab to have a new idea for using them.
Always inspiring 🙂
Mary Anne
LikeLike
Ok I’m already running to Target tonight to get the bead maker bottle thing, but this idea is brillant. Such a great Moms day gift or holiday idea for my Scouts! Love you! Keep em coming!
LikeLike
How long are the paper scraps you are using?
I am pretty interested in this idea. Waaaaaaay back in the late 60s, when my mom was singing in Sweet Adelines and I was just a very little kid, she was on the costume committee for her chorus, and needed to make 100 matching necklaces for very very cheap. The committee came up with paper beads, but they wanted long tube beads, and they used tissue paper. Because of the volume of beads needed (30 inches x 100…), it was all hands on deck, and because of the simplicity of the process, even the 7-year-old was drafted into helping. It seems to me they used a lot more glue–I’ve not done a lot of paper beads because my memory of it was more like dipping strips into thinned glue like making papier mache. THIS is a much more reasonable process. (I also remember the final coat: pearly transparent white nail polish.) My mom was so pleased with the results that she made several for herself. I remember the red/orange one and the blue/green one floating around somewhere for years.
LikeLike
The beads take 2 12″ long strips, the first one is 12: wide all the way down and the second is 1/2″ at one end tapered to 1/16″ on the other end:) What a lovely memory:)
LikeLike
Love these beads, I have a huge stash of paper and scraps to make a lot of these. Thanks for a great video tutorial.
LikeLike
these beads are charming – and SO easy done! Thanks so much for this wonderful tutorial!
best wishes, serafeena
LikeLike
I’ve always wanted to make those. I have tons of scrapbook paper that would make great beads. Thanks for yet another great tutorial. You rock!
LikeLike
Fantabulous video and beads. These are a must try
LikeLike
This is going to be an afternoon with daughter and granddaughter for sure. What did you string your beads on?
LikeLike
Hi Bev, I put them on a snake chain, I bought a 2 pack that had a necklace and bracelet at Joanns for like $6. the bracelet will be too large for a child though, it id barely small enough for me with all the beads on and it hooked on the smallest adjustment. You might try rat-tail or macrame cord and make an adjustable knot, I have a tutorial here if you need it: https://thefrugalcrafter.wordpress.com/2013/02/23/how-to-make-an-adjustable-knot-for-jewelry-quick-video/
LikeLike
Hello,
As for information I tried to use two coats of clear embossing powder but it doesn’t look nice to me . It seems that the second coat is more opaque and personally this is not what I am looking for.
So I am going to buy what You use the : ” ultra thick embossing enamel (UTEE)”.
Thanks for this tip !
LikeLike
Hi Chris, Make sure the glue is dry when you heat emboss, sometimes wet glue will make the bead cloudy, I’d try that before buying something new:)
LikeLike
I tried to let it cool ! And you know what ?? It works !!
Thanks again !!
LikeLike
Hum…..Well I think it was maybe not that dry indeed. I probably didn’t wait long enough between the 2 coats.
Thanks again.
LikeLike
Shopping for bead cores online… didn’t realize there were so many different sizes. Can you recommend the size that is best for these?
LikeLike
I got the ones that said fits 5.5mm holes but I think they were actually called 4.5mm, any size is fine, you just might need to use another size needle to make the bead on:)
LikeLike
Hi Lindsay, wow – love the look – what the height of those bead cores ?
I only find grommets here and they seem to to be too high.
LikeLike
do you men how deep in the bead they go? About 1/8 of an inch I think, the cores themselves are probably 1/4″ wide. Small grommets should work tho:)
LikeLike
yes, they have different heights and I probably don´t want to overlap them inside the bead ..thank you , Lindsay 😉
LikeLike
Hello, dear Lindsay! You website is very interesting, thank you for sharing! But I live in Russia and can’t understand some terms that you are using. I can’t match the word embossing with russain words.. Can you please explain me what do you use to make this glass-look, what is the powder that you use? Is it something like enamel? Thanks a lot!
LikeLike
In the US it is called embossing powder or embossing enamel. It is a fine plastic powder that when heated melts and give you a glass like finish. You could also varnish them.
LikeLike
Thank you! How do you heat them? using hairdryer?
LikeLike
use a heat gun because a hair dryer will blow away the powder, a heat gun has heat with out a lot of air:.
LikeLike
What do you use on that stamp pad…? What a liquid is that…? Thank you..
LikeLike
This is going to be my next bead project. Thanks Lindsey.
I use 3-4 coats of Judikins Diamond Glaze for my final coat on paper beads. You can add more coats if you want.
LikeLike
Love this project! Decided to finally give it a try. Rolling the paper just right for the cores to fit seems to be the hardest part. Practice, practice!
Also I decided to cut all the strips 1/2″ instead of cutting some 5/8″ and leaving 1/6″ on each end of the triangular pieces. Seems to work fine cutting corner to corner.
Now to try out the heat gun without burning myself. Ha!
LikeLike
hello. I love your video
I am Spanish and I would like to know what you do to look like glass.
I go through a sponge and made him a powder but not what is
I would love to tell me that it is
many thanks advance
LikeLike
in America we call the product embossing powder and many stamp companies make it. It is held to the bead with clear ink or glycerin from a pharmacy. I hope that helps as i have had many Spanish speaking viewers write to me in the comments on my video on YouTube.
LikeLike
hi..thank you soo much for this wonderful idea. I went out today and bought everything I needed (so i thought) and i am very excited. I forgot to get the bracelets and the bead cores-lol i have a brain injury and my memory is affected..plus i was so excited lol anyway I want the look of the bracelet that you have here but adjustable.Any suggestions? also where can I get them the cheapest and where can I get the bead cores the cheapest? Not overseas being Im so excited to get them and dont want to wait that long–lol Thank you again.. my email is trcandle@gmail.com Teri
LikeLike
you can use sewing eyelets if you don’t want to wait but you will save a lot of $$ if you get them on ebay, I got a pack of 500 from the seller 8 seasons, I waited 2 weeks but it was no big deal, maybe bu a packet of eyelets to tide you over:) The bracelets from joann were adjustable, there is a chain after the snake part and you can make it larger. I have small wrists so I wild have preferred the snake part shorter so if you are like me you might want to look at other store for tat but when you fill it us the bracelet becomes smaller due to the thickness of the beads.
LikeLike
Hi there
I would like to know what glue you used for your bead cores? I used a gel jewellery glue which made my glaze on my beads all milky! Please help!
LikeLike
I used a white PVA glue, it held the bead cores fine and it helped waterproof the center of the bead. The tension of the bead center is almost strong enough to keep the core in without glue.
LikeLike
Thanks for the European style paper beads video. I really want to learn how to do that type of jewelry. Question, after you roll you put something look like sugar. Then how did you do to have that glaze look?
LikeLike
it is embossing powder, heat it with a heat gun and it gets glassy:)
LikeLike
Does your’s crack over time. I did some and they seem to crack after a while. Am I doing something wrong?
LikeLike
I think maybe your paper is not tight enough.The only time they cracked on me was when they took a trip through the washer and dryer LOL!
LikeLike
What is the pad that you rubbed the bead on before applying the powder. Also I am not a crafter (yet) what is a heat gun? Love the beads.
LikeLike
it is a clear embossing ink pad, you can also use vegetable glycerin and a make-up sponge. The heat gun is a stamping tool used to melt embossing powder.
LikeLike
last questions – what length are your strips of paper and which paper strip do you use first – the wider one or the one that is more narrow?
LikeLike
they are 12″ long and you start with the wider paper then ad the wider end of the 2nd piece of paper.
LikeLike
I love how the beads turned out. I am going to start this weekend making them. Great tutorial. Where did you get the bead cores do they come in a 100 pack do Michaels or acmoore sell them. Please let me know before the weekend. Thank
LikeLike
you can use the Dritz sewing eyelets or sometimes the craft store will have bead cores with the sculpy clay (sculpy sells a 50 pack) but if you want the best price you can order them on Ebay, I got 500 for about $5 and free shipping.
LikeLike
I love the beads so much. I would like to know the kind of string you used
LikeLike
it is called a snake chain
LikeLike
I’ve watched your tutorial a few times, picking out something new each time, I’d missed before! You have a knack to teach and show clear, step by step instructions without treating those watching as idiots. Thank you so much, I’ve been truly inspired and have started to make paper beads for Pandora style bracelets here in the UK. My friends are amazed and are interested in buying my bracelets. A huge thank you.x
LikeLike
Hola. Soy de Costa Rica. Necesito la marca del esmalte para poder comprarlo por medio de internet. Acá no venden ese producto.
LikeLike
Hi Lindsay! I just made these beads following your instructions and for some reason, I get tiny little bubbles in the embossing enamel after using the heat gun on the bead. Help!!!
LikeLike
I bet the glue is too wet, let the glue on the bead dry before embossing.
LikeLike
Hi Lindsay,
i have tried these great idea, by the way, thanks for sharing it.
But unfortunately the surface breaks after a few days of use, small cracks and fractures around the embossed glaze.
I did the beads very tight and glued it before embossing them.
What did i wrong? Can you help me?
LikeLike
huh, the only time that happened to me was when I accidentally left them in a pocket and they went through the wash LOL!
LikeLike
So nice video, I really love it, where can I buy the varnish powder? Can u more specific when you heat the varnish powder
LikeLike
Any stamp store will have it, it is called clear embossing powder.
LikeLike
What do you use on that stamp pad…? What a liquid is that…? Thank you..
LikeLike
So clear. Thank you
LikeLike
Do you use regular, or Ultra thick embossing powder?
LikeLike
extra thick but you can use regular, you just may need a few more coats:)
LikeLike
Is a glue pad different than embossing ink pad?
LikeLike
yes but it might still work
LikeLike
Your beads r amazing. Looks like glass. Surely want to try. I m Staying at Delhi n never had such craft tutorials. So don’t understand how u made it so glossy….. Like glass. Plz suggest some simple name of glue I get here. I don’t understand your UTEE. Thanks
LikeLike
utee is a plastic powder you heat to mely, you can try fingernail polish or any other gloss sealer you can get.
LikeLike
WOW! This is so creative. I started with paper beading and loved it. Even though this is a 4 yr. Old post, it’s really fun. I don’t have to buy beads. I can make jewlry to go with any elfit.Thank you.
LikeLike
What size bead cord do you use for a size 9 knitting needle
LikeLike
So creative!Thanks for the idea.Im stocked with magazines of everything.Can magazine paper work?
LikeLiked by 1 person
yes but you will need more layers as it is thin paper
LikeLike
Hello
Your beads look awesome and authentic. I’m going to give your idea a try! I’ve seen quite a few DIY paper bead tutorials on Pinterest but, yours are head and shoulder above what I’ve seen.
Thank you
Patrick
LikeLiked by 1 person
Do you have a template for the paper cutting?
LikeLiked by 1 person
I don’t but it is easy
LikeLike