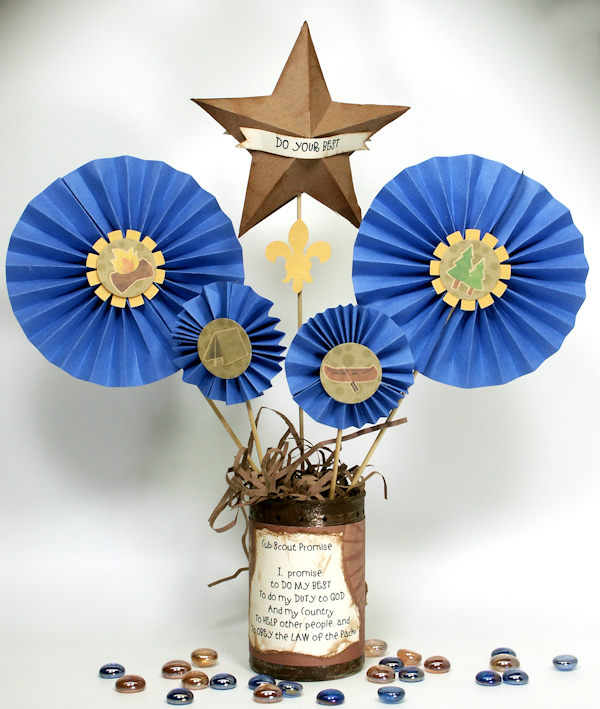
Well folks, it’s Cub Scout Blue & Gold banquet time and I was asked to come up with 24 centerpieces for the banquet tables. Since the budget was small (and I did not want to dip into pack funds for a decoration) I raided my recycle bin and put my printer & Cricut to work and made this:
The base is a soup can that I punched decorative holes around the rim with my Crop-a-Dial and then sponged on some brown acrylic paint, then I filled it halfway with sand to make it stable. Then I printed out the Cub Scout Law, Law of the Pack and the Cub Scout Oath using the font LD Neetle (so great for kid projects) as well as some clip art and paper from the Camping Out Collection from Lettering Delights (It’s on sale right now too BTW 🙂 ) on cream cover stock. I covered the center of the can with pattern paper then tore around the printed oath and law, inked the edges then glued them to the can. Here is the front and back (BTW the faux grass is just brown construction paper I ran through the office shredder and crumpled up):
Then I used a 12″x18″ sheet of construction paper and cut it into 2-6″x12″ strips and 2-3″x12″ strips and accordion folded them to make rosettes. I glued the rosettes to skewers and added the printed clipart (punched into circles) over the centers so it would be pretty from either side. I punched the gold layer with my I-top punch but I am pretty sure that same shape is on the Accent essentials Cricut CArt, oh I also cut the Fleur-de-lis from AE as well. I glued that to the skewer holding the star.
For the star cut 2 6″ stars from brown construction paper (honestly you might want to use cardstock because construction paper tends to snag but I am on a budget here and I used plain old construction paper) I used the star from the george cartridge. To make it easy to glue together I welded a tab to the side of on one of the stars so it would be easier to glue two together. I simply folded the star point to indent, then gathered the point folds up to make a “barn star, then I cut out a strip of paper with the cub scout motto “Do Your Best” and notched the ends, inked the edges and glued one to each side of the star.
I think I “Did My Best” with this project, what do you think?
By the numbers: The cost of this project was small, I am making 24 centerpieces and I used:
1 bag if skewers: $1
24 empty soup bans: free
1 package brown and 1 package blue construction paper: ($2 each) $4
and from my stash: 24 sheets of cream cover stock, ink pad, a dollop of brown acrylic paint and hot glue sticks.
So $5 for a total of 24 centerpieces, not bad eh? The look on the boy’s faces when they get their awards: Priceless!
Thanks for stopping by today! Hey, did you know you can read my blog on your Kindle reading device? Now you can! Get your frugalcrafting on the go, check out ThefrugalCrafter on Amazon.com for details!
Till next time happy crafting!


These look great! I especially like the star. We have blue and gold coming up soon, as well, but I am grateful to have not been asked for crafts! In a pinch, I could definitely use your great idea as a starting place. Great job!
LikeLike
Wow, you pretty much made magic with those small funds! They look great 🙂
LikeLike
Those are awesome. Great job
LikeLike
Lindsay,
Thank you for sharing this project! I’ve got a high school bowling banquet coming up in April and I need to make table decorations on a shoe-string budget. I’m seeing bowling pins on skewers with balls, bags, and shoes as accents. Since I have a snow day today (in Dallas!) I have all day to work on this! I’ll post some pictures when I’m done.
Thanks again for sharing your creative ideas and inspiring the rest of us!
Elaine 🙂
LikeLike
What a great idea! I love the can with the moto and am thinking this would make a great recycling craft project. Thanks for the inspiration!
LikeLike
What a great idea! I love the can with the moto and am thinking this would make a great recycling craft project. Thanks for the inspiration!
LikeLike
Hey Lindsay!
I took your great idea and changed it to a bowling theme for our end-of-the-season banquet. I had my students/bowlers come over to my house during Spring Break to help make the paper rosettes and to help glue the bowling pins and bowling balls to the sticks. (I also used your retro bowling svg files that I bought!) The decorations turned out so cute that most of the kids wanted to take them home as a souvenior! Thanks for sharing and inspiring the rest of us with your great ideas! 🙂 (Can I send you some pictures? Where would I send them?)
Elaine
LikeLike
Wow Elaine, I can’t wait to see! I sent you my email:)
LikeLike
Thank you so much for posting these! We are making them for our banquet. We’re going to have the boys put them together.
LikeLike
thanks! I’m glad you can use the idea! Later this week I’ll be posting this years blue and gold centerpeice if you want to check it out:)
LikeLike
This is a great idea! I’m going to make these sunflowers for a church meeting. Thanks!
LikeLike