Happy Monday folks! I took the kids to a birthday party yesterday. I have been friends with the little boy’s mom for many years and she always saves the cards and tags I make to use as embellishments in her scrapbooks so I always make sure to make some thing special for their cards, in this case a sweet tag:

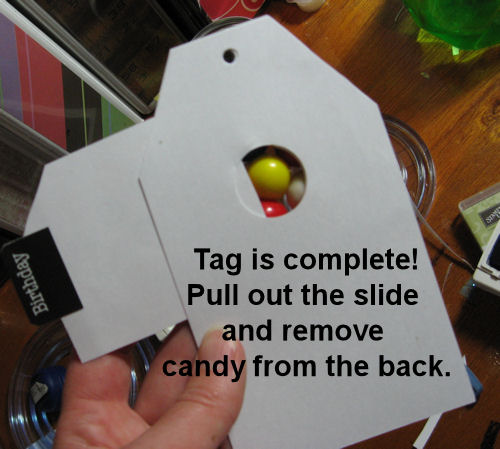
I love this stamp set for making quick kids birthday cards (what kid wouldn’t love real gum or candy in his card?) and usually you need to destroy the card to get to the goods but since I know his mom will save the tag I made a drop slot in the back so he can get the gum and mom can still have a cute scrapbook page embellishment. Here’s how:

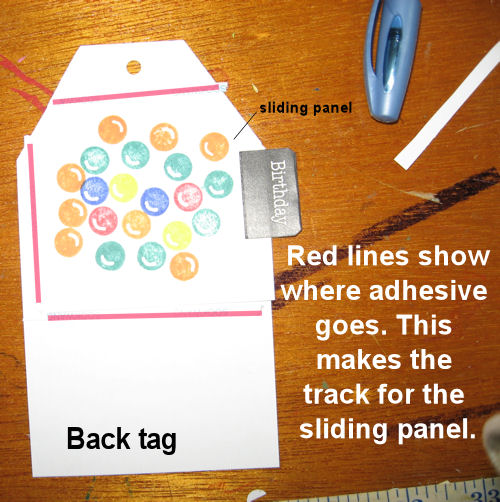
Also you need a scrap of cardstock that is about 2″ square and some sort of pull tab, I used a happy Birthday tab sticker but a rectangle of paper folded in half would work just as well. Stamp gum balls around the cut hole on the middle tag and all over the slider piece then stack them up line this: Top tag with the big hole, under that the stamped middle tag with the 1″ hole, the slider behind that and the un-stamped back tag. If all goes well it should look like this:


Now place the middle tag on the back tag and they will be adhered together. Remove the line on the treat cup and place it inside (from the back) of the top tag and carefully line both up on the middle tag, once the cup touches the tag it will be stuck for good so line it up carefully! then remove the top tag, ad adhesive to the back and adhere it to the tag stack. It will look like this:

Now flip it over and see:

I prefer making a tag with this set because when I make a card it wants to fall over due to the weight of the gum balls. I put the finished tag in a clear plastic envelop and tape it to the gift so it is a decoration too. I hope you give this a try, it is really fun and the kids get a kick out of it, and if your lucky the moms will too!
This tag qualifies for the following challenges: Clearly I stamp (birthday), Donna’s Den (happy birthday), Robyn’s Fetish (open), One Stop Craft Challenge (for the boys), SirStampsaLot (punch it-my only TAG entry, I punched the gumballs on the tag front, first photo)
Thanks for stopping by, thil next time happy crafting!
Love this tag…what a great idea to add this to a child’s gift! Your friend is going to love using this in her scrapbook for her son’s birthday party memories and her son is going to love the gumballs!!! TFS
Terry
LikeLike
Very cute! I love this set but don’t have it.
LikeLike
This is so cute! I have seen them but never with a slider to get the candy out. Very clever! Thanks for sharing. ~Diane
LikeLike
That looks great I love the idea of the slider. thanks for joining us at Donna’s Den & good luck.
Jenny x
LikeLike
yummy tag! Thanks for the tut; I’ll give it a try too. Nothing is coming up shortly, but once those special days come up, I will!
Thanks, Kimberly!
Carmen
LikeLike
This tag is really cute and very creative. Thank you for joining us at I Did It Creations Challenges (Robyn’s Fetish) this week.
LikeLike
This is a very clever idea, thanks for Joining us at One stop craft challenge this week
Hugs
Francesca
LikeLike
Hiya Lindsay, this tag is sooooooooooooooo sweet! 😉
Thanks for joining us at Donna’s Den. x
LikeLike
Yum yum bubble gum lol, brilliant tag. Thanks for joining us at Sir Stampalot.
Pinky
LikeLike
Thanks for sharing how you did this. I have this set and never thought of doing it this way. I only use it where you have to take the back off.
LikeLike
lots of great things on your blog!
LikeLike
Hi there
What a great idea, a card and a gift all in one.
Thank you for sharing with us at Stampalot Challenge this month and good luck.
B x
LikeLike
This is fab – such fun! Thanks for the tutorial.
Thank you for joining us for the first challenge at Donna’s Den & we hope to see you again 🙂
Hugs
Tracey
x
LikeLike
Great use of the treat holders. I have some, but never use them. Thanks for joining us at I Did It Creations.
LikeLike
Great idea! Thanks for sharing your techinique. 🙂
LikeLike
A gift with sweets – PERFECT!!!!! Thank you for joining us at Donna’s Den XX
LikeLike
OMG Lindsay…what an AWESOME card!!! LOVE LOVE LOVE the bubblegum machine!!! That is PRICELESS!!!! I also wanted to THANK YOU so much for your awesome comment on my blog!!!!!! You’ve made me smile!! I hope you are having a very blessed day!!
LikeLike
Great card good luck & thanks for joining us at OSSC, Janet
LikeLike
That is a really sweet kit., Love your layout. Wonderful colors. Thanks for playing along with us at Donna’s Den of Crafts. Good luck on the challenge
LikeLike
OH! This is just too sweet!!
LikeLike
Thanks for joining Sir Stampalot’s challenge with this great entry, good luck.
Happy crafting
Tracy x
LikeLike
oh, clever!
Thank you so much for playing with us this week at OSCC!
Have a great day,
–Kathryn
LikeLike
What a brilliant fun project and what a tag! 😀
Thank you for joining us for the first ever Donna’s den challenge and good luck.
Hugs
Amy xx
LikeLike
Oh my, this is too cute! Thanks for joining us for CIC this month.
LikeLike
What a great idea, and not just for birthdays! This could be a treat for any holiday. Thanks for sharing this!
LikeLike